Basic examples
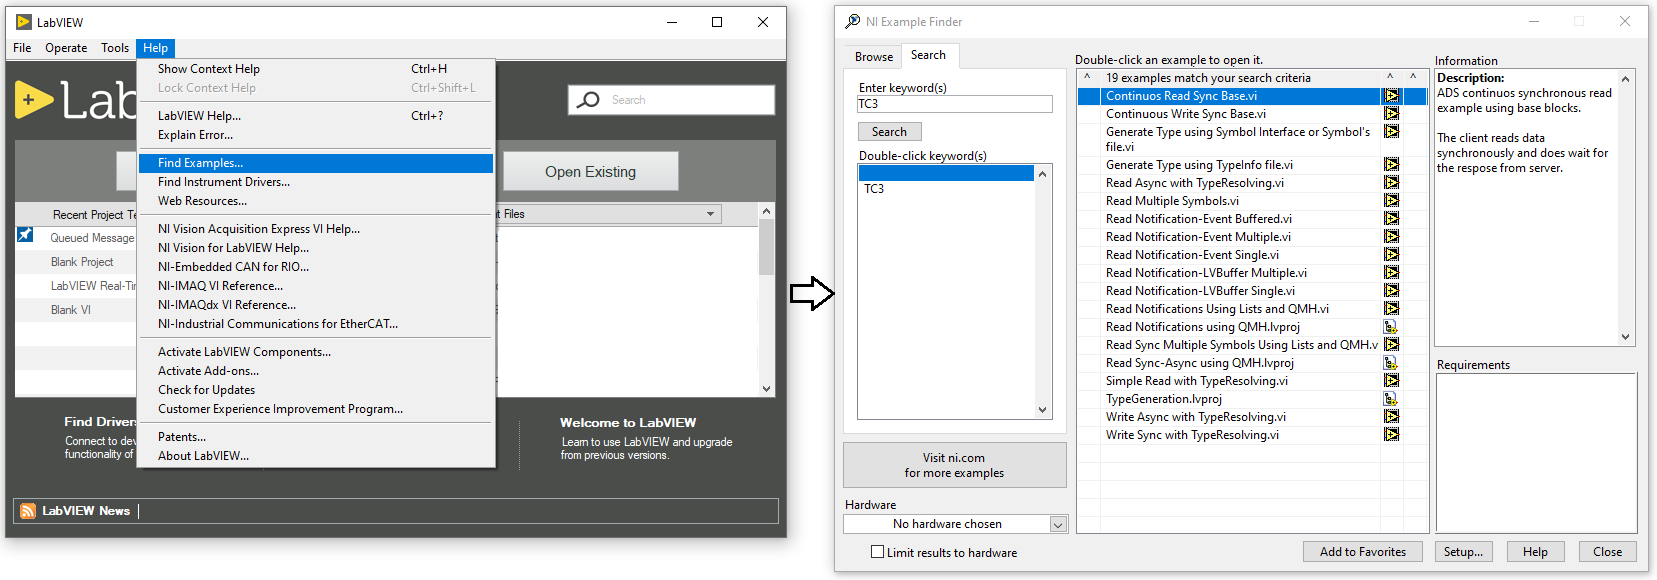
A large number of basic examples are included in the LabVIEW™ environment during the installation of the Interface for LabVIEW™. These can be found with the help of the NI™ Example Finder.
The following keywords facilitate the search for the examples:
- TC3
- Beckhoff
- Beckhoff LabVIEW™ Interface
- ADS
- TwinCAT
- TF3710
The NI™ Example Finder can be started in LabVIEW™ under Menu > Help > Find Examples.
Likewise, you can find all examples via the Directory Structure at
Beckhoff Automation > Beckhoff LabVIEW™ Interface.
The examples are categorized into the communication modes described at the beginning of the documentation:
- One-time reading
- One-time writing
- Reading data continuously
- Writing data continuously
- Generate LabVIEW™ type
- SumUp Read or Write
- CoE Read or Write
One-time reading
Simple Read with TypeResolving.vi
The example, like the other examples in Basic examples, uses the basic VIs from the LabVIEW™ VIs in the following steps:
- In the first step, the Symbol Interface basic block is called. When the example is executed, the user interface opens and the user can select an ADS symbol in the TwinCAT runtime.
- If you have already exported an XML description of your ADS symbols from the Symbol Interface, you can select it as a path so that the XML is loaded rather than calling the UI.
- In the second step, the Init basic block is called and the ADS client is initialized.
- The ReadGrpSymbols output may contain more than one ADS symbol (if you selected more than one symbol in step 1). In the example, Index Array selects the first ADS symbol in the list.
- After initialization the polymorphic ADS-Read block is called. The Read Choice input can be used to select which read mode is to be used. The Read Choice input is a LabVIEW™ Enum and provides the following options:
- Read Sync: For this, a synchronous read request is first sent to the TwinCAT runtime and a response is waited for. The received ADS data packet is then converted from raw data to the LabVIEW™ data type "Variant" using the TypeResolver.
- Noti. Single: For this, an ADS notification is registered and individual received notifications are passed on to LabVIEW™. After reading the notification, the notifications are unregistered again. The received ADS data is then converted from raw data to the LabVIEW™ data type "Variant" with the help of the TypeResolver.
- Noti. Buffered: For this, an ADS notification is registered and a block of received notifications is passed on to LabVIEW™. The number of notifications buffered in the block is determined by the
LVBufferSizesymbol parameter. - Interaction: Variant-to-Data can be used to customize the example to translate the Variant to an appropriate data type. The data type depends on the ADS symbol selected in the Symbol Interface. See Type Resolving.
- In the last step, the Release basic block is called and the ADS client is released from memory.
Notice | |
Noti. Single Noti. Single supports only the |
Read Async with TypeResolving.vi
The example, like the other examples in Basic examples, uses the basic VIs and the low-level VIs from LabVIEW™ VIs in the following steps:
- In the first step, the basic Symbol Interface block is called. When the example is executed, the user interface opens and the user can select an ADS symbol in the TwinCAT runtime.
- If you have already exported an XML description of the ADS symbols from the Symbol Interface, you can select it as a path so that the XML is loaded rather than calling the UI.
- In the second step, the Init basic block is called and the ADS client is initialized.
- The ReadGrpSymbols output may contain more than one ADS symbol (if you selected more than one symbol in step 1). In the example, Index Array selects the first ADS symbol in the list.
- After initialization, the block Read Async Single TypeResolved is called. An asynchronous read request is sent to the TwinCAT runtime for this purpose. The program code continues running without waiting for feedback.
- In this example the low-level block TryReadData is called in a while loop and waits for a response from the requested ADS server. Please note that this is an illustrative example. The implementation in actual applications may differ considerably. Once feedback has been received, the received data packet is converted to the appropriate LabVIEW™ data type "Variant".
- Interaction: Variant-to-Data can be used to customize the example to translate the Variant to an appropriate data type. The data type depends on the ADS symbol selected in the Symbol Interface. See Type Resolving.
- The next step is to call the low-level block Release Reader to release the reader from memory.
- In the last step the Release basic block is called and thus the ADS client is released from memory.
One-time writing
Write Sync with TypeResolving.vi
The example, like the other examples in Basic examples, uses the basic VIs from LabVIEW™ VIs in the following steps:
- In the first step, the basic Symbol Interface block is called. When the example is executed, the user interface opens and the user can select an ADS symbol in the TwinCAT runtime.
- If you have already exported an XML description of your ADS symbols from the Symbol Interface, you can select it as a path so that the XML is loaded rather than calling the UI.
- In the second step, the Init basic block is called and the ADS client is initialized.
- The WriteGrpSymbols output may contain more than one ADS symbol (if you selected more than one symbol in step 1). In the example, Index Array selects the first ADS symbol in the list.
- Interaction: Insert the appropriate data type in the place marked in red. The data type depends on the ADS symbol selected in the Symbol Interface. See Data types.
- After initialization, the block Write Sync Single TypeResolved is called. For this purpose, the raw data is first converted from the LabVIEW™ data type to a suitable TwinCAT 3 data type and then a synchronous write request is sent to TwinCAT. The block waits for a response from the server to ensure that the data was sent successfully.
- In the last step the Release basic block is called and thus the ADS client is released from memory.
Write Async with TypeResolving.vi
The example, like the other examples in Basic examples, uses the basic VIs and the low-level VIs from LabVIEW™ VIs in the following steps:
- In the first step, the basic Symbol Interface block is called. When the example is executed, the user interface opens and the user can select an ADS symbol in the TwinCAT runtime.
- If you have already exported an XML description of your ADS symbols from the Symbol Interface, you can select it as a path so that the XML is loaded rather than calling the UI.
- In the second step, the Init basic block is called and the ADS client is initialized.
- The WriteGrpSymbols output may contain more than one ADS symbol (if you selected more than one symbol in step 1). In the example, Index Array selects the first ADS symbol in the list.
- Interaction: Insert the appropriate data type in the place marked in red. The data type depends on the ADS symbol selected in the Symbol Interface. See Data types.
- After initialization, the block Write Async Single TypeResolved is called. For this purpose, first the raw data is converted from the LabVIEW™ data type to a suitable TwinCAT 3 data type and then an asynchronous write request is sent to TwinCAT. The block does not wait for a response from the ADS server.
- In this example the low-level block CheckWriteStatus is called in a While loop and waits for a response from the requested ADS server. Please note that this is an illustrative example. The implementation in actual applications may differ considerably.
- The next step is to call the low-level block Release Writer to release the writer from memory.
- In the last step the Release basic block is called and thus the ADS client is released from memory.
Reading data continuously
The examples in this group use the polling procedure or LabVIEW™ event-based procedures to request the data packets cyclically.
Continuos Read Sync Base.vi
The example, like the other examples in Basic examples, uses the basic VIs and the low-level VIs from LabVIEW™ VIs in the following steps:
- In the first step, the basic Symbol Interface block is called. When the example is executed, the user interface opens and the user can select an ADS symbol in the TwinCAT runtime.
- If you have already exported an XML description of your ADS symbols from the Symbol Interface, you can select it as a path so that the XML is loaded rather than calling the UI.
- In the second step, the low-level blocks Base Init, Get List of ReadWrite Symbols and Get List of Registered Targets are called to initialize the ADS client.
- To speed up reading and type resolving, the ADS Reader, with the call of Init Reader, and the TypeResolver, with the call of Init Type, are initialized in advance and only once in the next step.
- In the next step the Send Reader-Request block requests a new data packet from TwinCAT with each cycle of the loop. The received data packet is converted to a suitable LabVIEW™ data type "Variant" using the call Resolve From TC Type.
- Interaction: Variant-to-Data can be used to customize the example to translate the Variant to an appropriate data type. The data type depends on the ADS symbol selected in the Symbol Interface. See Type Resolving.
- When the termination condition for the loop is reached, the ADS reader is released from memory with the call Release Reader and the TypeResolver with the call Release Type.
- In the last step the Release basic block is called and thus the ADS client is released from memory.
Read Notification-Event Single
The example, like the other examples in Basic examples, uses the basic VIs and the low-level VIs from LabVIEW™ VIs in the following steps:
- In the first step, the basic Symbol Interface block is called. When the example is executed, the user interface opens and the user can select an ADS symbol in the TwinCAT runtime. When selecting, note the parameter settings of the symbols for this operation mode: E-Noti. Single.
- If you have already exported an XML description of your ADS symbols from the Symbol Interface, you can select it as a path so that the XML is loaded rather than calling the UI.
- In the second step, the Init basic block is called and the ADS client is initialized.
- The ReadGrpSymbols output may contain more than one ADS symbol (if you selected more than one symbol in step 1). In the example, Index Array selects the first ADS symbol in the list.
- A User Event is created and registered. See also the LabVIEW™ documentation on user events.
- When E-Noti. Single is called, an ADS notification is registered on the ADS server for the selected ADS symbol.
- The next step is to wait for the ADS notifications in the event structure. If no notification is received, the event structure times out. Calling the block Stop Notification stops the ADS notification. The stop occurs at the ADS server so that no more messages are sent.
- Interaction: Type Resolving is not implemented in the example. Two options are available. The Resolving type is either realized within the event loop or after the ADS notification has been completed/unregistered. The following items in the event structure are relevant: Data and TimeStamps. The latter are the ADS timestamps.
- When the block Unregister Notification is called, the ADS notification of the symbol is unregistered at the ADS server and the handle to the ADS notification is released from memory.
- In the last step the Release basic block is called and thus the ADS client is released from memory.
Read Notification-Event Buffered.vi
The example, like the other examples in Basic examples, uses the basic VIs and the low-level VIs from LabVIEW™ VIs. The example is identical in structure to Read Notification-Event Single. The only differences are:
- The polymorphic VI is set to E-Noti. Buffered.
- At the Data point in the event loop an array of size
LVBufferSizeis always passed.
Read Notification-Event Multiple
The example, like the other examples in Basic examples, uses the basic VIs and the low-level VIs from LabVIEW™ VIs. The example is identical in structure to Read Notification-Event Buffered. The only differences are:
- The polymorphic VI is set to E-Noti. Multiple Symbols.
- For each ADS symbol a corresponding measurement duration ElapseTimeMs (in milliseconds) can be selected.
- Reading from each ADS symbol requires corresponding LabVIEW™ event case.
Read Notification-LVBuffer Multiple
The example, like the other examples in Basic examples, uses the basic VIs and the low-level VIs from LabVIEW™ VIs in the following steps:
- In the first step, the basic Symbol Interface block is called. When the example is executed, the user interface opens and the user can select an ADS symbol in the TwinCAT runtime. When selecting, observe the parameter settings of the symbols for the operation mode LVB-Noti. Multiple Symbols.
- If you have already exported an XML description of your ADS symbols from the Symbol Interface, you can select it as a path so that the XML is loaded rather than calling the UI.
- In the second step, the Init basic block is called and the ADS client is initialized.
- The ReadGrpSymbols output may contain more than one ADS symbol (if you selected more than one symbol in step 1). In the example, Array Subset selects the first 3 ADS symbols in the list.
- For each selected ADS symbol, a handle to the LVBuffer is initialized with the call to Init LVBuffer Handle.
- When LVB-Noti. Multiple Symbols is called, ADS notifications are registered on the ADS server for the selected ADS symbols. For this purpose the block takes an array of ADS symbols as input. In addition, the duration of the individual notification can be entered in milliseconds. Thus, the notifications are automatically stopped after the time expires.
- In the next step, the individual symbols are read in a while loop. Reading can be waited for a defined time (timeout) or infinitely long.
- When the block Unregister Notification is called, the ADS notification of the symbol is unregistered at the ADS server and the handle to the ADS notification is released from memory.
- When the block Release LVBuffer Handle is called, the handle to the LVBuffer is released from memory.
- In the last step the Release basic block is called and thus the ADS client is released from memory.
Read Notification-LVBuffer Single
The example, like the other examples in Basic examples, uses the basic VIs and the low-level VIs from LabVIEW™ VIs in the following steps:
- In the first step, the basic Symbol Interface block is called. When the example is executed, the user interface opens and the user can select an ADS symbol in the TwinCAT runtime. When selecting, observe the parameter settings of the symbols for the operation mode LVB-Noti. Single Symbol.
- If you have already exported an XML description of your ADS symbols from the Symbol Interface, you can select it as a path so that the XML is loaded rather than calling the UI.
- In the second step, the Init basic block is called and the ADS client is initialized.
- The ReadGrpSymbols output may contain more than one ADS symbol (if you selected more than one symbol in step 1). In the example, Index Array selects the first ADS symbol in the list.
- A handle to the LVBuffer is initialized for the selected ADS symbol, with the call of Init LVBuffer Handle.
- When LVB-Noti. Single Symbol is called, ADS notifications are registered on the ADS server for the selected ADS symbol. In addition, the block allows to enter a measurement duration in milliseconds. Thus, the notifications are automatically stopped after the time expires.
- In the next step, the selected symbol can be read in a while loop. Reading can be waited for a defined time (timeout) or infinitely long. It is important to consider whether the ADS notifications are sent Cyclic or OnChange from the server.
- When the block Unregister Notification is called, the ADS notification of the symbol is unregistered at the ADS server and the handle to the ADS notification is released from memory.
- When the block Release LVBuffer Handle is called, the handle to the LVBuffer is released from memory.
- In the last step the Release basic block is called and thus the ADS client is released from memory.
Writing data continuously
Continuos Write Sync Base.vi
The example, like the other examples in Basic examples, uses the basic VIs and the low-level VIs from LabVIEW™ VIs in the following steps:
- In the first step, the basic Symbol Interface block is called. When the example is executed, the user interface opens and the user can select an ADS symbol in the TwinCAT runtime.
- If you have already exported an XML description of your ADS symbols from the Symbol Interface, you can select it as a path so that the XML is loaded rather than calling the UI.
- In the second step, the Init basic block is called and the ADS client is initialized.
- The WriteGrpSymbols output may contain more than one ADS symbol (if you selected more than one symbol in step 1). In the example, Index Array selects the first ADS symbol in the list.
- To speed up writing and type resolving, the ADS Writer, with the call of Init Writer, and the TypeResolver, with the call of Init Type, are initialized in advance and only once in the next step.
- In the next step the Send Writer-Request block sends a new data packet to TwinCAT with each cycle of the loop. Before writing, the LabVIEW™ data type Variant is converted to a suitable TwinCAT 3 data type by calling Resolve To TC Type block.
- After reaching the termination condition of the loop, the ADS reader is released from memory by calling Release Writer and the TypeResolver by calling Release Type.
- In the last step, the Release basic block is called and the ADS client is released from memory.
Generate LabVIEW™ type
To automatically generate a LabVIEW™ data type to an ADS symbol, the TypeResolver and the Generate Type wrapper block are used. The following examples describe two different ways to implement this:
- Generate Type using Symbol Interface or Symbol's file
- Generate Type using TypeInfo file
Generate Type using Symbol Interface or Symbol's file
The example, like the other examples in Basic examples, uses the basic VIs and the low-level VIs from LabVIEW™ VIs in the following steps:
- In the first step, the basic Symbol Interface block is called. When the example is executed, the user interface opens and the user can select an ADS symbol in the TwinCAT runtime.
- If you have already exported an XML description of your ADS symbols from the Symbol Interface, you can select it as a path so that the XML is loaded rather than calling the UI.
- In the second step, the Init basic block is called and the ADS client is initialized.
- The ReadGrpSymbols and WriteGrpSymbols output may contain more than one ADS symbol (if you selected more than one symbol in step 1).
- In a For loop is executed:
- TypeResolver: With Init Type the type description is loaded in the TypeResolver and passed to the LabVIEW™ process as XML string (TypeInfo).
- TypeGenerator: Calling the Generate Type Wrapper VI generates a LabVIEW™ type.
- Release-Type: Releases the handle to the TypeResolver from memory.
- Releases the handle to the client.
Generate Type using TypeInfo file
In contrast to Generate Type using Symbol Interface or Symbol’s file, the example uses a pre-generated TypeInfo file to generate a LabVIEW™ type.
SumUp Read or Write
Read SumUp with TypeResolving.vi
The example, like the other examples in Basic examples, uses the basic VIs from the LabVIEW™ VIs in the following steps:
- In the first step, the Symbol Interface basic block is called. When the example is executed, the user interface opens and the user can select an ADS symbol from his TwinCAT runtime.
- If you have already exported an XML description of your ADS symbols from the Symbol Interface, you can also select the exported file in the Front Panel before starting the VI, so that the XML is loaded rather than calling the UI.
- In the second step, the Init basic block is called and the ADS client is initialized.
- The ReadGrpSymbols output may contain more than one ADS symbol (if you selected more than one symbol in step 1). In the example, Index Array selects the first and second ADS symbols of the list.
- After initialization of the ADS client, the TypeResolvers are initialized with the selected symbols.
- After that the SumUp handle is initialized for reading with the help of Init SumUp. Here the flag bAutosend is set to true so that new data is read automatically.
- The Add Request block assembles the SumUp sub-commands.
- After that, the example splits into two different threads:
- Loop 1: Reads cyclically the new data one after the other from the sub-commands. The read data is converted to corresponding LabVIEW™ data types using the initialized TypeResolver.
- Loop 2: Enables or disables the automatic sending of ADS requests.
- In the last step, all initialized handles are released from memory.
Notice | |
ADS error message when reading symbols with bAutosend set to false ADS error messages may occur in Loop 1 if the flag bAutosend is set to false when initializing the SumUp handle. In this case, the block Get Data starts reading the data from the sub-commands even though they have not yet been sent to the ADS server and therefore do not contain any data. |
Write SumUp with TypeResolving.vi
The example, like the other examples in Basic examples, uses the basic VIs and the low-level VIs from LabVIEW™ VIs in the following steps:
- In the first step, the basic Symbol Interface block is called. When the example is executed, the user interface opens and the user can select an ADS symbol from his TwinCAT runtime.
- If you have already exported an XML description of the ADS symbols from the Symbol Interface, you can select it as a path so that the XML is loaded rather than calling the UI.
- In the second step, the basic Init block is called and the ADS client is initialized.
- The WriteGrpSymbols output may contain more than one ADS symbol (if you selected more than one symbol in step 1). In the example two ADS symbols of the types timestamp and string are expected. With Index Array the first and the second ADS symbol of the list are selected.
- After initialization, the TypeResolvers are initialized to the selected symbols. Then it is checked whether the first symbol has the timestamp data type and the second has the string data type.
- After that the SumUp handle is initialized for writing with the help of Init SumUp. Here the flag bAutosend is set to false so that the new data is not written automatically.
- After that, the example splits into two different threads:
- Loop 1: Waits in an event structure for new data generated by Loop 2. The new data is distributed to the appropriate sub-commands and waited to be sent. Before that the raw data is transformed into a TwinCAT 3 data type. If the sub-command already contains data, these are replaced by the new data. In the event structure, automatic sending can be enabled or disabled.
- Loop 2: Generates the block diagram events in a cycle of 250 ms.
- In the last step, all initialized handles are released from memory.
CoE Read or Write
The example, like the other examples in this chapter, uses the basic VIs and the low-level VIs from LabVIEW™ VIs in the following steps:
- In the first step, the basic Init block is called up with an empty character string and the ADS client is initialized.
- The CoE blocks expect the AMS address as a string of the EtherCAT device from which the CoE configuration is to be read. The Device Address control element expects a character string with the following format: AMS Net-Id of the master and AMS Port of the device (AMS NetId:Port).
If the control element is left empty, the example opens a dialog box for selecting an EtherCAT device.
- The example reads the CoE list from the EtherCAT device.
- Interaction:
- Double-click on an object in the CoE list to select it and read the object description. This calls up the low-level VI.
- An entry with a subindex can be read using the Check Entry button.
- In the next step, various CoE entries can be read or written.
- In the last step, the client handle is released from the memory.
Heartbeat Connection Monitoring
Continuous Read with Heartbeat.vi
The example is based on the "Continuous Read Sync Base" example and extends it to include Heartbeat connection monitoring. The example, like the other examples, uses the basic VIs and the low-level VIs in the following steps:
- In the first step the basic Symbol Interface block is called. When the example is executed, the user interface opens and the user can select an ADS symbol in the TwinCAT runtime.
- If you have already exported an XML description of your ADS symbols from the Symbol Interface, you can select it as a path so that the XML is loaded rather than calling the UI.
- In the second step, the ADS client is initialized using Init.
- Connection monitoring is then initialized using Init Heartbeat. The parameters for connection monitoring are already defined here. Changing the parameters at runtime is not possible. The Init Heartbeat returns a Heartbeat event, which is used to query the status of the connection.
- To speed up reading and type resolving, the ADS Reader, with the call of Read, and the TypeResolver, with the call of Init Type, are initialized in advance and only once in the next step.
- In the next step, the While loop and the Run Heartbeat block are executed in parallel. The Run Heartbeat block carries out connection monitoring and runs until the Stop Heartbeat block is called. Continuous reading and the reaction to Heartbeat events take place in the while loop.
- There is an event structure in the While loop. This waits for the duration defined by the user in "Polling time read in ms" for an event to occur. If no Heartbeat event occurs, the timeout case of the event structure is executed.
- If the event structure times out, a read operation is carried out. In the event of an error, connection monitoring is aborted by calling the Stop Heartbeat (timeout errors from the ADS read are ignored, as Heartbeat connection monitoring).
- Interaction: Variant-to-Data can be used to customize the example to translate the Variant to an appropriate data type. The data type depends on the ADS symbol selected in the Symbol Interface. See Type Resolving.
- If a Heartbeat event occurs, the Event data (Target address, Connection state, Heartbeat handle and Timestamp) is used to display the status of the connection in the front panel of the example VI.
- Interaction: In the Heartbeat event case of the event structure, code can be implemented which is to be executed in the event of a change in the connection state. For example, it could be implemented here that a warning is issued to the user in the event of a timeout.
- Once the termination condition of the loop has been reached, the ADS reader is released from the memory with the Read call, the Heartbeat connection monitoring with the Release Heartbeat call and the TypeResolver with the Release Type call.
- In the last step the basic Release block is called to release the ADS client from memory.
Continuous Write with Heartbeat.vi
The example is based on the "Continuous Write Sync Base" example and extends this with Heartbeat connection monitoring. A minimum configuration for connection monitoring is shown here using the Heartbeat Wrapper VI. The process is carried out in the following steps:
- In the first step the basic Symbol Interface block is called. When the example is executed, the user interface opens and the user can select an ADS symbol in the TwinCAT runtime.
- If you have already exported an XML description of your ADS symbols from the Symbol Interface, you can select it as a path so that the XML is loaded rather than calling the UI.
- In the second step, the basic Init block is called and the ADS client is initialized.
- The WriteGrpSymbols output may contain more than one ADS symbol (if you selected more than one symbol in step 1). In the example, Index Array selects the first ADS symbol in the list.
- To speed up writing and type resolving, the ADS Writer, with the call of Write, and the TypeResolver, with the call of Init Type, are initialized in advance and only once in the next step.
- In the next step, connection monitoring is started using the Heartbeat Wrapper VI and called up until either a connection interruption is detected or the value of the "boolean Controls Stop Heartbeat" is set to True.
- At the same time, continuous writing takes place in the While loop. In the next step, the Write block sends a new data packet to TwinCAT with each cycle of the loop. Before writing, the LabVIEW™ data type Variant, with the call to TypeResolver block, is converted to a suitable TwinCAT 3 data type.
- Once the termination condition of the loop has been reached, the ADS reader is released from memory by calling Write, the Heartbeat connection monitoring is released via the Heartbeat Wrapper VI and the TypeResolver is released by calling Release Type.
- In the last step the basic Release block is called and the ADS client is released from memory.
Read Notification-Event Single with Heartbeat.vi
The example is based on the "Read Notification-Event Single" example and extends it to include Heartbeat connection monitoring. The example, like the other examples, uses the basic VIs and the low-level VIs in the following steps:
- In the first step the basic Symbol Interface block is called. When the example is executed, the user interface opens and the user can select an ADS symbol in the TwinCAT runtime. When selecting, note the parameter settings of the symbols for this operation mode: ADS-Read.
- If you have already exported an XML description of your ADS symbols from the Symbol Interface, you can select it as a path so that the XML is loaded rather than calling the UI.
- In the second step, the basic Init block is called and the ADS client is initialized.
- The ReadGrpSymbols output may contain more than one ADS symbol (if you selected more than one symbol in step 1). In the example, Index Array selects the first ADS symbol in the list.
- Connection monitoring is then initialized using Init Heartbeat. The parameters for connection monitoring are already defined here. Changing the parameters at runtime is not possible. The Init Heartbeat returns a Heartbeat event, which is used to query the status of the connection.
- A user event is created for the notifications and then registered together with the Heartbeat event.
- Calling ADS-Read registers an ADS notification at the ADS server for the selected ADS symbol. At the same time, connection monitoring is started with the Run Heartbeat block.
- The next step is to wait for the ADS notifications or a Heartbeat event in the event structure. If no event occurs, the event structure enters a timeout. If data arrives, a notification event is triggered and the received data is displayed in the front panel. If the connection status changes (Heartbeat event), the status of the connection is displayed. In addition, the notifications are stopped when an interruption is detected and restarted when the connection is re-established.
- Interaction: Type Resolving is not implemented in the example. There are two ways: The Resolving type is either realized within the event loop or after the ADS notification has been completed/unregistered. The points of contact in the event structure are Data and TimeStamps. The latter are the ADS timestamps.
- When the Unregister Notification block is called, the ADS notification of the symbol is unregistered at the ADS server and the handle to the ADS notification is released from memory.
- In the last step, the Heartbeat connection monitoring is released from the memory with the Release Heartbeat call and the ADS client with the basic Release block call.
Read QMH with Heartbeat.vi
The example is based on the example "Read Notifications using QMH" and extends it to include Heartbeat connection monitoring. It shows the integration of the Heartbeat low-level VIs into a more complex LabVIEW™ project.
In the example, the user can select any number of symbols to read. Either an xml file with the symbols is specified before the VI is started or the symbols are selected in the symbol interface when the VI is started. The symbols are then displayed in a list. Double-click on an icon to select it for reading. The "Read Noti Sgl." and "Read Noti Buff." buttons can be used to select between the continuous, event-controlled read modes Read Notification Single and Read Notifications Buffered. The corresponding SubVI then opens and the data is read accordingly.
Connection monitoring is initialized in "Initialize.vi". The Heartbeat event received during initialization is registered when the "Register List Events.vi" block is called and evaluated in the "Producer Loop".
ADS Remote Procedure Call (RPC)
The example, like the other examples in Basic examples, uses the basic VIs from the LabVIEW™ VIs in the following steps:
- In the first step, the basic Symbol Interface block is called. When the example is executed, the user interface opens and the user can select an ADS symbol from his TwinCAT runtime.
- If you have already exported an XML description of your ADS symbols from the Symbol Interface, you can also select the exported file in the Front Panel before starting the VI, so that the XML is loaded rather than calling the UI.
- In the second step, the Init basic block is called and the ADS client is initialized.
- The ReadWriteGrpSymbols output may contain more than one ADS symbol (if you selected more than one symbol in step 1). In the example, Index Array selects the first and second ADS symbols of the list.
- After initializing the ADS client, the ADS RPC block is called by passing the IN/INOUT parameters together with the method name to the block. After a successful call, the block returns the following outputs:
- Return value of the method (if available)
- OUT parameters
- Modified INOUT parameters
- In the last step, all initialized handles are released from memory.