Example: "Synchronizing a Planar mover on a track with another Planar mover"
Guided by these instructions you will create a TwinCAT project in which a Planar mover located on a Planar track is coupled to another Planar mover on a parallel Planar track and then follows its setpoints.
Coupling a Planar mover to another Planar mover is largely analogous to coupling a Planar mover to an axis; see Example "Synchronizing a Planar mover on a track with one axis". This example is short and builds on the above example.
Creating a Planar mover
- See Configuration.
- 1. Create two Planar movers.
- 2. Put "Parameter (Init)" into simulation mode (
TRUE). The parameter is hidden and only becomes visible if the "Show Hidden Parameters" checkbox is activated.
Creating a Planar track
- 3. Add two Planar tracks via Groups > Add New Item…, see Configuration.
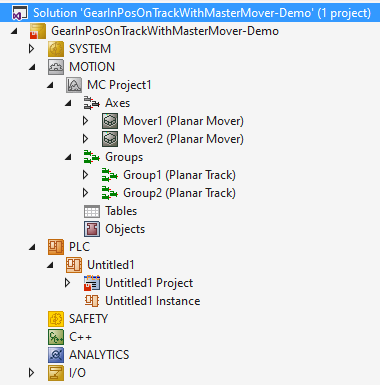
- The Solution Explorer has the following entries:
Creating a PLC
- See preliminary steps under Creating a PLC.
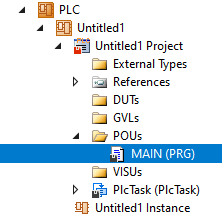
- 1. Create the desired number of movers ("MC_PlanarMover") and tracks ("MC_PlanarTrack") via MAIN.
- These represent movers and tracks in the MC Configuration.
- 2. Create the following variables.
PROGRAM MAIN
VAR
    master_mover : MC_PlanarMover;
    slave_mover  : MC_PlanarMover;
    master_track : MC_PlanarTrack;
    slave_track  : MC_PlanarTrack;
    state        : UDINT;
    pos1, pos2   : PositionXYC;
END_VAR- 3. Build the PLC to create symbols of the "PLC movers" and "PLC tracks".

- 4. Link the Planar movers and the Planar tracks (see Example "Joining and moving a Planar mover on the track").
Programming state machines
With the following state machine, which is programmed in MAIN, the Planar tracks are geometrically defined and activated (states 0 to 3), the Planar movers are activated and coupled to the respective Planar track (states 4 to 11), and the Planar mover acting as master moves on its track (state 12).
Finally, the command to start synchronization with the Master Planar Mover (GearInPosOnTrackWithMasterMover) is sent to the Slave Planar Mover (state 13). After the END_CASE statement, the Planar objects are updated cyclically.
CASE state OF
  0:
    pos1.SetValuesXYC(100, 620, 0);
    pos2.SetValuesXYC(860, 620, 0);
    master_track.AppendLine(0, pos1, pos2);
    master_track.Enable(0);
    state := state + 1;
  1:
    IF master_track.MCTOPLC_STD.State = MC_PLANAR_STATE.Enabled THEN
      state := state + 1;
    END_IF
  2:
    pos1.SetValuesXYC(100, 100, 0);
    pos2.SetValuesXYC(860, 100, 0);
    slave_track.AppendLine(0, pos1, pos2);
    slave_track.Enable(0);
    state := state + 1;
  3:
    IF slave_track.MCTOPLC_STD.State = MC_PLANAR_STATE.Enabled THEN
      state := state + 1;
    END_IF
  4:
    master_mover.Enable(0);
    state := state + 1;
  5:
    IF master_mover.MCTOPLC.STD.State = MC_PLANAR_STATE.Enabled THEN
      state := state + 1;
    END_IF
  6:
    master_mover.JoinTrack(0, master_track, 0, 0);
    state := state + 1;
  7:
    IF master_mover.MCTOPLC.STD.CommandMode = MC_PLANAR_MOVER_COMMAND_MODE.OnTrack THEN
      state := state + 1;
    END_IF
  8:
    slave_mover.Enable(0);
    state := state + 1;
  9:
    IF slave_mover.MCTOPLC.STD.State = MC_PLANAR_STATE.Enabled THEN
      state := state + 1;
    END_IF
  10:
    slave_mover.JoinTrack(0, slave_track, 0, 0);
    state := state + 1;
  11:
    IF slave_mover.MCTOPLC.STD.CommandMode = MC_PLANAR_MOVER_COMMAND_MODE.OnTrack THEN
      state := state + 1;
    END_IF
  12:
    master_mover.MoveOnTrack(0, 0, 500.0, 0, 0);
    state := state + 1;
  13:
    slave_mover.GearInPosOnTrackWithMasterMover(0, master_mover, 0, 100.0, master_track, 100.0, slave_track, 0, 0);
    state := state + 1;
END_CASE

master_mover.Update();
slave_mover.Update();
master_track.Update();
slave_track.Update();
Activating and starting the project
- 1. Activate the configuration via the button in the menu bar
 .
. - 2. Set the TwinCAT system to the "Run" state via the button
 .
. - 3. Log in the PLC via the button in the menu bar
 .
. - 4. Start the PLC via the Play button in the menu bar.
The Master Planar Mover will move to the given target position (in this case 500) on the specified Planar track, and the Slave Planar Mover will follow its movement. The positions of the Planar movers can be tracked in the online view (by clicking the button).
The Slave Planar Mover stops at position 500, since the Master Planar Mover also reaches zero dynamics here.
In the function call in State 13, the sync positions of the master (arguments 4 and 5) or slave (arguments 6 and 7) are passed to the Slave Planar Mover. These are the respective positions at which the slave becomes synchronous with the master, i.e. at which it reaches its dynamic values. In fact, here as well as in Example "Synchronizing a Planar mover on a track with one axis", it is possible for the slave to get in sync with its master significantly sooner. Like with synchronization with an axis, a special Specialized feedback types object is required for monitoring synchronicity status and possible errors.
Like with synchronization with a master axis, the synchronization movement of the slave can be programmed over several tracks by specifying a Planar TrackTrail object.
If the Master Planar Mover moves across a track boundary during an active synchronization command, the position it passes to its slave is simply summed across the track boundary.
If a master sync position is to be specified on a Planar track passed by the Master Planar Mover in the future, make sure that the Master Planar Mover has already commanded a move involving that Planar track at the time the GearInPosOnTrackWithMasterMover command is sent.