Example "Synchronizing a Planar mover on a track with one axis"
Using these instructions, you will create a TwinCAT project in which a Planar mover located on a track is coupled to an axis whose setpoints it then follows.
In this case, the Planar mover is not controlled directly by a MoveOnTrack command, in which a specified target position is approached with subsequent halt, see Example "Joining and moving a Planar mover on the track". Instead, the Planar mover remains coupled to an axis until a subsequent command terminates this coupling, or an error occurs.
After sending the GearInPosOnTrack command that initiates the coupling to an axis, the Planar mover will attempt to be at the specified slaveSyncPosition if the axis it is coupled to is at the masterSyncPosition and simultaneously assumes the dynamics of the master axis. If synchronicity can be reached earlier (i.e. the Planar mover already has the same dynamics at slaveSyncPosition – x as the master axis, which is at masterSyncPosition – x at this time), then the Planar mover will activate this configuration and become synchronous earlier. If synchronicity cannot be reached at the specified time, the Planar mover will attempt to synchronize with the master axis until a subsequent command is received or an error occurs.
If the Planar mover loses its synchronization status, e.g. due to rapidly changing dynamics of the master axis, it will try to synchronize again as soon as possible. The synchronization status can be accessed at any time from the PLC via the corresponding feedback object. Synchronization can also be lost if maintaining the specified distance from the Planar mover that is ahead requires the synchronous Planar mover to decelerate. Again, the system tries to regain synchronization as quickly as possible once the obstacle is removed.
An example of an error that causes the command to abort is a master axis behavior that would force the Planar mover to move at negative velocity beyond the start of a Planar track. Such a movement is not permitted even with a MoveOnTrack command. In such a case, the Planar mover will remain in sync (or try to sync, if it isn't already) until it is forced to stop so that it comes to a halt at the beginning of the Planar track. In addition, an error is reported back. The exact position at which the Planar mover initiates its stop depends on the current dynamic limits.
If the GearInPosOnTrack command is given dynamic limits whose velocity limit is below the current velocity of the master axis, the Planar mover will nevertheless attempt to synchronize, since it cannot be ruled out that the master axis will decelerate at a later point in time in such a way that it can be reached again. In particular, no error is returned in such a case.
Creating a Planar mover
- See Configuration.
- 1. Create a Planar mover.
- 2. Put "Parameter (Init)" into simulation mode (
TRUE). The parameter is hidden and only becomes visible if the "Show Hidden Parameters" checkbox is activated.
Creating a Planar track
- 3. Add the Planar track via Groups > Add New Item…, see Configuration.
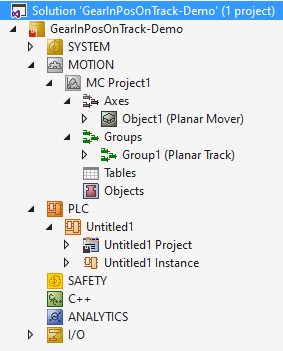
- The Solution Explorer has the following entries:
Creating a master axis
- To create a master axis, an NC/PTP NCI configuration must first be created.
- 1. Select MOTION > Add New Item….
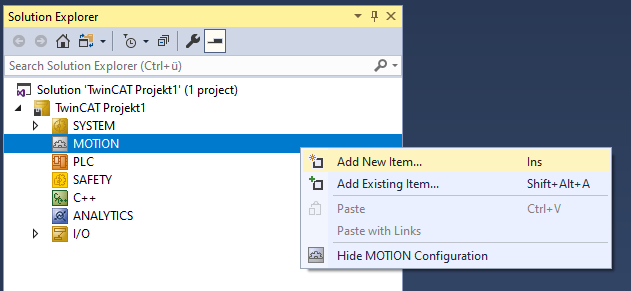
- 2. In the following dialog box, select NC/PTP NCI Configuration and confirm with OK.
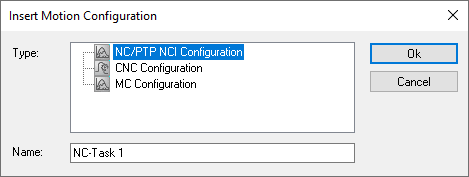
- You have created an NC/PTP NCI Project.
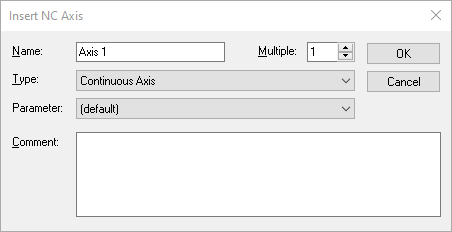
- 3. Right-click in the created NC project Axes > Add New Item....

- 4. In the following dialog box, create one (or more) axes and confirm with OK
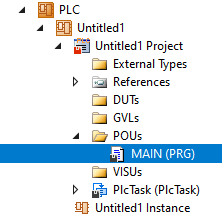
Creating a PLC
 | For this PLC project, you must also add "Tc2_MC2" to control the master axis, see Inserting libraries. |
- See preliminary steps under Creating a PLC.
- 1. Create the desired number of movers ("MC_PlanarMover") and tracks ("MC_PlanarTrack") via MAIN.
- These represent movers and tracks in the MC Configuration.
- 2. Create the following variables.
PROGRAM MAIN
VAR
    mover      : MC_PlanarMover;
    track      : MC_PlanarTrack;
    axis       : AXIS_REF;
    power_axis : MC_Power;
    move_axis  : MC_MoveAbsolute;
    state      : UDINT;
    pos1, pos2 : PositionXYC;
END_VAR- 3. Build the PLC to create symbols of the "PLC mover", the "PLC track" and the "PLC axis".

- 4. Link the Planar mover, Planar track (see Example "Joining and moving a Planar mover on the track") and the axis, as described in the next section.
Linking an axis
- 5. Double-click Axis 1
in the Solution Explorer.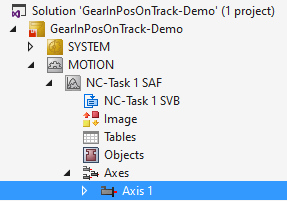
- 6. Switch to the Settings tab.
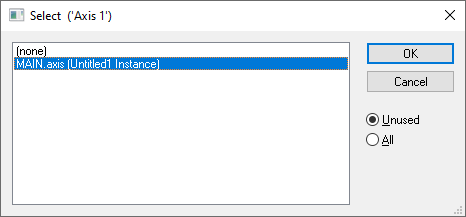
- 7. Click Link to PLC... and select in the dialog that follows the entry MAIN.axis and confirm with OK.
Programming state machines
With the following state machine, which is programmed in MAIN, the Planar track is geometrically defined and activated (State 0), the Planar mover is activated and coupled to the Planar track (State 2 or 4), and the master axis is enabled (State 6) and moved (State 7).
Finally, the command to start synchronization with the master axis ("GearInPosOnTrack") is sent to the Planar mover (State 8). Here, too, the Planar objects are updated cyclically and the axis FBs are called (after END_CASE statement):
CASE state OF
  0:
    pos1.SetValuesXYC(100, 100, 0);
    pos2.SetValuesXYC(860, 100, 0);
    track.AppendLine(0, pos1, pos2);
    track.Enable(0);
    state := state + 1;
  1:
    IF track.MCTOPLC_STD.State = MC_PLANAR_STATE.Enabled THEN
      state := state + 1;
    END_IF
  2:
    mover.Enable(0);
    state := state + 1;
  3:
    IF mover.MCTOPLC.STD.State = MC_PLANAR_STATE.Enabled THEN
      state := state + 1;
    END_IF
  4:
    mover.JoinTrack(0, track, 0, 0);
    state := state + 1;
  5:
    IF mover.MCTOPLC.STD.CommandMode = MC_PLANAR_MOVER_COMMAND_MODE.OnTrack THEN
      state := state + 1;
    END_IF
  6:
    power_axis(Axis := axis,
    Enable := TRUE,
    Enable_Positive := TRUE);
    IF power_axis.Status THEN
      move_axis(Axis := axis, Execute := FALSE);
      state := state + 1;
    END_IF
  7:
    move_axis(Axis := axis,
    Position := 600,
    Velocity := 30,
    Acceleration := 100,
    Deceleration := 100,
    Jerk := 100,
    Execute := TRUE);
    state := state + 1;
  8:
    mover.GearInPosOnTrack(0, axis.DriveAddress.TcAxisObjectId, 0, 100, 100, track, 0, 0);
    state := state + 1;
END_CASE

mover.Update();
track.Update();
power_axis(Axis := axis);
move_axis(Axis := axis);
axis.ReadStatus();
Activating and starting the project
- 1. Activate the configuration via the button in the menu bar
 .
. - 2. Set the TwinCAT system to the "Run" state via the button
 .
. - 3. Log in the PLC via the button in the menu bar
 .
. - 4. Start the PLC via the Play button in the menu bar.
The master axis will move to the given target position (600 in this case), and the Planar mover will follow its movement. The position of the Planar mover can be tracked in the online view (by clicking the button).
The mover comes to a halt at position 600, since the master axis also reaches zero dynamics here. If a value greater than the length of the track (760 in this case) is programmed in State 7 for the target position of the master axis, the Planar mover comes to a halt at the end of the Planar track in order not to derail and does not follow the master axis any further. The error in such a scene is potentially returned to the PLC by the MC, but is not accepted by the above PLC code in this case. A feedback object is required for this purpose and for monitoring the synchronization status.
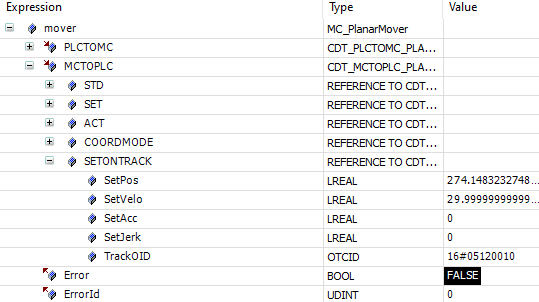
In the function call in State 8, the sync positions of the master axis (third argument) or the Slave Planar Mover (fourth argument) are passed to the Planar mover. These are the respective positions at which the slave becomes synchronous with the master, i.e. at which it reaches its dynamic values. The fifth argument in the function call specifies the Planar track to which the position in the previous argument refers. In fact, it is possible for the slave to get in sync with its master significantly sooner.
A synchronization movement over a sequence of consecutive tracks is possible by using a Planar TrackTrail object. In such a case, a transition from one Planar track to the next is possible during the synchronization phase or when synchronicity already exists. The deceleration of the Planar mover analogous to the above example with only one Planar track would only occur at the end of the last Planar track, if the movement of the master axis would require it to be exceeded.