Record/Playback
Camera streams can be recorded and input to the PLC on the Record/Playback tab. This can be helpful for the development in order to record a camera stream on the desk and repeatedly play it back offline at a later time. The real behavior of the camera hardware is thus simulated with the original images.
Either the simulation mode is activated, in which case camera streams can be played back, or the simulation mode is deactivated, in which case camera streams can be recorded. It is not possible to do both simultaneously.
A camera stream consists of individual images that are saved together with the corresponding time markers in their own format (.tcs). Through the additional saving of the time markers, the time behavior of the camera on the machine can be simulated with application realism. The image data are saved in precisely the format in which they are sent by the camera; no further conversion takes place.

 | Camera requirement The camera must support timestamps and enter valid values in the image header. The timestamps are needed per image to be able to simulate the temporal behavior. |
| System requirements Use fast SSD hard disks and at least 8 GB RAM for the recording and playback of camera streams. If slower storage media are used, reduce the image rate if necessary via the parameter Image Offset. |
| (De)activating TcCOM objects The activation/deactivation of the camera TcCOM objects should not be done manually, as further links have to be adapted when changing from the simulation mode and from the Ads Communication in the background. |
The three areas of the Record/Playback assistant (Record, Playback, Stream files) are explained below.
Recording a camera stream:
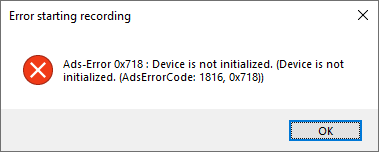
The recording of a camera stream is only possible with an active camera connection. Accordingly, the simulation mode of the camera instance must be disabled and the standard acquisition selected. The Ads Communicator TcCOM module is also required.
The settings for Record Camera Stream are located in the Record Camera Stream area:
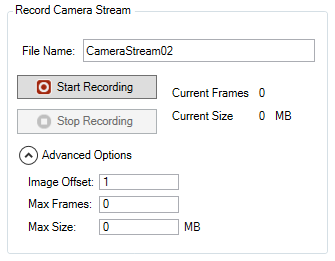
File Name | Text box for the file name of the camera stream. The path used to save the file is defined in Selection of file path and streams. |
| Button for starting a recording. Only active if recording is possible. |
| Button for stopping a recording. Only active during recording. |
Current Frames | Number of images in the currently recorded camera stream. |
Current Size | File size of the currently recorded camera stream. |
Advanced Options | Option to show and hide advanced options. |
Image Offset | Specifies the image recording sequence. Depending on the writing speed of the storage medium, the image size and the frames per second, it may be necessary to skip images. Default: 1 (i.e. an attempt is made to record every image). |
Max Frames | Maximum permitted number of images in the camera stream to be recorded. The recording will be ended automatically as soon as this number of images is reached. Default: 0 (i.e. no limit). |
Max Size | Maximum allowed file size of the camera stream to be recorded in MB. As soon as this file size is reached, the recording is automatically stopped. Default: 0 (i.e. no limit). |


| Enough free storage space? Before recording a stream, make sure that there is sufficient storage space on your target system or limit the stream size if necessary with Max Frames and Max Size. |
The following conditions must be met for a stream to be recorded:
- Simulation mode is disabled.
- An Ads Communication object exists and is activated.
- TwinCAT is in Run mode.
- The camera must be in the
ACQUIRINGstatus.
If these conditions are not met, the following notes and suggested solutions may appear:

- Simulation mode means a state in which a stream can be played back but not recorded. The state can be changed via the Disable Simulation link in the note. This also requires that the configuration is reactivated
 .
. - Simulation mode has been switched off, but the change is only applied after the configuration has been activated.
- The recording of a camera stream is only possible in TwinCAT Run mode. This warning is displayed in all other TwinCAT states.
- Recording a camera stream is only possible if there is an open connection to the camera, as data is read from the camera before recording. Therefore, the camera should already be in
ACQUIRINGstatus at this point. - The Ads Communication module is required for recording camera streams. It can be activated via the link in the note. If no ADS Communicator object exists yet, it can be added via Add New Item… on the camera object and Try to fix on the General tab. The change is accepted after activating the configuration .


| Activating an ADS Communicator module in advance If you plan to record a camera stream at a later time without first stopping TwinCAT (e.g. during the runtime of a machine), you must activate the ADS Communicator module in advance. If the Ads Communicator object is activated, it is possible that images from the camera may still be referenced internally in the object for a short time and therefore cannot be directly transformed into displayable images. For further details see Displayable images. |
Playback of a camera stream:
In order to play back a camera stream, the simulation mode of the camera must be activated; this is possible either via the General tab of the camera object or in the message mentioned below.
If you write the configuration with Write to Module into the TcCom object and save it in the project, these values are already available after the activation of the project and the simulation starts directly with the Start Acquisition command from the PLC. The advantage of this is that you do not have to manually reset the settings and start the stream every time.
The settings for playing back a camera stream are located in the Playback Camera Stream area:
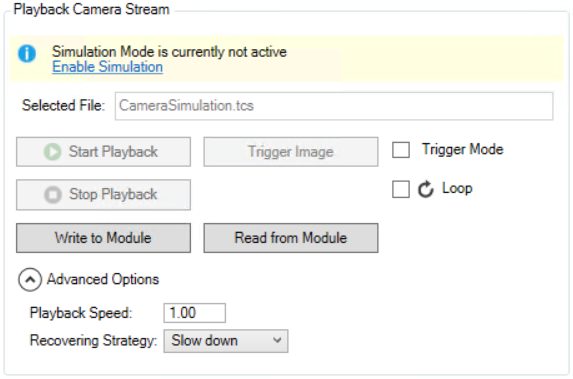
Selected File | Text box for displaying the selected stream file. The selection is made from the list of available streams. |
Start Playback | Button for starting the playback. Only enabled if playback is possible. The playback always begins with image 1, irrespective of where the stream may have been stopped previously. |
Stop Playback | Button for stopping the playback. Only enabled while a stream is played back. |
Trigger Mode | Selection of the Trigger mode, in which the frames in the stream can be triggered individually. |
Trigger Image | Button for triggering an image. Only active when Trigger mode is selected and while a stream is played back. |
Loop | Option to select whether the stream is to be played once or in an infinite loop. |
Write to Module | Writes the current settings to the TcCom module. Stored are: Playback Mode, Playback Speed, Playback Strategy, Loop and the path of the selected stream file. |
Read from Module | Reads the stored values from the module and sets these settings. |
Advanced Options | Show / hide advanced settings. |
Playback Speed | Acceleration/deceleration factor for playback speed. (>1 acceleration; <1: deceleration) Default: 1.00 = speed matches the recording |
Recovering Strategy | Strategy in the event that playback at the specified speed is not possible:
|
The following conditions must be met for a stream to be played back:
- Simulation mode is enabled.
- TwinCAT is in Run mode.
The following notes and warnings may appear above the text field with the selected file name:

- Simulation mode is the state under which a stream can be played back. This state can be reached via the Enable Simulation link and subsequent activation of the configuration .
- Simulation Mode has been enabled, but the change only becomes active after the configuration has been enabled.
- Playback of a camera stream is only possible in TwinCAT Run mode. This warning is displayed in all other TwinCAT states.

Selection of file path and streams
The file path and stream selection is shown below:

| Status bar for recording or playback |
Camera Stream File Directory | Currently set file path. This path is used both for reading already recorded streams and for writing new streams. Subfolders are also searched for stream files. The file path always refers to the target system, not the development system. Make sure that this file path is not affected by write filters or similar. See Important paths. |
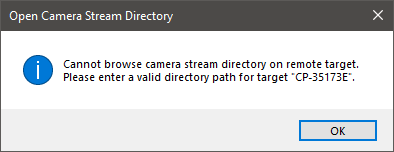
Browse… | This button opens a selection window for browsing the destination folder. This is only possible when the development system is also the target system. Otherwise the following message appears:
|
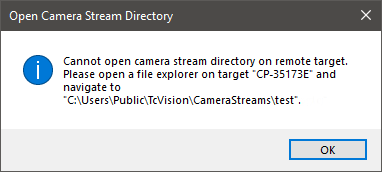
Open directory… | Button for opening the specified file path in the local File Explorer. This can also be done by double-clicking in the free area in the file list. This is only possible when the development system is also the target system. Otherwise the following message appears:
|
Restore default | Button for setting the default file path. |
Refresh | Button to update the stream list. |
Name | List of all camera streams in the selected file path, which are also used for stream selection for playback. |
Frames | Number of images of which the respective camera stream consists. |
Size | File size of the respective camera stream in MB. |
Bytes | The size specification in bytes. |