Commissioning
System Requirements
|
Technical data |
Description |
|---|---|
|
Required license |
TC1200 |
|
Operating system |
Windows 10, Windows 11, Windows CE |
|
CPU architecture |
x86, x64, Arm® |
Commissioning the PLC HMI
Step 1: Enable the PLC HMI
The object "TargetVisualization" ( ) enables the PLC HMI. It can be added to the object "Visualization Manager" in the PLC project tree via the context menu command Add > TargetVisualization (see also PLC documentation: Creating a visualization > Visualization object).
With the TargetVisualization object a visualization task "VISU_TASK" is created in the Solution and a reference to this task in the PLC project. The reference is used to call the visualization code. Therefore, you have to reactivate the configuration after adding the object.
 | Deleting a TargetVisualization object If you delete a TargetVisualization object and have not added an additional WebVisualization object, you have to delete the task "VISU_TASK" under System > Tasks in the TwinCAT project tree. This task is not required in the integrated visualization. (See also Editor of the object WebVisualization and Integrated visualization) |
Step 2: Configure the PLC HMI Client
| Step 2 is only necessary if you are using a Build <4022.0 or if you want to start a PLC HMI Client with a remote connection to the runtime device. From Build 4022.0 or higher, the .ini file is automatically generated and updated in the folder C:\TwinCAT\3.1\Boot\Plc. From Build 4026.0 or higher, the .ini file is automatically generated and updated in the folder C:\ProgramData\Beckhoff\TwinCAT\3.1\Boot\Plc. |
In order to establish the connection between the client and the device on which the corresponding visualization code is executed, you must adapt the Tc3PlcHmi.ini file.
The .ini file is available for Builds <4022.0 in the folder C:\TwinCAT\3.1\Components\Plc\Tc3PlcHmi, for Builds >=4022.0 in the folder C:\TwinCAT\3.1\Boot\Plc and for Builds >=4026.0 in the folder C:\ProgramData\Beckhoff\TwinCAT\3.1\Boot\Plc
Example of a .ini file:
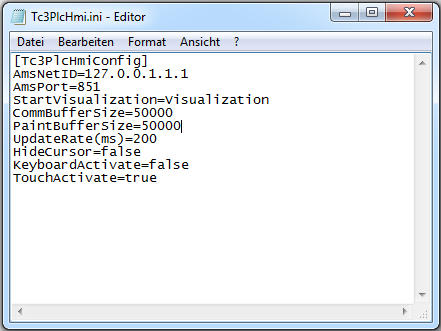
AMSNETID | AmsNetID of the device, on which the visualization code is executed. Preset: 127.0.0.1.1.1 |
AmsPort | AmsPort of PLC project, to which the visualization belongs. Preset: 851 |
StartVisualization | Name of the visualization object to be opened as start page. Preset: Visualization |
CommBufferSize | Memory size in bytes that the visualization allocates for this PLC HMI Client and uses for the communication. Preset: 50000 |
PaintBufferSize | Memory size in bytes that the visualization allocates for this PLC HMI Client and uses for the drawing actions. Preset: 50000 |
UpdateRate(ms) | Update rate in milliseconds, at which the client data are queried again. Preset: 200 |
HideCursor | Setting through which the cursor can be hidden. Preset: false |
KeyboardActivate | Setting through which input via a hardware keyboard is enabled. A software keyboard is used automatically if this setting is disabled. Preset: false |
TouchActivate | Setting through which touch-based input is enabled. Preset: true |
Step 3: Set PLC HMI as startup application
| Step 3 is only necessary if you are using a Build <4024.0 or if you want to start a PLC HMI Client with a remote connection to the runtime device. From Build 4024 or higher, the PLC HMI Client is automatically started locally on the runtime device. |
If PLC HMI is to start automatically when the computer is booted with the boot project, there must be a link to the Tc3PlcHmi.exe application in the StartUp folder.
Execute the following steps to do this:
- Open the directory C:\TwinCAT\3.1\Target\StartUp.
- Add a new link via the context menu command New.
- Enter C:\TwinCAT\3.1\Components\Plc\Tc3PlcHmi\Tc3PlcHmi.exe as storage location.
- Confirm this dialog and the following dialog.
Execute the following steps for Beckhoff CE devices:
- Start the Beckhoff Startup Manager under Start > StartMan.
- Add a new item via the New button.
- Give the item the name "Tc3PlcHmi" and select the type "ShellCommand".
- Confirm the dialog.
- Under the Startup Options, select "Autostart" and enter a time under Delay in order to open the client only when the PLC project has already been started.
- Switch to the Shell Command tab.
- In the field Enter Shell command, enter "\Hard Disk\TwinCAT\3.1\Components\Plc\Tc3PlcHmi\X.exe". Replace the "X" with the name of the Client Exe that is stored under the specified path. This may differ between ARM and ATOM devices, for example.
- Confirm the dialog.
Step 4: Start the PLC HMI Client
| Step 4 is only necessary if you are using a Build <4024.0 or if you want to start a PLC HMI Client with a remote connection to the runtime device. From build 4024 or higher, the PLC HMI Client is automatically started locally on the runtime device. |
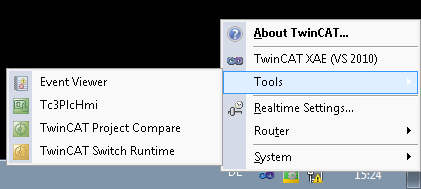
A PLC HMI Client is started with the aid of the Tc3PlcHmi.exe application. This is located in the directory C:\TwinCAT\3.1\Components\Plc\Tc3PlcHmi, but can also be linked to any desired location. If you create a link in the directory C:\TwinCAT\3.1\Target\StartMenuAdmin\Tools you can start the application via the TwinCAT icon in the context menu under Tools.
If the development PC is connected, the visualization can also be displayed in the development environment. However, it is not equivalent to an integrated visualization, but is also based on a PLC HMI Client.
For Beckhoff CE devices you have to activate a setting in the visualization manager before starting the client; this setting enables all image files in the svg format to be automatically converted to the bmp format. This step is required, because under CE only image files in bmp format are supported in the PLC HMI Client. Both image file formats are nevertheless loaded on the target system, since a PLC HMI Web Client continues to use the svg format. The PLC HMI Client for CE can be found in directory \Hard Disk\TwinCAT\3.1\Components\Plc\Tc3PlcHmi.
See also:
- PLC documentation: Creating a visualization > Visualization Manager > Settings
- PLC documentation: Creating a visualization > Visualization variants > Integrated visualization
- Documentation TC3 PLC HMI Web