PLC HMI Web
PLC HMI Web enables the visualization to be displayed in any web browser. It is realized as a Java script, which queries the display information from the web server. Only changes in the display are transferred cyclically. When a visualization project is downloaded, all files required for the PLC HMI Web up to <TC3.1.4026.0 are transferred to directory C:\TwinCAT\3.1\Boot\Plc\Port_851\Visu and from >=TC3.1.4026.0 to the directory C:\ProgramData\Beckhoff\TwinCAT\3.1\Boot Plc\Port_851\Visu. This includes the Java script, the basic HTML page (HTM file) for the visualization, and all images required in the visualization.
 | PLC HMI Web can currently only be configured for PLC projects that can be reached via port 851. |
The following topics are described below:
Requirements
- On the server side the web server must be configured accordingly.
- On the client side, as a minimum Microsoft Internet Explorer 10 or the latest version of Mozilla Firefox, Google ChromeTM or Safari® must be available.
| Data security violations In order to minimize the risk of data security violations, the following organizational and technical measures are recommended for the system, on which your applications run:
|
Commissioning the PLC HMI Web
Step 1: Configure Microsoft Internet Information Services (IIS)
The PLC HMI Web uses the Microsoft IIS as web server. The IIS has to be configured accordingly. The configuration is handled by the TF1810 | TC3 PLC HMI Web installation, which is available for download from the Beckhoff website.
| Use without a valid certificate in the TF1200 TwinCAT 3 UI Client If a PLC HMI Web Client is to be started in the UI Client without a valid certificate, a corresponding entry must be added to the configuration file of the UI Client. (See TF1200: FAQ) |
Step 2: Enable PLC HMI Web
The object "WebVisualization" ( ) enables the PLC HMI Web. It can be added to the "Visualization Manager" object in the PLC project tree via the context menu command Add > WebVisualization (see also PLC documentation: Creating a visualization > Visualization Object).
With the WebVisualization object a visualization task "VISU_TASK" is created in the Solution and a reference to this task in the project. The reference is used to call the visualization code. Therefore, you have to reactivate the configuration after adding the object.
| Deleting a WebVisualization object If you delete a WebVisualization object and have not added an additional TargetVisualization object, you have to delete the task "VISU_TASK" under System > Tasks in the TwinCAT project tree. This task is not required in the integrated visualization. (See also: TF1800: Editor of the TargetVisualization object and PLC: Integrated visualization) |
Step 3: Call PLC HMI Web
To call the start page of the visualization, enter the following address in the web browser: https://Gerätename/Tc3PlcHmiWeb/Port_851/Visu/webvisu.htm
Sample: https://localhost/Tc3PlcHmiWeb/Port_851/Visu/webvisu.htm
"webvisu" is the HTML start page of the visualization defined in the PLC HMI Web settings. After the call this is used to display the start visualization, which is also defined in the manager, in the browser. The visualization can then be operated in the browser.
Optionally, you can assign a name to the PLC HMI Web when calling it so that you can address it specifically later in the application. To do this, enter the parameter ClientName=<Name> after the URL.
Sample: https://localhost/Tc3PlcHmiWeb/Port_851/Visu/webvisu.htm?Clientname=V_ClientXY
Editor of the WebVisualization object
The "WebVisualization" object (), which you can add in the PLC project tree below the "Visualization Manager" object, enables the PLC HMI Web and contains the settings for the web visualization. Double-click on the object in order to edit the settings in an editor window.
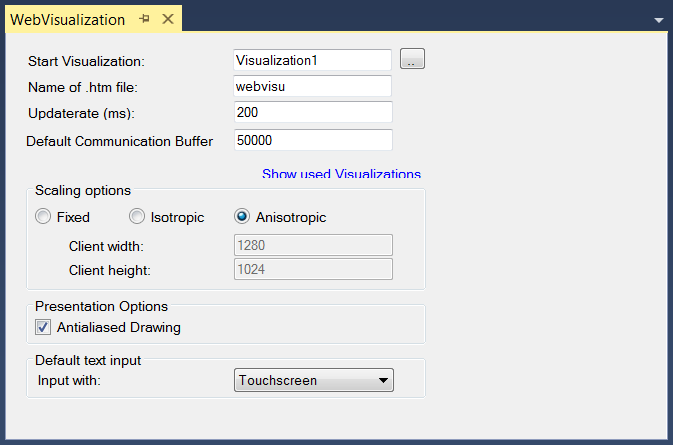
Start Visualization | Name of the visualization to be displayed automatically when the PLC HMI Web is started. "Visualization" is to be entered here as standard. The input assistant can be used to select a different visualization. |
Name of .htm file | Name of the basic HMTL page of the visualization, which must also be entered as the address in the web browser. Example: |
Updaterate (ms) | Update rate in milliseconds, with which the data in the web browser are updated. |
Default Communication Buffer | Size of the communication buffer in bytes. Specifies the maximum available memory for the data transfer between web client and web browser. |
Show used Visualizations | Button for opening the standard dialog of the Visualization Manager: Here you can select the visualizations that are to be used for the PLC HMI Web. (See also PLC documentation: Creating a visualization > Visualization Manager > Visualizations) |
Scaling options
Fixed | The size of the visualization is retained, irrespective of the size of the browser window. |
Isotropic | The size of the visualization depends on the size of the browser window. The visualization retains its proportions, however. |
Anisotropic | The size of the visualization depends on the size of the browser window. The visualization does not retain its proportions. |
Client size | The display size of PLC HMI Web is defined through the following settings:
|
Presentation options
Antialiased Drawing | Activate this option, if antialiasing is to be used when the visualizations are drawn in the visualization editor window of the programming system. (Offline or online) |
Default text input
This setting is only then active if the input type “Standard” is selected in the input configuration of the visualization element. In this case, the default text entries defined in the Visualization Manager are used.
Touchscreen | Select this option if the web clients are operated with a touchscreen by default. |
Keyboard | Select this option if the web clients are operated with a keyboard by default. |