Simple companion specification
This documentation article is intended to get you started using this product quickly. After successful installation and licensing, perform the following steps to create an initial nodeset based on a companion specification.
 | OPC UA Core Nodeset By default, the TwinCAT OPC UA Nodeset Editor automatically loads the OPC UA Core Nodeset, which defines the namespace http://opcfoundation.org/UA/. |
| TF6100 TC3 OPC UA Server This product works together with the TwinCAT OPC UA Server to run a created Nodeset and display it on the server's address space. Please ensure that the TF6100 TC3 OPC UA Server product is installed locally and/or on your target system. |
| Companion specification sample nodeset As an example of a companion specification, a nodeset is used that defines an ObjectType "MyObjectType" with a few member variables. This nodeset can be downloaded from our TE6100_Samples repository on GitHub. |
The following Quick Start tutorial will guide you through the following steps:
- Preparing a PLC project
- Creating a new project
- Importing the companion specification nodeset
- Creating object instances
- Linking the created instances with PLC variables
- Deploying the project to TwinCAT OPC UA Server
Preparing a PLC project
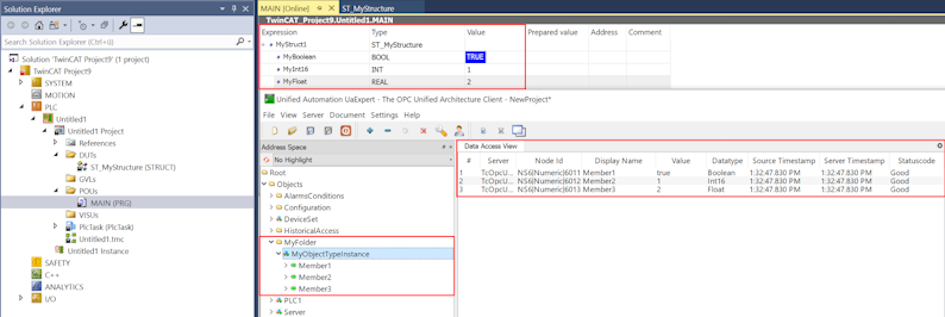
Create a new TwinCAT project and add a PLC project. Create the following data structure in the PLC project and instantiate it three times in the MAIN program.
TYPE ST_MyStructure :
STRUCT
  MyBoolean : BOOL;
  MyInt16 : INT;
  MyFloat : REAL;
END_STRUCT
END_TYPE

PROGRAM MAIN
VAR
  MyStruct1 : ST_MyStructure;
  MyStruct2 : ST_MyStructure;
  MyStruct3 : ST_MyStructure;
END_VAR
Creating a new project
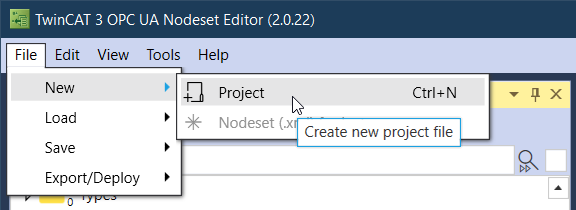
To create a new Nodeset project, please open the menu File and click on New > Project.
In the following selection dialog, you can configure the name for the project and, if the checkbox is activated (by default), a nodeset to be created. The name and the (namespace) Uri for a new information model can be defined in this nodeset.

Importing the Companion Specification Nodeset
Import the file "te6100_quickstart_companion_specification.xml" from the GitHub repository into the TwinCAT OPC UA Nodeset Editor by clicking the button LoadNodeset in the Type Explorer.
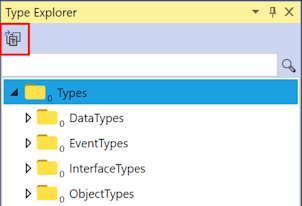
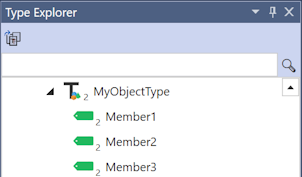
The import loads the type model from the nodeset into the Type Explorer and displays it there. The type model contains an ObjectType "MyObjectType", which we now want to instantiate. You can use the textbox to search for the type name or you can scroll to that type, which can be found under the ObjectTypes \ BaseObjectType node.
Creating object instances
Use the context menu to create a new folder in the Instance Explorer. You can rename the folder by double-clicking on it and then renaming the "Name" attribute in the Attribute Explorer. Then save this change via the Save button in the Attribute Explorer toolbar.
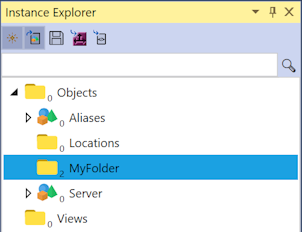
Then drag and drop the type "MyObjectType" from the Type Explorer into the created folder in the Instance Explorer.

This creates a new object instance of the type "MyObjectType" and places it in the folder created. All mandatory member variables of the type are transferred accordingly to the Instance Explorer and displayed there as nodes below the object instance. You can now link these nodes with SPS variables.
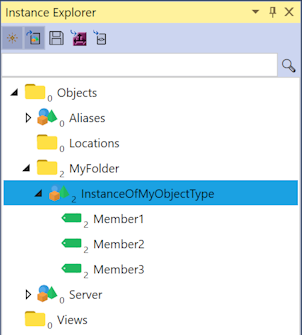
You can rename the instance via the Attribute Editor.
Linking the created instances with PLC variables
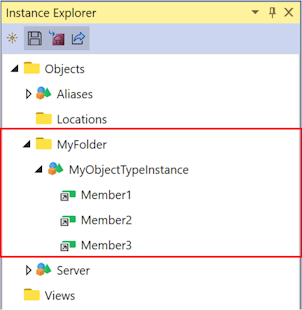
We now want to link the member variables of the now created object instance with variables from our prepared PLC project. For this purpose, the TwinCAT Target Browser can be used, which you can open in the menu View.
Navigate to the prepared PLC project in the Target Browser and link the individual member variables of the data structure with the corresponding member variables of the object instance by dragging and dropping them onto the corresponding node in the Instance Explorer. The data types here are as follows:
|
Member variable |
Data type |
|---|---|
|
Member1 |
Boolean (BOOL) |
|
Member2 |
Int16 (INT) |
|
Member3 |
Float (REAL) |
You can also get this information from the Attribute Explorer if you double-click on the variable. As soon as you have linked all variables you can activate the project on the TwinCAT OPC UA Server in the next step.
Deployment of the project on the local TwinCAT OPC UA server
To deploy the project to the local TwinCAT OPC UA Server, click the Deploy configuration to local TwinCAT OPC UA Server button in the Instance Explorer toolbar.

This exports the project nodeset, including the necessary dependencies, to the locally installed TwinCAT OPC UA Server and also creates a corresponding configuration file for the server. The directory from the options or the project file is used as the target (see Application and project settings).
| Restart the TwinCAT OPC UA Server to load the configuration The TwinCAT OPC UA Server must be restarted after the configuration has been adjusted in order to apply it. For this reason, the server should be restarted after deployment via the Nodeset Editor in order to load the new TcUaNodesetConfig and the nodesets configured in it. The address space of the server then contains all the nodes contained in the nodesets. |