Axis context menu
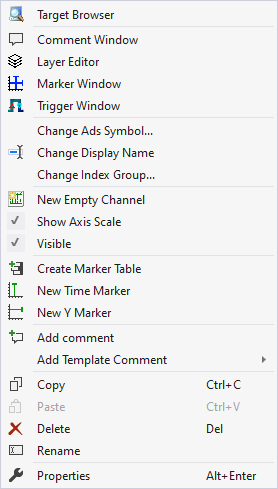
The first two groups contain the functionalities for opening various Windows tools. These include firstly the Target Browser, the Comment Window, the Layer Editor, the Marker Window and finally the Trigger Window.
In the following group, the existing configuration can be reconfigured with just a few clicks.
"Change Ads Symbol..."
If the symbol names have changed in several ADS acquisitions, parts of the name can be exchanged using this function.
"Change Display Name"
The "Change Display Name" function can be used to set the level of detail to be displayed for the names of the channels and acquisitions.
"Change Index Group..."
This function can be used to change the Index Group of all ADS variables. Either an offset can be calculated or a new value can be entered.
"New Empty Channel"
A new channel can be added below the axis group with this entry.
"Show Axis Scale"
Setting whether the axes should be displayed or not. If the tick is visible on the left, the axes are drawn, otherwise they are not. This does not change the visibility of the channels or the chart.
"Visible"
Setting whether the entire axis group should be displayed. If the tick is present, the visible channels and the corresponding chart are displayed. If the tick is not visible, nothing more of the axis group is displayed.
The following group offers various functions for interacting with the markers.
"Create Marker Table"
This function can be used to add an automatically generated table in the Marker Window, which displays all information on the selected axis group.
Depending on the chart type, different types of markers can be inserted using the menu entries below.
"Add comment"
To write additional information to the selected node, this function can be used to add a new comment, which is displayed in the comment window.
"Add Template Comment"
In this submenu, new templates can be created or selected in order to add them.