Advanced Settings
After adding an EtherCAT(Direct Mode) to the I/O configuration, open the "EtherCAT" tab on the right and press the "Advanced Settings..." button. This opens the "Advance Settings" dialog. Following dialogs are included in the 'Advanced Settings' dialog:
Dialog | Description | |
|---|---|---|
StateMachine | General settings of the master. | |
With the help of the 'Slave Settings' dialog the user can change settings for all EtherCAT slaves. To change these settings for an individual EtherCAT slave device, open the 'Advanced settings' dialog of the slave and open the 'Behavior' dialog. | ||
Cyclic Frames | With the help of 'Sync Tasks' dialog one can set the maximal number of sync tasks and the MTU of the cyclic Ethernet Frames sent by the master. | |
Distributed Clocks | The 'Distributed Clocks Master' dialog enables the user to view and change the master settings of the distributed clocks. | |
Diagnosis | The 'Online View' dialog enables the user to add additional columns to the list view of the 'Online' tab of the EtherCAT device. | |
State Machine Master Settings
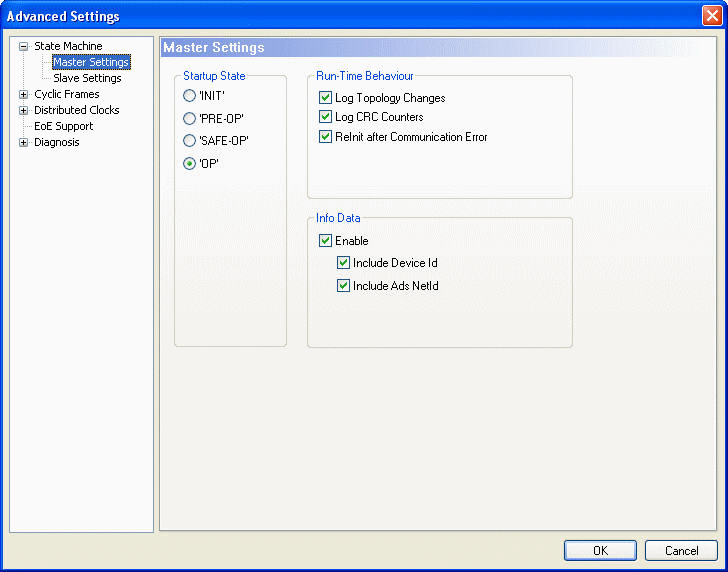
Startup State: The EtherCAT master runs to checked state after startup. If for instance 'OP' is checked the EtherCAT master runs through all EtherCAT states to arrive at 'OP' state. To stay in the state 'INIT' after startup one would have to check the 'INIT' button.
Run Time Behaviour
Log Topology Changes: If this box is checked, topology changes are logged.
Log CRC Counters: If this box is checked, the CRC counters are logged.
ReInit after Communication Error: If this box is checked, all slaves are set to init after a communication error has occurred.
Info Data
Enable: If this box is checked, the 'Info' device image is added to the EtherCAT device:
Additionally, an entry 'InfoData' is added to the EtherCAT device and to the connected EtherCAT slave devices. 'InfoData' contains input variables that supply information about the EtherCAT device, that normally do not change very often. Variables mapped to the 'Info' images are not updated cyclically, but only if the image has changed. The ChangeCnt shows how often the contents of the image has changed.
Include Device Id: If this box is checked, the input variable 'DevId' is added to InfoData. This is the device id of the EtherCAT device.
Include Ads NetId: If this box is checked, the input variable 'AmsNetId' is added to InfoData. The AmsNetId is a parameter necessary for communicating with the EtherCAT master device via ADS. The ADS port of the EtherCAT master is always 0xFFFF(65535) and the Ads Port of an EtherCAT slave device is equal to the fixed address (see EtherCAT Addr) of the slave.
State Machine Slave Settings
With the help of the 'Slave Settings' dialog the user can change settings for all EtherCAT slaves. To change these settings for an individual EtherCAT slave device, open the 'Advanced settings' dialog of the slave and open the 'Behaviour' dialog.
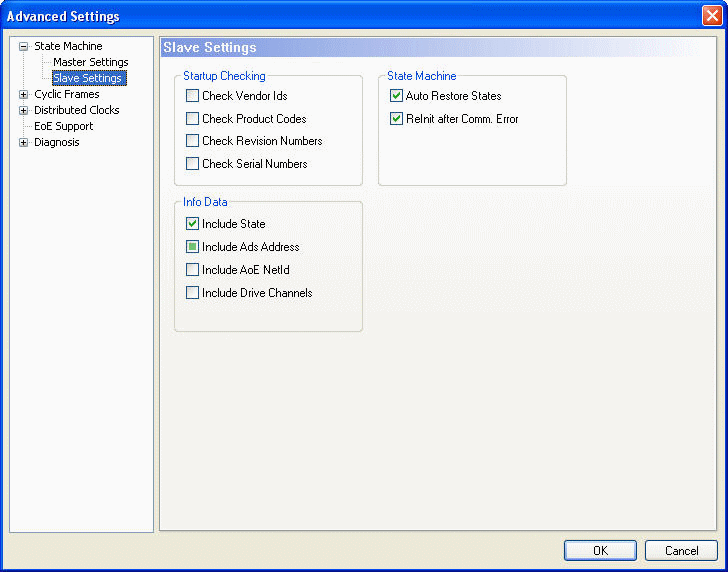
Startup Checking
The user can specify which slave information should be checked by the master during startup.
Check Vendor Ids: If this box is checked, the master checks if the vendor id of each slave device is the same as the configured one.
Check Product Codes: If this box is checked, the master checks if the product code of each slave device is the same as the configured one.
Check Revision Numbers: If this box is checked, the master checks if the revision number of each slave device is the same as the configured one.
Check Serial Numbers: If this box is checked, the master checks if the serial number of each slave device is the same as the configured one.
State Machine
Auto Restore States: If this box is checked, the EtherCAT master tries to restore the state of an EtherCAT slave automatically. If an EtherCAT slave device changes from error state (ERR SAFE-OP, ERR OP etc.) to a valid state(SAFE-OP, OP etc), the EtherCAT master tries to set the device to the current state of the master.
ReInit after Comm. Error:
Info Data
To enable this group, the Info Data has to be enabled in the 'Master Settings' dialog.
Include State: If this box is checked, the input variable 'State' is added to the InfoData entry of each EtherCAT slave. This variable holds the current EtherCAT state and link status of an EtherCAT slave.
Include Ads Address: If this box is checked, the input variable 'AdsAddress' is added to the InfoData entry Info of each EtherCAT slave. This variable is added by default for all EtherCAT slaves, that support a mailbox protocol like CoE(CANopen over EtherCAT) or SoE.
Include Drive Channels: If this box is checked, the input variables 'ChnX'(X=Channel number) are added to the InfoData entry of every drive.
Synchronization Sync Tasks
With the help of 'Sync Tasks' dialog one can set the maximal number of sync tasks and the MTU of the cyclic Ethernet Frames sent by the master.
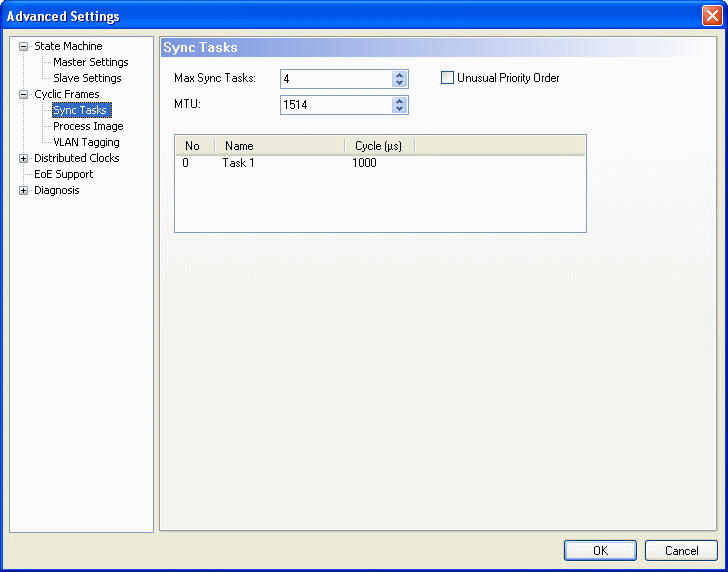
Max Sync Tasks: Maximal number of tasks that can take part in process data communication. How many tasks really take part in the process data communication, depends on the mapping of the variables of the EtherCAT slave devices. For each task that takes part in process data communication at least one EtherCAT frame is sent cyclically. If "Max Sync Tasks" is set to two and the configuration consists of two EtherCAT slave devices whose variables are mapped to two different tasks, two tasks would take part in the process data communication. If the variables were mapped to the same task, only one task would take part in the process data communication.
MTU: The MTU(Maximum Transmission Unit) specifies the maximum size in bytes of the cyclic Ethernet Frames sent by the master. The minimum size is 28 Bytes ( 14 Bytes(Ethernet-Header) + 2 Bytes(E88A4-Header) + 10 Bytes(EtherCAT-Header) + 0 Byte( EtherCAT Data) + 2 Bytes(EtherCAT working counter)) and the maximum size 1514 (14 Bytes(Ethernet-Header) + 2 Bytes(E88A4-Header) + 10 Bytes(EtherCAT-Header) + 1486 Bytes( EtherCAT Data) + 2 Bytes(EtherCAT working counter)).
Synchronization Distributed Clocks
The 'Distributed Clocks Master' dialog enables the user to view and change the master settings of the distributed clocks.
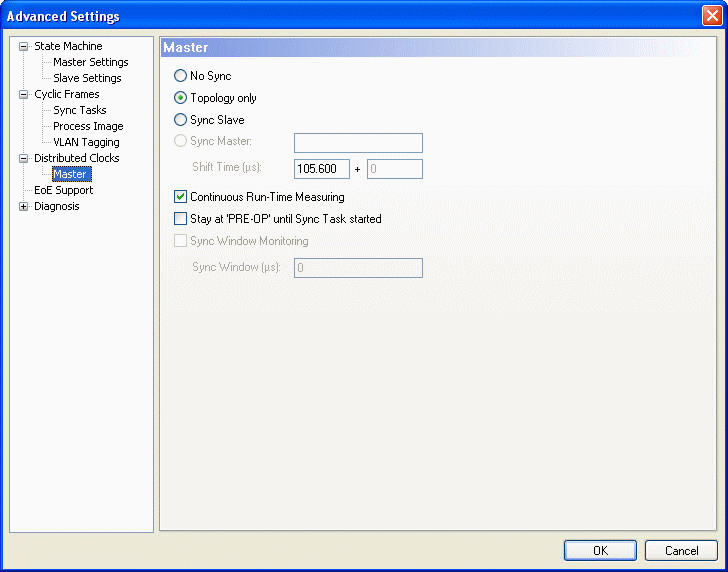
No Sync: In this mode no synchronization of the EtherCAT devices takes place.
Topology Only: In this mode no synchronization of the EtherCAT devices takes place, but the topology is calculated by the master. The master needs to know the topology to be able to calculate the delay time between the slaves. As a consequence, this calculation is always performed in the "Sync Slave" and "Sync Master" mode.
Sync Slave: In this mode synchronization of the EtherCAT devices takes place, and the EtherCAT master is used as reference clock. As a consequence the Master sends a BWR(Broad cast write) command cyclically to distribute the system time to all slaves. Because the master clock is not as accurate as the clock of an EtherCAT slave device one should normally prefer the 'Sync Master' mode and set the first EtherCAT device as reference clock.
Sync Master: In this mode synchronization of the EtherCAT devices takes place, and the EtherCAT slave right to "Sync Master" is set as reference clock. As a consequence, the master cyclically sends an EtherCAT command to read out the system time of the "Sync master" device and distributes this time to all other slave devices.
The "Sync Master" mode is disabled if no device is set as reference clock. To activate this mode one has to configure a slave device as a reference clock device (see Distributed Clock Settings). The first three Sync modes are disabled if a reference clock device is set. To be able to select one of these modes no slave device is allowed to be set as reference clock:
- Select the "Sync Master" device in the tree view of the System Manager
- Go to the EtherCAT tab and press the "Advanced Settings..." button. This opens the Advanced Settings dialog.
- Select the entry "DistributedClocks/Settings" in the tree view of the dialog.
- Uncheck the entry "Reference Clock Device"
Diagnosis Online View
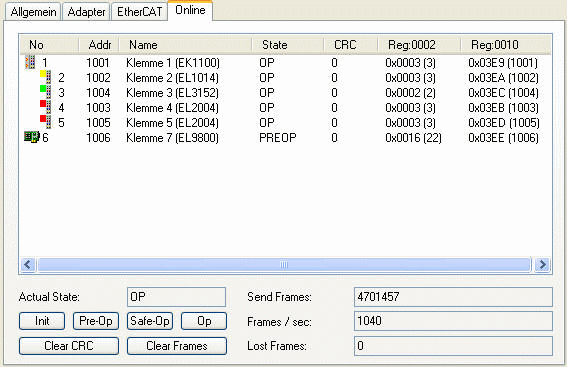
The "Online View" dialog enables the user to add additional columns to the list view of the "Online" tab of the EtherCAT device. The additional columns display the contents of the ESC registers selected in this dialog. One can either select a specific register by checking a specific item in the list view or typing an address in the edit field and pressing the "Add" button.

Show Change Counters: If this box is checked, a column is added to the list view of the "Online" tab displaying two counters separated by a slash. The first counter displays the number of abnormal state change. The second counter displays how often the communication to the slave device has been lost.
Example:
To display the physical address and the Soccom Build of an EtherCATSlave device we would have to select the item 0002 and the item 0010 in the list view:
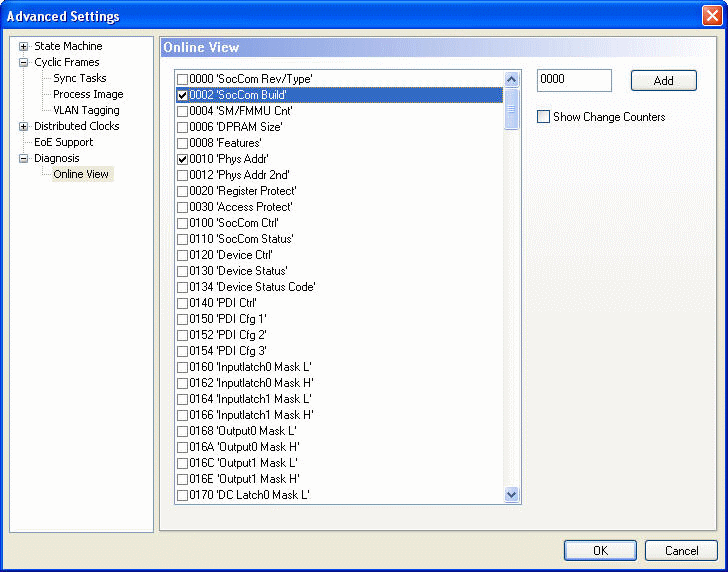
Next you must close the "Advanced Settings" dialog and go to the "Online" tab of the EtherCAT master device. Here you can see that two new columns have been added to the list view, one for the "Soccom Build"(Reg:0002) and one for the physical address of the EtherCAT device (Reg:0010).