TwinCAT Scope2 Architecture
When configuring a Scope View, the following elements are available in hierarchical order:
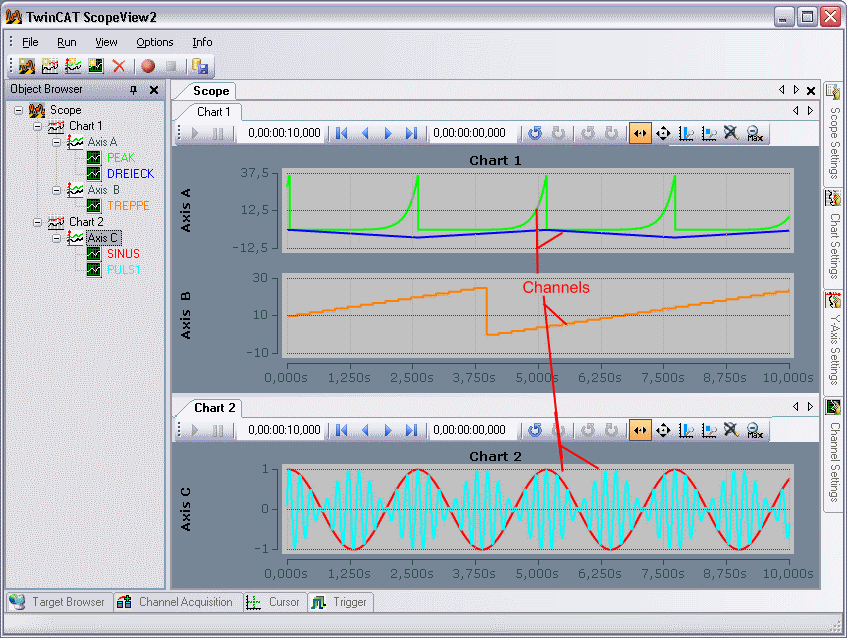
- Scope: the scope builds the highest configuration-level. All elements added to a scope are subject to the same recording settings, see Scope Settings.
- Chart: charts are the actual display area of the Scope View. They provide the X axis as the time-defined basis of the display. Each chart has its own toolbar for changing the display. In a second bar the start time and end time of the recording are displayed as absolute time value, as well as the current position of the chart origin, relative to the start time. Format: "hours:minutes:seconds.milliseconds"). General settings, such as colors, can be set in the Properties.
- Y axis: the Y axes offer the option to group the channels within one chart. By means of automatic or free scaling, each axis provides the range of values that covers the connected channels, see Y-Axis Settings.
- Channels represent the system variables to be analyzed. They are assigned to a system element with a fixed address, the acquisition. General settings, such as color or line width, can be made in the Settings.
Window
Each of the above elements is assigned a window with settings. These windows can be opened by double-clicking on the corresponding Object browser element or via the View menu.
The scope windows can be arranged in any order and size, in the center of the main window. It is also possible to position them one after the other as tabs. Within the area spanned for a scope, the same counts for the connected chart windows. All other windows can be snapped to the edges or arranged as a separate window on the screen. Here, too, several windows can be placed one behind the other as tab. If you press the push pin button in the header of a window, it will be mined to the corresponding edge, and when you touch it with the mouse, it will temporarily slide into the image.
All property windows are explained in one of the other menu items.
Configuration
The options for creating or editing a Scope configuration are explained below. The way in which the properties of the respective elements can be changed is described in the description of the associated window.
To add elements:
- File -> Add -> Element -> New adds a new element to the last selected higher element. If there is no higher element yet, it will be created.
- ToolBar -> New Element Button -> adds a new element.
- Context menu in ObjectBrowser -> Element -> New adds a new element.
- To create a channel with acquisition from the Target Browser: see "Target Browser" menu item
To remove elements:
- File -> Delete removes the selected element and all sub-elements.
- Toolbar-> Delete button removes the selected element and all subelements.
- Context menu in Object Browser -> Delete removes the associated element and all subelements.
- In the Object Browser <Del> to remove the selected element.
Moving / copying individual elements:
- Each element can be moved with drag&drop in the Object Browser. In doing so it must always be added to an element that is one level higher in the hierarchy. If an element is moved to another Scope, then it is only copied. Thus, it is still available in the original Scope.
- The described moving operations are available within a Scope even after the start of recording.
- Context menu in Object Browser -> Copy -> select another element -> Paste.
Saving a Scope configuration
Scope View 2 uses an XML description with the file extension .sv2 as the configuration format.
- File -> Save saves the configuration under the file name already assigned.
- File -> Save As saves the configuration under a different name or in a different location.
- Context menu in Object Browser -> Save saves the configuration under the already assigned file name.
- Context menu in Object Browser -> Save As saves the configuration under another name or in another location.
Loading a Scope configuration
- File -> Add ->Scope -> Load opens a file selection menu. Select an .sv2 file here.
- Context menu in Object Browser -> Add -> Scope -> Load opens a file selection menu.
- Furthermore, an existing file can be dragged into the Object Browser to load the corresponding configuration.
- Under File -> Rescent Files you can choose among the last opened files.
- In the context menu of the object browser there is also a Resent Files button.
Saving data (always with configuration)
- see menu item Scope
Loading data files
- see Loading a Scope configuration. But in the file menu select file type .svd.
Deactivating / activating a channel
A channel can be disabled in the configuration in order to prevent it being recorded. However, it is retained when saving the configuration.
- Context menu of the channel in the Object browser -> Disable / Enable disables / enables the channel.