Project Configuration
Different devices groups can be created and managed under Project Configuration. Different devices from your network can be allocate to these groups, and stored actions can be executed on the individual devices of a group with the Update command. The script editor offers scope for user-defined, complex scripts in addition to the predefined scripts.
The first and main step is to select the so-called NetShare folder. The files (file paths) to be loaded onto the target system(s), which are specified in the different scripts, are consolidated in the NetShare folder and issued centrally from this here to the devices in the respective group. The following diagram illustrates this principle.
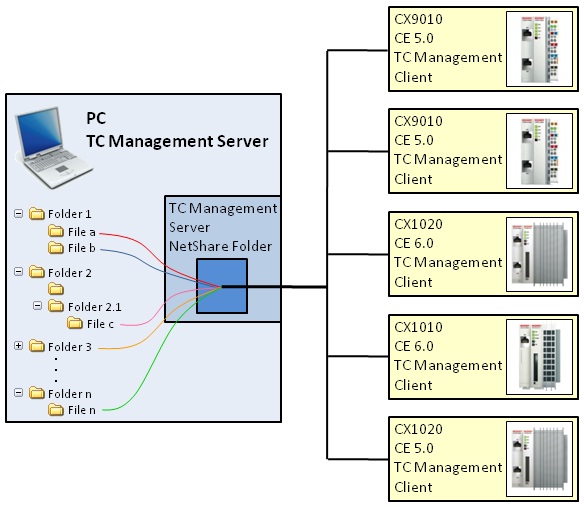
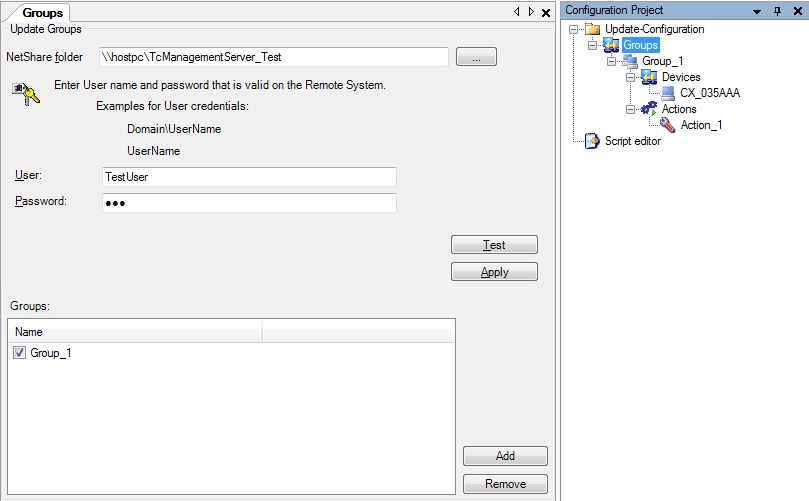
To implement the settings select Groups in the configuration tree (see the diagram in section: Groups). The NetShare folder must be an enabled folder with write and read access.
Enter the Windows user name and the password to gain access to the NetShare folder. Use the Test button to check whether access rights are available. All changes on this page must be explicitly confirmed via the Apply button. Otherwise the changes will not take effect and are discarded.
Use the Start Update button to initiate an update for all activated devices in the currently selected group.
Groups, Devices and Actions:
The Groups entry also provides an overview of the groups that have already been created in the Project Configuration. Further groups can be added via the Add button or by right-clicking on New in the configuration tree context menu. Groups can be activated and deactivated through checkboxes in the Groups window.
The procedure for devices within a group is similar. Open the Devices window for the respective group by clicking on Devices. Devices can be added via the context menu of the Project Configurator, via the Add button in the Devices window, or very conveniently through drag and drop from your Network Environment into the Devices window.
The procedure for Actions is similar, which makes the software operation very intuitive. Individual actions for certain updates can be switched on or off.
As an example, in the three images shown above the next update is only carried out for Group_1 and its embedded devices CX_00FCB2 and CX_014DA8 with Action_1 and Action_3.
Selecting individual devices in a group will provide an overview with information on the respective device, showing the name, NetId, IP, TwinCAT version and the operating system of the device, among others. From here you can initiate or cancel updates for the currently selected device. A device-specific logger provides detailed information on the current device status.
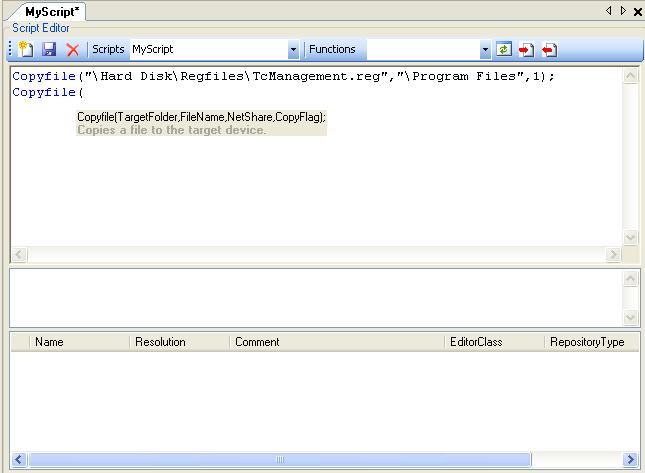
When adding actions to your existing configuration of groups and devices, you can choose between several standard scripts. These scripts can be used to specify, what exactly should be done or executed on the target device(s). Click here to find out which standard scripts are available and what their functions are.
A script editor is available if the available scripts are insufficient for your requirements, or if you want to define a complex script for executing several functions at the same time. Click here to find out how to write, save and use such scripts.