Scope nodes
The Scope node in the Solution Explorer is a type of administration shell for the Scope configuration. Several Scope nodes can be created in a measurement project. A Scope contains the charts, axes and channels of a configuration. With selected Scope nodes the higher-level properties are displayed in the Property window. These fulfill the following functions.
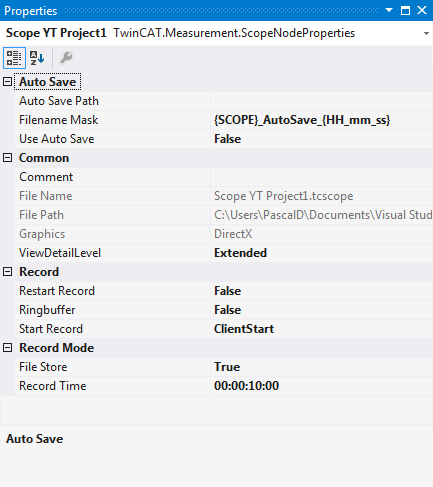
Auto Save
Auto Save Path | Here you can select the path for saving the recording via the file browser. |
Filename Mask | Affects the filename of the recording to be saved. In this way it is possible to realize continuous timestamps, for example. |
Use Auto Save | Turns on automatic saving for a stopped recording. |
Auto delete mode | Here you can set the mode in which the Auto Delete function should run. If set to "Disabled", no files will be deleted. "Capacity“ deletes the oldest file in the folder if more than the number of files specified in "Delete more than" has been saved. If set to "OlderThan", all files older than the time specified in "Delete older than" will be deleted. The option "CapacityOrOlderThan" is a combination of "Capacity" and "OlderThan". That is, files are deleted when the conditions for either option are met. |
Auto Save Mode | After a recording is stopped: None – no data is stored automatically. SVDX – the data is automatically stored in a .svdx file. Export – the data is exported. The export configuration can be customized. |
Configuration | With this option, the configuration of the export can be set via the wizard. |
Delete more than | This option defines when and with how many created files the oldest is to be deleted. The option is only active as long as "Capacity" or "CapacityOrOlderThan" is selected in "Auto Delete". |
Delete older than | This option defines the number of seconds after which a file is to be deleted with Auto Delete. This option is only active as long as "OlderThan" or "CapacityOrOlderThan" is selected in "Auto Delete". |
Image Delete Mode | Here you can set in which mode the Auto Delete function for the image data should run. If set to "Disabled", no files will be deleted. "Capacity“ deletes the oldest file in the folder if more than the number of files specified in "Delete more than" has been saved. If set to "OlderThan", all files older than the time specified in "Delete older than" will be deleted. The option "CapacityOrOlderThan" is a combination of "Capacity" and "OlderThan". That is, files are deleted when the conditions for either option are met. With the "Like Data" setting, the settings are taken from the data. |
Delete Images older than | This option defines the number of seconds after which a file is to be deleted with Auto Delete. This option is only active as long as "OlderThan" or "CapacityOrOlderThan" is selected in "Auto Delete". |
Delete Images more than | This option defines when and with how many created files the oldest is to be deleted. The option is only active as long as "Capacity" or "CapacityOrOlderThan" is selected in "Auto Delete". |
Common
Comment | A free comment can be stored here. |
File Name | Filename of the current Scope instance. |
File Path | Directory in which the Scope instance was saved. |
Graphics | Shows the currently used graphic. A distinction is made between GDI+ and DirectX. |
ViewDetailLevel | Here you can set the level of detail for showing or hiding various options. For a better overview, the Extended level is particularly recommended for XY plots. The option is therefore only available for XY plots at present. The options “Default” and “Extended” are available for all chart types. |
Record
Restart Record | Here you can restart a stopped recording. |
Ring buffer | Here you can specify how the server should respond, once the recording time has been reached.
|
Start Record | Here you can set whether the recording should be started via the recording button (UserStart) or when a trigger event occurs (TriggerStart). |
Record Mode
File Store | Here you can specify whether the server should buffer the data in a local file (True) or only in the RAM (False). The choice depends on the quantity of data to be recorded and the recording equipment. The access time is faster, if only the RAM is used. For larger data quantities it is usually necessary to activate the “File Store” option. |
Record Time | Here you can specify the total recording time. It is entered in the format Days:Hours:Minutes:Seconds. |
Synchronization mode | This option sends a command to the selected TwinCAT controllers to activate timestamp correction. This can be done in the familiar Soft, Medium and Hard levels from the TwinCAT configuration. This option only takes effect if the TwinCAT configuration of the selected controllers has also configured the respective mode. Subsequent configuration from the scope is not possible. |
Changing the settings of several Scopes at the same time
To change the settings for several Scopes at the same time, please refer to the chapter Multiple selection.
Context menu
The context menu entries for a Scope project differ depending on whether the project is a pure Scope configuration or whether it is a loaded SVDX.
Context menu of a pure Scope configuration
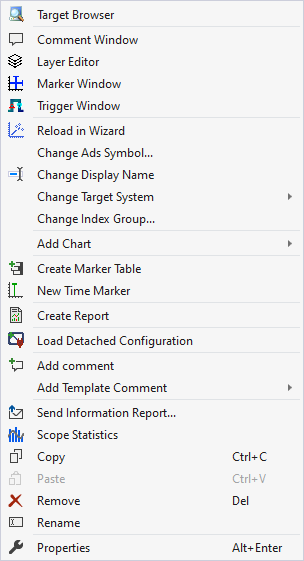
The first two groups contain the functionalities for opening various Windows tools. These include firstly the Target Browser, the Comment Window, the Layer Editor, the Marker Window and finally the Trigger Window.
In the following group, the existing configuration can be reconfigured with just a few clicks.
"Reload in Wizard"
This function can be used to open the Scope project in the Project Wizard in order to reconfigure it there. However, this function is only available if only ADS acquisitions are available.
"Change Ads Symbol..."
If the symbol names have changed in several ADS acquisitions, parts of the name can be exchanged using this function.
"Change Display Name"
The "Change Display Name" function can be used to set the level of detail to be displayed for the names of the channels and acquisitions.
"Change Target System"
If the target system of all ADS acquisitions is to be changed, this can be done with this function by selecting the new target system in the submenu.
"Change Index Group..."
This function can be used to change the Index Group of all ADS variables. Either an offset can be calculated or a new value can be entered.
"Add Chart"
The various chart types or images can be added to the project using the submenu.
The following group offers various functions for interacting with the markers.
"Create Marker Table"
This function is used to create tables for all charts in the Marker window that are linked to the charts to display all chart information.
"New Time Marker"
Creates a new Time Marker and adds it to the selected element.
"Create Report"
Creates a report based on the project.
"Load Detached Configuration"
This function can be used to load a detached project from a connected server.
"Add comment"
To write additional information to the selected node, this function can be used to add a new comment, which is displayed in the comment window.
"Add Template Comment"
In this submenu, new templates can be created or selected in order to add them.
Various standard functionalities can be found in the last two groups.
"Send Information Report..."
Open the Support Information Report to send a message to the support team.
"Scope Statistics"
Open the Scope statistics.
The selected node can be copied ("Copy"), removed ("Remove"), renamed ("Rename") or inserted below it ("Paste"). The Visual Studio properties window can also be opened for further parameterization ("Properties").
Context menu of an SVDX file
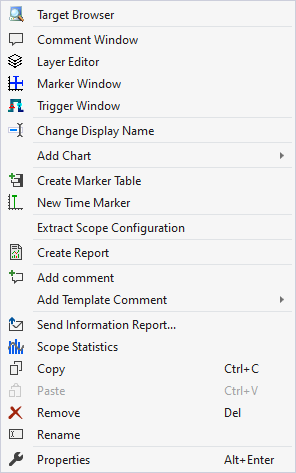
The first two groups contain the functionalities for opening various Windows tools. These include firstly the Target Browser, the Comment Window, the Layer Editor, the Marker Window and finally the Trigger Window.
In the following group, the existing configuration can be reconfigured with just a few clicks.
"Change Display Name"
The "Change Display Name" function can be used to set the level of detail to be displayed for the names of the channels and acquisitions.
"Add Chart"
The various chart types or images can be added to the project using the submenu.
The following group offers various functions for interacting with the markers.
"Create Marker Table"
This function is used to create tables for all charts in the Marker window that are linked to the charts to display all chart information.
"New Time Marker"
Creates a new Time Marker and adds it to the selected element.
"Extract Scope Configuration"
Extracts the Scope configuration from the selected .svdx.
"Create Report"
Creates a report based on the project.
"Add comment"
To write additional information to the selected node, this function can be used to add a new comment, which is displayed in the comment window.
"Add Template Comment"
In this submenu, new templates can be created or selected in order to add them.
Various standard functionalities can be found in the last two groups.
"Send Information Report..."
Open the Support Information Report to send a message to the support team.
"Scope Statistics"
Open the Scope statistics.
The selected node can be copied ("Copy"), removed ("Remove"), renamed ("Rename") or inserted below it ("Paste"). The Visual Studio properties window can also be opened for further parameterization ("Properties").