Trigger
Triggers can be a useful addition to the scope configuration for controlling a scope recording or for marking significant events in the data stream.
The triggers in the scope are organized in groups and sets. In a group the trigger action such as Start Record or Set Mark can be selected. The set defines the actual trigger condition, e.g. exceeding of a limit value of a particular variable. The sets can be linked using logical operators.
A basic distinction is made between two types of sets, a channel and a menu directory type.
Trigger groups and trigger sets can be added via the trigger context menu.
Context menu
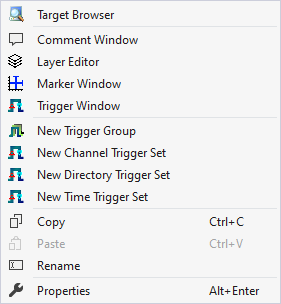
The first two groups contain the functionalities for opening various Windows tools. These include firstly the Target Browser, the Comment Window, the Layer Editor, the Marker Window and finally the Trigger Window.
The entries in the third group can be used to create new trigger groups.
"New Trigger Group"
Creates an empty Trigger Group.
New Channel/Directory/Time Trigger Set
Creates a new Trigger Group with a new Trigger Set of the type Channel, Directory or Time.
Various standard functionalities can be found in the last two groups.
The selected node can be copied ("Copy"), removed ("Remove"), renamed ("Rename") or inserted below it ("Paste"). The Visual Studio properties window can also be opened for further parameterization ("Properties").
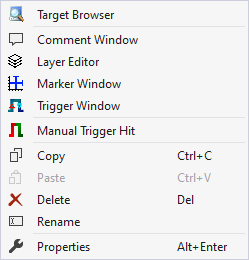
Manual triggering of trigger set
Triggers can be manually triggered for test purposes via the Trigger Set context menu command Manual Trigger Hit.
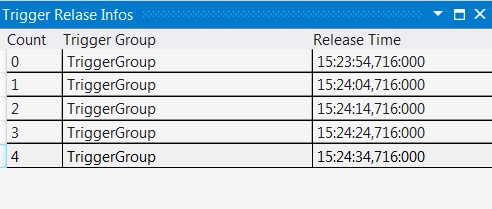
Trigger Window
The Trigger window can be opened via the Trigger context menu. It displays the triggers with the times at which they were triggered. If you pause the chart displays and select the corresponding events in the trigger window, the display in the chart jumps to the corresponding position.
Marker Window
In the Marker Window, channel values from the times of markers or trigger events (timers) can be output and compared with other timer values. A Marker Window always refers to the project selected in the Solution Explorer.
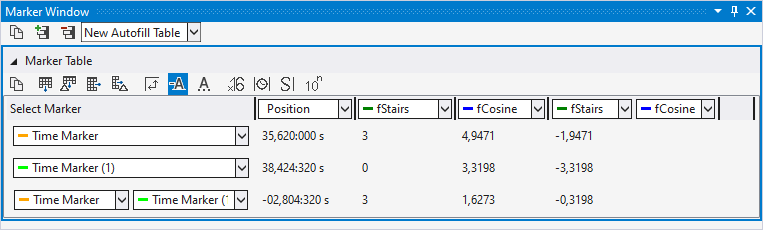
The Marker Window consists of a menu bar and an arbitrary number of tables. The tables can be freely created and also deleted again.
The menu bar at the top edge of the Marker Window contains the following buttons:
- Copy: Copies all values from the Marker Window to the clipboard so that they can be pasted into another program.
- Add table: Adds a new table.
- Delete table: Deletes the selected table.
- At the side of the buttons there is also a selection box in which all charts existing in the configuration are listed. If a chart is selected there, an automatic table is created containing all markers and channels that refer to the chart.
All tables are pictured below one another under the menu bar. The values of the various channels at the different times of the timers are displayed in a table.
There are two different options for the rows and columns.
- Option 1: Select one timer / channel; in this case only the value of one time/one channel is output.
- Option 2: Select two timers/channels; in this case the difference between the values is calculated.
If two timers and two channels are selected, the difference is calculated between the 1st channel and the 1st time (position) and between the 2nd channel and the 2nd time (position).
The following buttons are available for the configuration of the table:
- Copy: Copies the values from the table.
- Add row: Adds a row with a single selection option.
- Add difference row: Adds a row with a double selection option for a difference.
- Add column: Adds a column with a single selection option.
- Add difference column: Adds a column with a double selection option for a difference.
- Rotate orientation: The orientation setting button lets you define whether the timers or channels are in columns or in rows.
- Colored marking: In order to be able to assign markers and channels not only on the basis of the names, small lines can be displayed in front of the name, which have the same color as the associated elements.
- Colored numbers: The data can be drawn in the table in the same colors as the color of the associated timer.
- Hex notation: The values are displayed using hexadecimal notation.
- Absolute time: The time is displayed as an absolute time.
- Unit: The units of the channels are also displayed in the table.
- Scientific Notation: If the Scientific Notation is set to 'default' for the markers, this setting can be used to overwrite the value for the display in the Marker window.
If the 'Components Highlight' setting is active in the options, the associated channels and markers can be highlighted in the diagram by clicking on a cell. If the value is set to 'Enabled', simply selecting the cell is sufficient. If the option is set to 'DoubleClick', a cell must be selected by double-clicking on it.