Setup OPC XML-DA on Windows 7
All necessary files for OPC XML-DA will be automatically installed by the setup routine. This chapter describes the required IIS (Internet Information Services) configuration for OPC XML DA on Windows 7.
Please note: The configuration may be different in other Windows Operating Systems, for example Windows XP.
Step 1: Installing IIS on Windows 7
By default, IIS is not part of the Windows 7 installation. Therefore you need to add this functionality manually. For more information see http://technet.microsoft.com/de-de/library/cc725762%28v=ws.10%29.aspx.
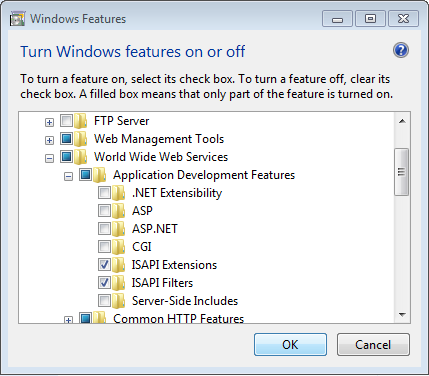
Please note: When installing IIS, the following extensions need to be activated:
- ISAPI Extensions
- ISAPI Filters
Step 2: Create "Virtual Directory" in IIS (Internet Information Service)
Usually this step will be performed automatically by the Setup.
- Open "Internet Information Service (IIS) Manager" which can be found under "Control Panel\Administrative Tools\"
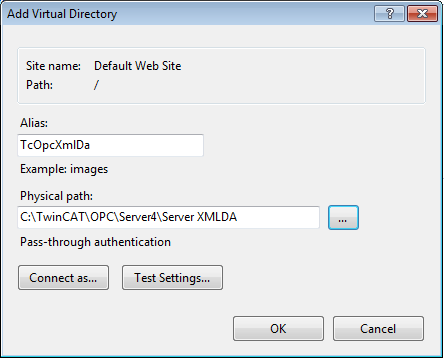
- Right click on "Default Web Site"
- Select "Add Virtual Directory..."
- Please enter the alias "TcOpcXmlDa" and the physical path to your TwinCAT OPC XML DA Server installation. By default, this folder should be under C:\TwinCAT\OPC\Server4\Server XMLDA. Click on "OK".
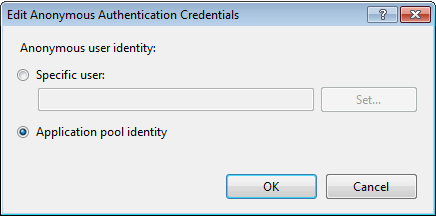
- Double-click the "Authentication" icon, select "Anonymous Authentication" and click on "Edit". Instead of specifying a user account, select the "Application pool identity" and click on "Ok".
- Next, you need to set execute permissions on that virtual directory. Select the added directory and double-click on "Handler Mappings"
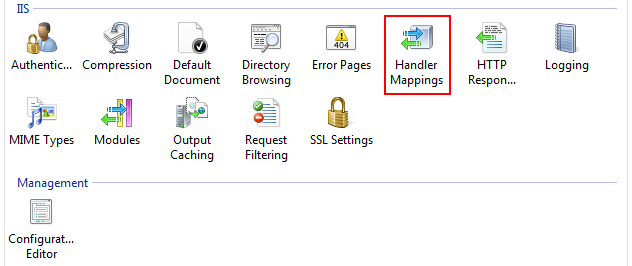
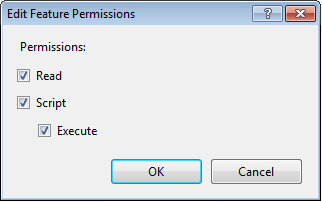
- Click on "Edit Feature Permissions" and select the "Execute" permission. Click on "OK".
- As a next step you need to create an ISAPI allowance. Please select the root node in IIS Manager (named after your computername) and then double-click "ISAPI and CGI Restrictions".
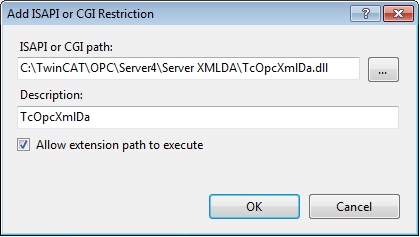
- Click on "Add" to create a new enabled extensions. In the "ISAPI or CGI path" textbox, please specify the path to TcOpcXmlDa.dll, which normally is "C:\TwinCAT\OPC'Server4\Server XMLDA\TcOpcXmlDa.dll". Also select the checkbox "Allow extension path to execute".
- Restart your system.
Please note: If you use Windows 7 64-bit, you need to explicitely enable 32-bit ISAPI-DLLs in IIS. In this case, please perform the following steps:
- Open "Internet Information Service (IIS) Manager" which can be found under "Control Panel\Administrative Tools\"
- Click on "Application Pools"
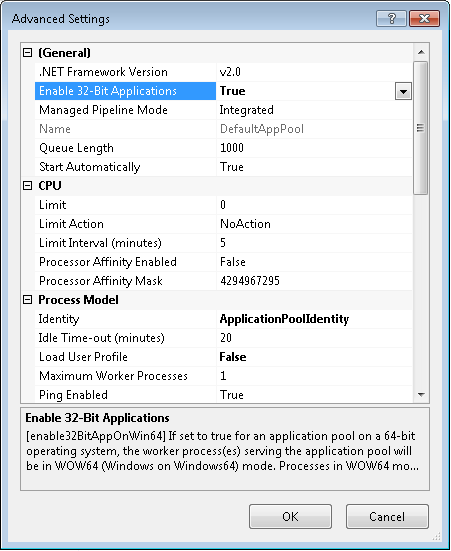
- Select the "DefaultAppPool" and click on "Advanced Settings..." from the Actions panel
- Set the entry "Enable 32-bit Applications" to "True", then click on "OK" to commit the changes
Step 3: Testing OPC-XML DA configuration
The URL of the OPC-XML DA Server on the PC system can be accessed locally or from a remote computer. In both cases, open the web browser (e.g. Internet explorer) and enter the URL of the OPC-XML DA Server, for example:
http://<ip-adress or name of PC device>/tcopcxmlda/tcopcxmlda.dll
Examples:
http://192.16.17.5/tcopcxmlda/tcopcxmlda.dll
http://localhost/tcopcxmlda/tcopcxmlda.dll
The OPC-XML DA Server will reply with a status page containing the product version. If you see this page, the installation and configuration of OPC-XML DA has been successful.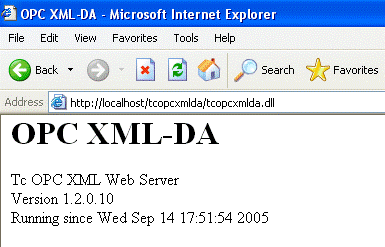
Please note:
In case of problems (like receiving no HTML status data) please check if your system uses a proxy server. After deactivating the proxy and reloading the URL, the OPC-XML DA Server should reply with the status info above.