Camming UI
The Camming UI tab is used to display and edit the selected cam plate.
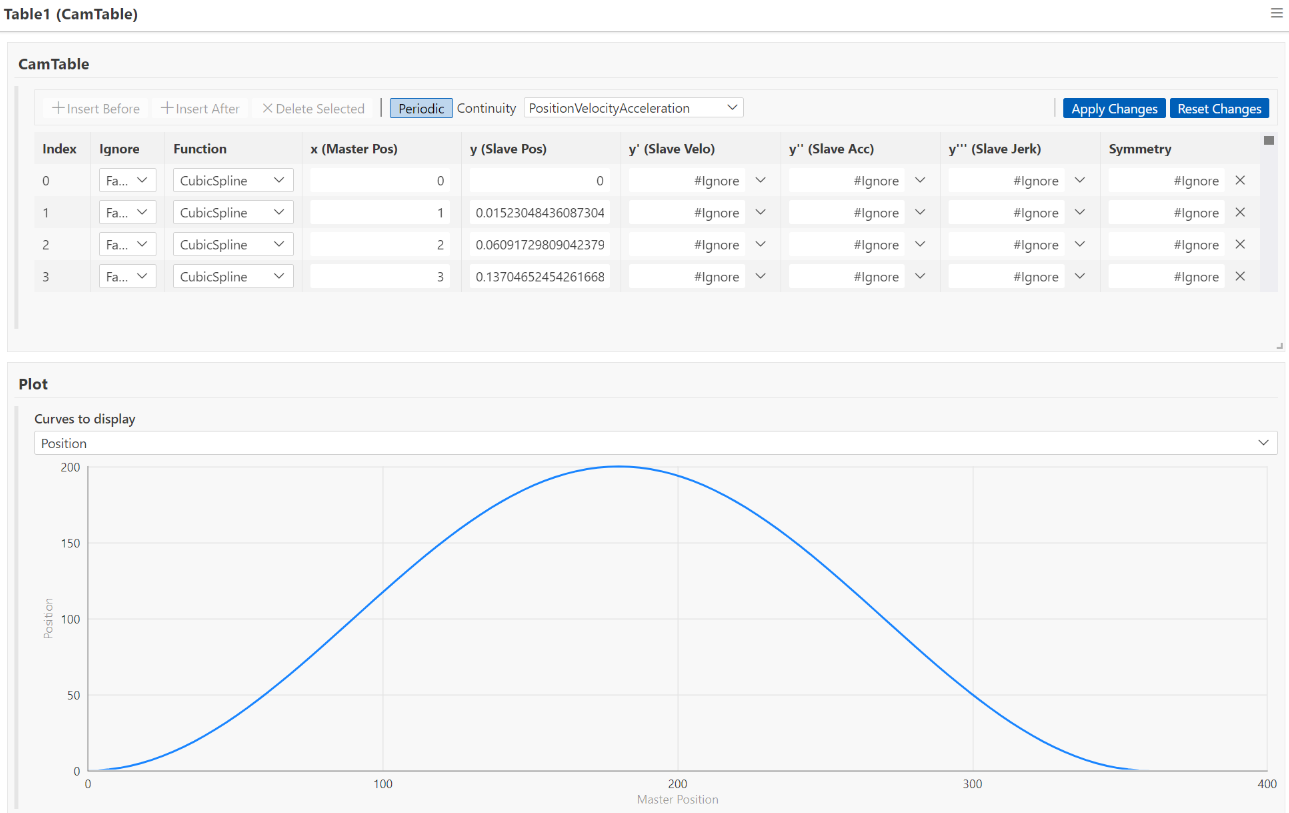
CamTable
The “CamTable” card contains the individual support points for the current cam plate. Changes can be made to the table, which are represented directly on the “Plot” card. Click Apply Changes to save the changes. Reset Changes, on the other hand, resets any unsaved changes to their original values. If the “Periodic” checkbox is selected, the cam plate is treated as a periodic table.
Plot
The “Plot” card displays a graphical representation of the current cam plate. In addition to the position, checkboxes can be used to display the velocity and acceleration curves. You can also use the “Show Original” checkbox to display the original curves for position, velocity, and acceleration. The original curves are the ones that are currently active. In contrast, the curves shown are the fitted curves, which have not yet been saved.
Menu 
You can open the menu in the upper-right corner.
The menu offers various actions and settings:
Selection | Description |
|---|---|
Reconnect | This reestablishes the connection between the UI and the object to be displayed and reloads the data. |
Settings | This opens the settings. |
Import | Opens the File Manager to import cam plates. |
Export | Opens options for exporting the cam plate. |
Save Layout | Saves the current UI layout. You must enter a custom name. The saved layout can only be used in the current project. |
Apply Layout | Applies an existing layout to the current view. The “default” layout is set by default. Additional layouts that have been saved using “Save Layout” are also available here. |
Layout Manager | Opens the Layout Manager. |
Reset Layout | Resets the UI so that the default layout is used again. |
Theme | You can choose from the following themes for the color scheme:
|
Layout Manager
The Layout Manager displays your saved layouts and offers additional options.
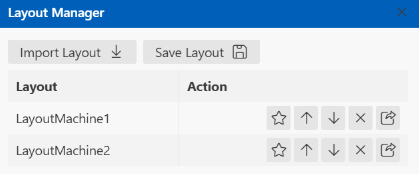
Selection | Description |
|---|---|
| Sets this layout as the default layout for future UIs of the same object type. For example, if the UI layout for an axis is marked with a star, the layout specified here will be used in the UI for every newly inserted axis object. This setting applies to the entire engineering system and is not limited to a single project. |
| Imports an existing layout into the project. |
| Saves the current UI layout within the project. Another window will open so you can enter a name. If an existing layout name is used, the existing layout will be overwritten. |
| Changes the order of your layouts. You can use the arrow keys to move a layout up or down in the list. |
| Deletes the corresponding custom layout. |
| Export the layout you created so that it can be used in other projects as well. Next, you must specify the storage location. |




Settings
Under “Settings”, you can configure various settings for the Camming UI. Clicking the Save button saves the settings you have configured within the project.
Common
Selection | Description |
|---|---|
Number Of Digits | Number of decimal places to display. |
XAR Interval [ms] | Specifies the interval at which data is read from the runtime environment. |
XAE Interval [ms] | Specifies the interval at which data is read from the engineering environment. |
Feedback Duration [s] | Sets the duration for which the feedback window (pop-up) is displayed. |
Severity of Feedback | Specifies from which level events are displayed in the feedback window. |
Error Code Format | Options: Hex, Decimal Specifies the format in which the error code is displayed (as a hexadecimal or decimal number). |
Show Full Name | If necessary, enlarges the axis name display so that it is shown in its entirety. |
Lock Layout | If selected, this prevents cards from being accidentally moved or resized. Everything continues to work as usual, only the layout is fixed. |
Polling State
The polling state displays data from the UI's last request to the Motion driver for diagnostic purposes.
Selection | Description |
|---|---|
Polling State | Idle / Polling / No Connection / Error |
Error message | Error message that appears if an error occurs in the communication between Motion UI and the driver. |
Last Fetch Duration | Total duration of the UI's most recent request to the motion driver. |
Last Bundled Response | Final response from the driver to the UI. |
Storage unit
Selection | Description |
|---|---|
Layouts and Inputs | Clicking Clear resets the layout to the default view and clears any entries made in the UI. |
Settings | Clicking Clear clears the settings you have configured for this interface. |
Notice | |
Clearing cannot be undone Export any layout you want to keep from the Layout Manager before clearing storage. Clearing cannot be undone. |