Quickstart
Create or download ONNX file
If you do not have your own ONNX to hand for an initial test, you can use the ONNX Model Zoo on GitHub for tests, for example. In the following, ResNet50 from the ONNX Model Zoo is used as an example.
Netron can be used to easily inspect whether the requirements for execution with the TwinCAT Machine Learning Server are met.
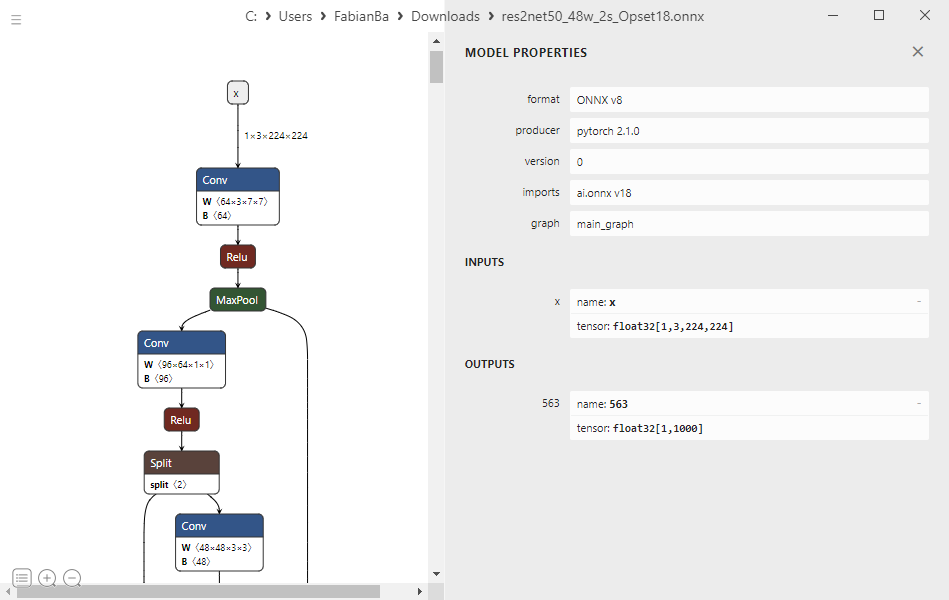
The Input Nodes are not dynamic and the ONNX Opset used is also supported.
Preparing ONNX file with TwinCAT Machine Learning Model Manager
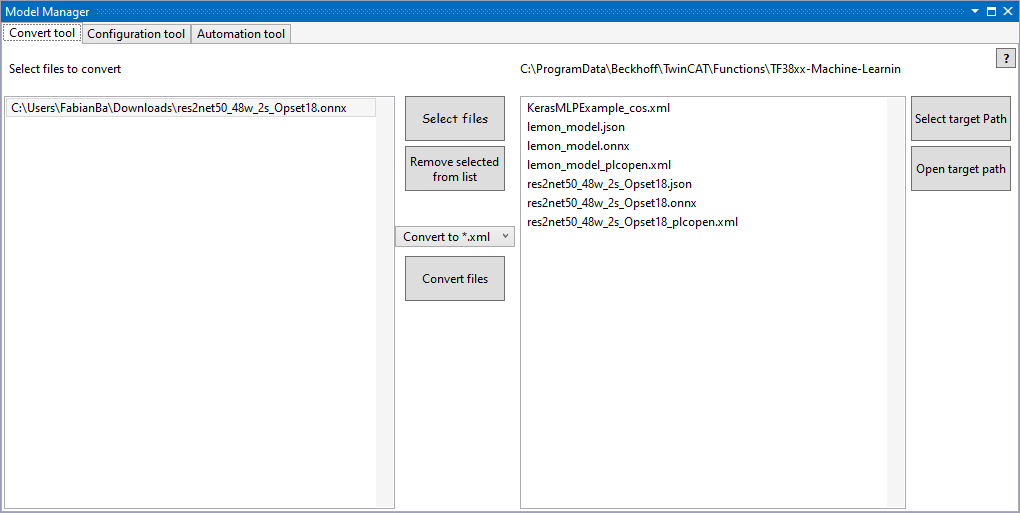
Open TwinCAT XAE and navigate to TwinCAT > Machine Learning > Machine Learning Model Manager.
Load the downloaded ONNX with "Select files" and then select "Convert files". The ONNX and the associated JSON and PlcOpenXml created are now displayed in the target path.
Select "Open target path" to open the File Explorer on this path.
Making files available on the target system
In this Quickstart, it is assumed that the TwinCAT Machine Learning Server is operated on the same device as the PLC. Accordingly, the model files (res2net50_48w_2s_Opset18.onnx and res2net50_48w_2s_Opset18.json) are stored on the target device under the path C:\models.
Further information on this step can be found here: Make model description files available on the Server Device.
Writing source code
It starts with an empty PLC project. First import the created res2net50_48w_2s_Opset18_plcopen.xml by right-clicking on the DUTs folder and selecting "Import PLCopenXML".
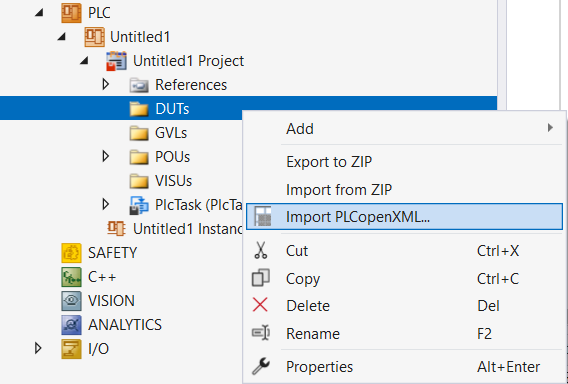
Also add the PLC library Tc3_MlServer under References.
In the minimal sample, the code consists of two steps. First, a session is created on the TwinCAT Machine Learning Server and then the inference of the loaded model is executed.
Declaration
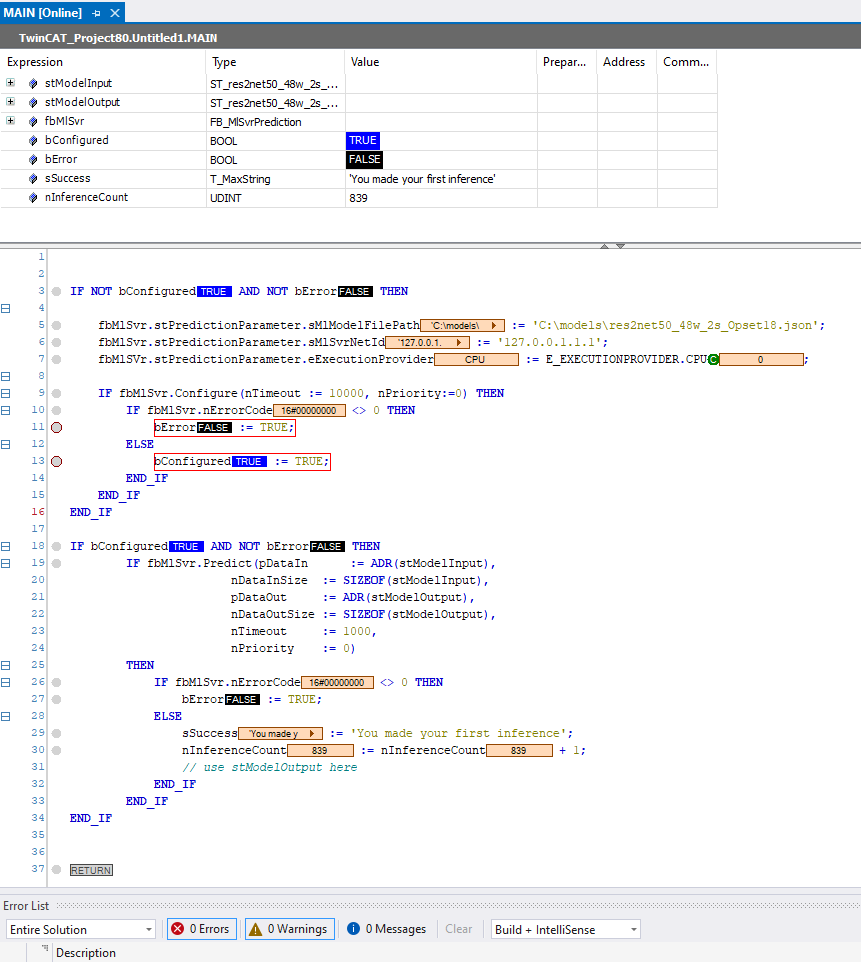
stModelInput : ST_res2net50_48w_2s_Opset18Input;
stModelOutput : ST_res2net50_48w_2s_Opset18Output;

fbMlSvr     : FB_MlSvrPrediction;
bConfigured : BOOL := FALSE;
bError      : BOOL := FALSE;

sSuccess        : T_MaxString;
nInferenceCount : UDINT := 0;
Code
IF NOT bConfigured AND NOT bError THEN

   fbMlSvr.stPredictionParameter.sMlModelFilePath := 'C:\models\res2net50_48w_2s_Opset18.json';
   fbMlSvr.stPredictionParameter.sMlSvrNetId := '127.0.0.1.1.1';
   fbMlSVr.stPredictionParameter.eExecutionProvider := E_ExecutionProvider.CPU;

   IF fbMlSvr.Configure(nTimeout := 10000, nPriority:=0) THEN
      IF fbMlSvr.nErrorCode <> 0 THEN
         bError := TRUE;
      ELSE
         bConfigured := TRUE;
      END_IF
   END_IF
END_IF

IF bConfigured AND NOT bError THEN
      IF fbMlSvr.Predict(
                  pDataIn      := ADR(stModelInput),
                  nDataInSize  := SIZEOF(stModelInput),
                  pDataOut     := ADR(stModelOutput),
                  nDataOutSize := SIZEOF(stModelOutput),
                  nTimeout     := 1000,
                  nPriority    := 0)
      THEN
         IF fbMlSvr.nErrorCode <> 0 THEN
            bError := TRUE;
         ELSE
            sSuccess := 'You made your first inference';
            nInferenceCount := nInferenceCount + 1;
            // use stModelOutput here
         END_IF
      END_IF
END_IF
Activating the configuration
Activate your configuration and start the PLC. The result is shown below. The counter value nInferenceCount increases and the variable sSuccess displays a success message.