Installation
System requirements
In the following, a distinction is made between the engineering PC and the runtime PC. The following definition applies: on the engineering PC, MATLAB® functions are converted to TwinCAT objects by using the Target for MATLAB®. Similarly, a TwinCAT solution can be created on this PC, which uses the created objects, but it does not have to be. The TwinCAT solution created is then loaded from the engineering PC onto a runtime PC in the TwinCAT runtime environment for project execution.
On the engineering PC
- MATLAB® R2019a or higher
- MATLAB® and MATLAB® Coder™ Toolbox
- Visual Studio 2017 or higher (Professional, Ultimate or equivalent edition)
- During installation, the option Desktop development with C++ must be selected manually. The option can also be installed later.
- TwinCAT 3.1.4024.7 or higher
- Install TwinCAT 3 XAE or Full Setup only after Visual Studio has been installed with Desktop development with C++.
- TwinCAT Tools for MATLAB® and Simulink® setup
On the runtime PC
- Supported operating systems
- Windows 11, Windows 10, Windows Server (32-bit and 64-bit)
- TwinCAT/BSD
- TwinCAT XAR version 3.1.4024.7 or higher
 | Built objects can be easily forwarded TwinCAT objects built on an engineering PC (or Build Server) can be easily forwarded to other people. They only need the TwinCAT XAE development environment in order to use the created objects (TcCOM or PLC function blocks) in a TwinCAT solution. |
Installation (TwinCAT 3.1 Build 4026)
The TE1401 | TwinCAT 3 Target for MATLAB® workload installs all dependencies required to create TwinCAT objects.
- Install one of the supported Visual Studio versions, if not already installed. Remember to install the Desktop development with C++ option.
- Install the TwinCAT Package Manager.
- Install the following workload via the TwinCAT Package Manager:
Command line: tcpkg install TE1401.TargetForMATLAB.XAE
- Execute Integration in Visual Studio that you have installed with the Desktop development with C++ option.
- Start MATLAB® as administrator and execute
C:\Program Files (x86)\Beckhoff\TwinCAT\Functions\TE14xx-ToolsForMatlabAndSimulink\SetupTE14xx.p in MATLAB®.
If you want to create a TwinCAT project and use TwinCAT objects that have already been built, install the following workloads:
- TwinCAT Standard
tcpkg install TwinCAT.Standard.XAE - TwinCAT Block Diagram Classic
tcpkg install TwinCAT.XAE.BlockDiagramClassic - In some cases you will also need the following packages:
tcpkg install TwinCAT.XAE.TMX.MatSimUtilities
Installation (TwinCAT 3.1 Build 4024)
- Install one of the supported Visual Studio versions, if not already installed. Remember to install the Desktop development with C++ option.
- 1. Start TwinCAT 3 XAE or Full Setup if these are not already installed.
If Visual Studio and TwinCAT are already installed, but the Visual Studio version does not meet the above requirements (e.g. TwinCAT XAE Shell or Visual Studio without C++ option), you will need to install a suitable version of Visual Studio version first (install the C++ option, if necessary). Then run TwinCAT 3 setup to integrate TwinCAT 3 into the new (or modified) Visual Studio version. - 2. If you have not yet installed MATLAB® on your system, install it. The order in which MATLAB® has been installed is irrelevant.
- 3. Start TwinCAT Tools for MATLAB® and Simulink® Setup to install the TE1401 TwinCAT Target for MATLAB®.
- The TwinCAT Target for MATLAB® is installed within the TwinCAT folder structure, i.e. it is separate from the MATLAB® installation.
- 4. Start MATLAB® as administrator and run
%TwinCAT3Dir%.. \Functions\TE14xx-ToolsForMatlabAndSimulink\SetupTE14xx.p in MATLAB®.
- A setup window opens. See the following section.
Setting up the software
Version SetupTE14xx.p
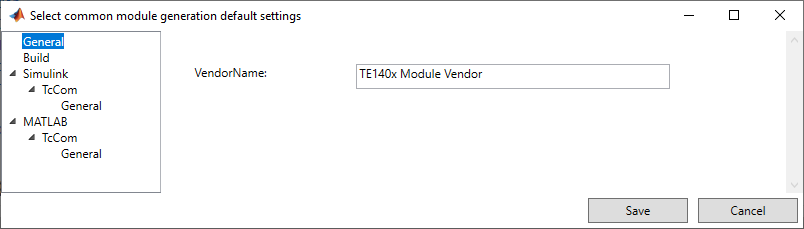
After executing the p-file, a dialog opens in which you can save general default settings that will then apply to the system. You can make the settings directly or make/change them at a later time.
If you want to execute the p-file without this dialog, you can use the following command: SetupTE140x('Silent', true);
Setting options in the dialog are:
VendorName, GroupName (MATLAB®) and GroupName (Simulink®)
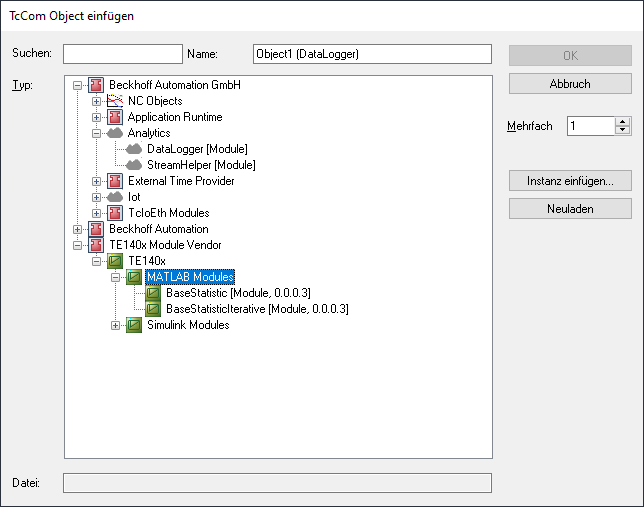
These settings influence the hierarchy in which the generated TwinCAT objects are sorted. See diagram below. Here the entries VendorName "TE140x Module Vendor" and GroupName "TE140x|MATLAB Modules" are for MATLAB® and "TE140x|Simulink Modules" for Simulink®.
To change the default settings, you can access the dialog with TwinCAT.ModuleGenerator.Settings.Edit in the MATLAB® Console. Here you are also offered additional entries that you can store as default.