Options
About TwinCAT PLC Control there can be of course only one viewpoint. In TwinCAT PLC Control, however, you can configure the view of the main window (and have more than one viewpoint). In addition you can make other settings. For this you have the command "Project" Options" at your disposal. The settings you make thereby are, unless determined otherwise, saved in the file "TwinCAT PLC Control.ini" and restored at the next TwinCAT PLC Control startup.
'Project' 'Options'
With this command the dialog box for setting options is opened. The options are divided into different categories. Choose the desired category on the left side of the dialog box by means of a mouse click or using the arrow keys and change the options on the right side.
You have at your disposal the following categories:
- Load & Save
- User information
- Editor
- Desktop
- Color
- Directories
- Log
- Build
- Passwords
- Sourcedownload
- Symbol configuration
- Database connection
- Macros
- TwinCAT
If the runtime system is a bus controller, then the TwinCAT category will be replaced by these options:
- Controller Settings
- Controller Advanced
Load & Save
If you choose this category, then you get the following dialog box:
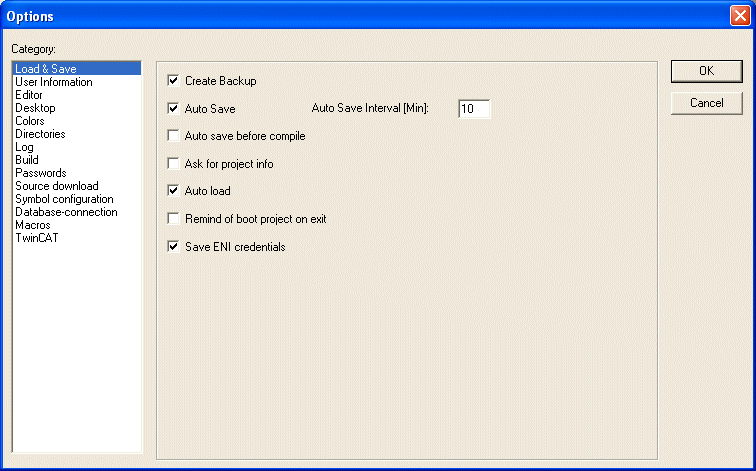
Option dialog box of the category Load & Save
Create Backup
When activating an option, a check appears before the option. If you choose the option Create Backup, then TwinCAT PLC Control creates a backup file at every save with the extension ".bak". In this way you can always restore the versions before the last save.
Auto Save
If you choose the option Auto Save, then while you work your project is constantly saved to a temporary file with the extension ".asd" according to a set time interval (Auto Save Interval). This file is erased at a normal exit from the program. If for any reason TwinCAT PLC Control is not shut down "normally" (e.g. due to a power failure), then the file is not erased.
When you open the file again the following message appears:
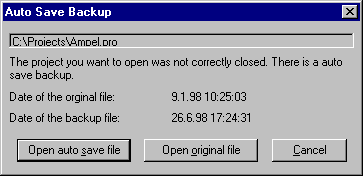
You can now decide whether you want to open the original file or the auto save file.
Auto Save before compile
The project is saved before each compilation.
Ask for project info
If you request the option Ask for project info, then when saving a new project, or saving a project under a new name, the project info is automatically called. You can visualize the project info with the command "Project" "Project info" and also process it.
Auto load
If you choose the option Auto Load, then at the next start of TwinCAT PLC Control the last open project is automatically loaded. The loading of a project at the start of TwinCAT PLC Control can also take place by entering the project in the command line.
Remind of boot project on exit:
If the project has been modified and downloaded without creating a new boot project since the last download of a boot project, then a dialog will advise the user before leaving the project: "No boot project created since last download. Exit anyway?"
Save ENI credentials:
User name and Password, as they might be inserted in the Login dialog for the ENI data base, will be saved with the project.
User Information
If you choose this category , then you get the following dialog box:
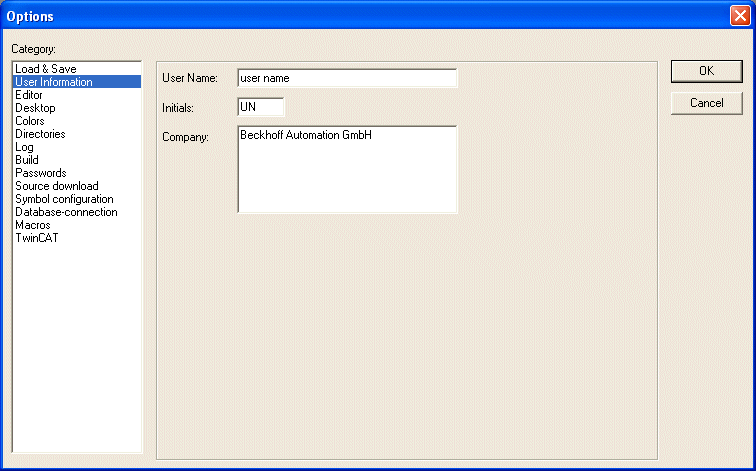
To User information belong the Name of the user, his Initials and the Company for which he works. Each of the entries can be modified and is saved with the project.
Editor
If you choose this category, then you get the following dialog box:
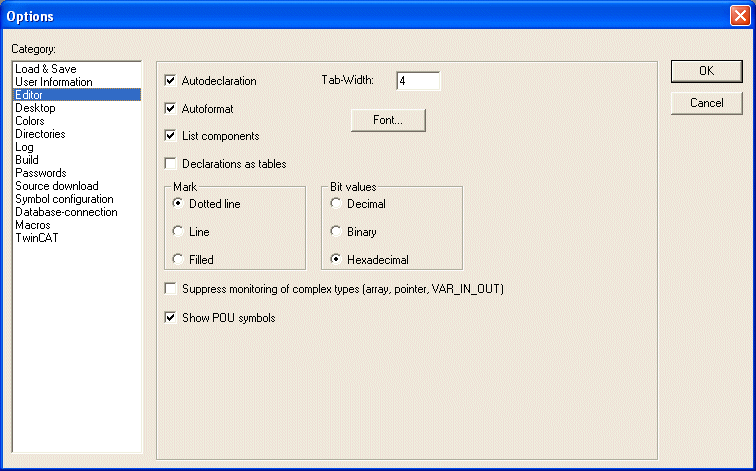
When activating an option, a check (ü) appears before the option. You can make the following settings for the Editors:
- Autodeclaration
- Autoformat
- List components
- Declaration as tables
- Tab width
- Font
- Display of the text selection (Mark)
- Display of the Bitvalues
- Suppress monitoring of complex types (array, pointer, VAR_IN_OUT)
- Show POU symbols
Autodeclaration
If you have chosen the Autodeclaration, then (following the input of a not-yet-declared variable) a dialog box will appear in all editors with which this variable can be declared.
Autoformat
If the option Autoformat in the category Editor of the options dialog box has been chosen, then TwinCAT PLC Control executes automatic formatting in the IL editor and in the declaration editor.
When you finish with a line, the following formatting is made:
- Operators written in small letters are shown in capitals;
- Tabs are inserted to that the columns are uniformly divided.
List components:
If this option is activated, then the Intellisense functionality will be available. This means that if you insert a dot at a position where an identifier should be inserted, then a selection list will open, offering all global variables which are found in the project. The Intellisense function is available in editors, in the Watch- and Receiptmanager and in the Sampling Trace.
Declarations as tables
If the option Declarations as tables in the Editor category in the Options dialog box is selected, then you can edit variables in a table instead of using the usual declaration editor. This table is arranged as a card-index box in which there are register cards for input, output, local, and input/output variables. For each variable you have available the fields Name, Address, Type, Initial, and Comment.
In the field Tab-Width in the category Editor of the Options dialog box you can determine the width of a tab as shown in the editors. The default setting is four characters, whereby the character width depends upon the font which is chosen.
Font
By clicking on the button Font in the category Editor of the Options dialog box you can choose the font in all TwinCAT PLC Control editors. The font size is the basic unit for all drawing operations. The choice of a larger font size thus enlarges the printout, even with each editor of TwinCAT PLC Control.
After you have entered the command, the font dialog box opens for choosing the font, style and font size:
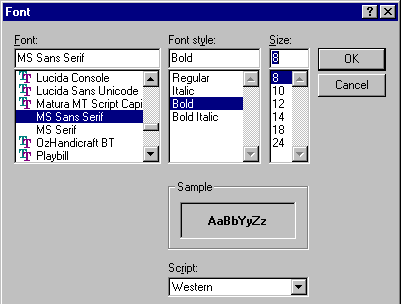
Dialog box for setting the font
Mark:
You can choose whether the current selection in your graphic editors should be represented by a dotted rectangle (Dotted), a rectangle with continuous lines (Line) or by a filled-in rectangle (Filled). The selection is activated in front of which a point appears.
Bitvalues:
You can choose whether binary data (type BYTE, WORD, DWORD) during monitoring should be shown Decimal, Hexadecimal, or Binary. The selection is activated in front of which a point appears.
Suppress monitoring of complex types (array,pPointer, VAR_IN_OUT):
If this option is activated, then complex data types like arrays, pointer, VAR_IN_OUTs will not be displayed in the monitoring window in online mode.
Show POU symbols:
If this option is activated, then symbols will be displayed in POU boxes, provided that those are available as bitmaps in the library folder. The name of the bitmap file must be composed of the POU name and the extension ".bmp". Example: The symbol file for POU TON must be named TON.bmp:
Desktop
If you choose this category, then you get the following dialog box:
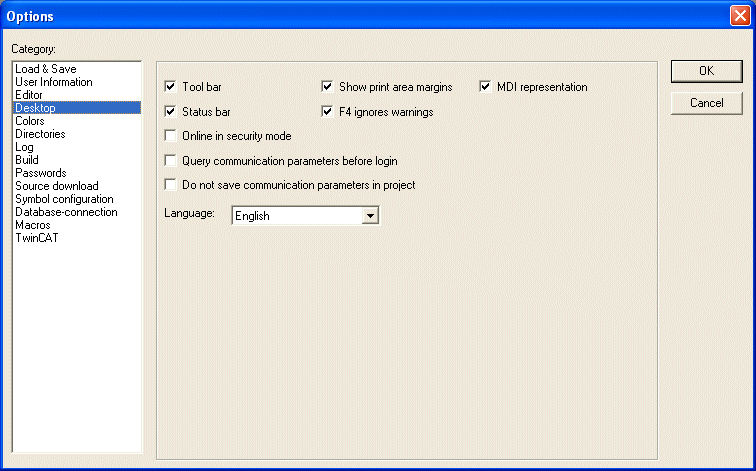
Options dialog box of the category Desktop
Tool bar
If the option tool bar has been chosen, then the tool bar with the buttons for faster selection of menu commands becomes visible underneath the menu bar.
Status bar
If the option status bar has been chosen, then the status bar at the lower edge of the TwinCAT PLC Control main window becomes visible.
Online in security mode
In Online mode with the commands 'Run', 'Stop', 'Reset' 'Toggle Breakpoint', 'Single cycle', 'Write values', 'Force values' and 'Release force', a dialog box appears with the confirmation request whether the command should really be executed.
Query communication parameters before login
As soon as the command 'Online' 'Login' is executed, first the communication parameters dialog will open. To get in online mode you must first close this dialog with OK.
Do not save communication parameters in project
The settings of the communication parameters dialog ('Online' 'Communication Parameters') will not be saved with the project.
Show print area margins
In every editor window, the limits of the currently set print range are marked with red dashed lines. Their size depends on the printer characteristics (paper size, orientation) and on the size of the “Content” field of the set print layout (menu: 'File” “Documentation Settings”).
F4 ignores warnings
After compilation, when F4 is pressed in a message window, the focus jumps only to lines with error messages; warning messages are ignored.
MDI representation
Per default this option (Multiple-Document-Interface) is activated and thus several windows can be opened at the same time. If the option is deactivated (SDI mode) only one window can be opened and will be displayed in full screen mode.
Exception: The action of a program and the program itself can be displayed side by side even in MDI mode.
Language
Define here, in which language the menu and dialog texts should be displayed.
Colors
If you choose this category, then you get the following dialog box:
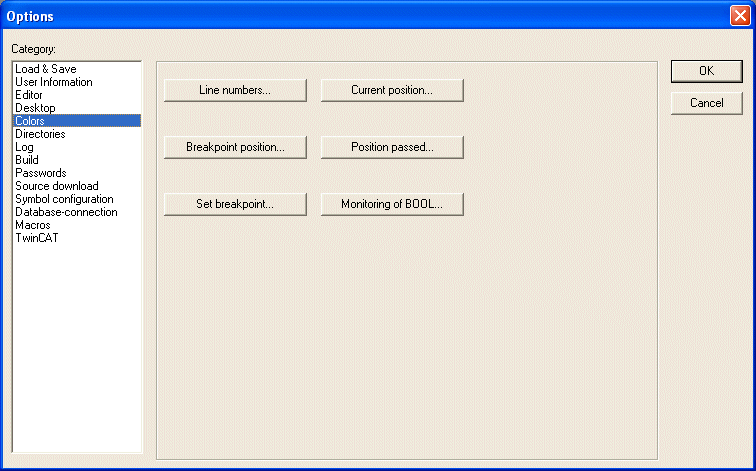
Options dialog box of the category Color
You can edit the default color setting of TwinCAT PLC Control. You can choose whether you want to change the color settings for Line numbers (default setting: light gray), for Breakpoint positions (dark gray), for a Set breakpoint (light blue), for the Current position (red), for the Position passed (green) or for the Monitoring of Boolean values (blue). If you have chosen one of the indicated buttons, the dialog box for the input of colors opens.
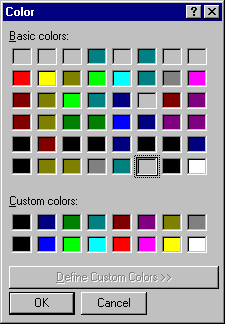
Dialog box for setting colors
Directories
If you choose this category, then you get the following dialog box:
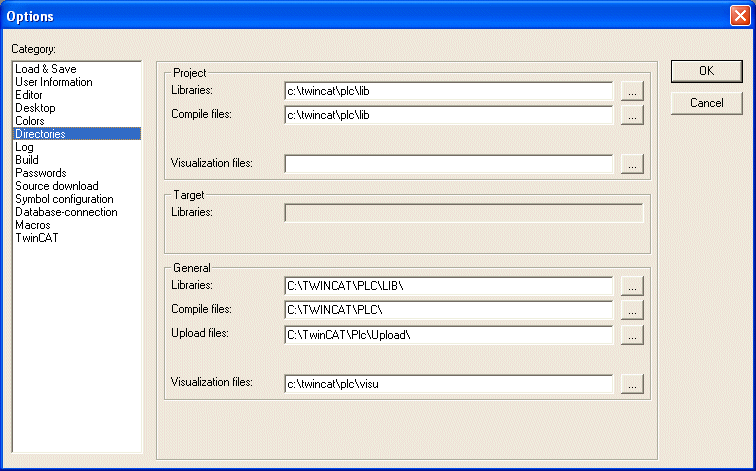
Directories can be entered in the Project and General areas for TwinCAT PLC Control to use in searching for libraries and Visualization files, as well as for storing compile and source-upload files. If you activate the button (...) behind a field, the directory selection dialog opens. For library files, several paths can be entered for each, separated by semicolons “;”.
 | Library paths can be entered relative to the current project directory, by using a prefixed ".". |
The information in the Project area is stored with the project; information in the General area is written to the ini file of the programming system and thus apply to all projects.
The Target area just displays the directories for libraries in the Target file. These fields cannot be edited, but an entry can be selected and copied (right mouse button context menu).
TwinCAT PLC Control generally searches first in the directories entered in 'Project', then in those in 'Target System' (defined in the Target file), and finally those listed under 'General'. If two files with the same name are found, the one in the directory that is searched first will be used.
Log
If you choose this category, then you get the following dialog box:
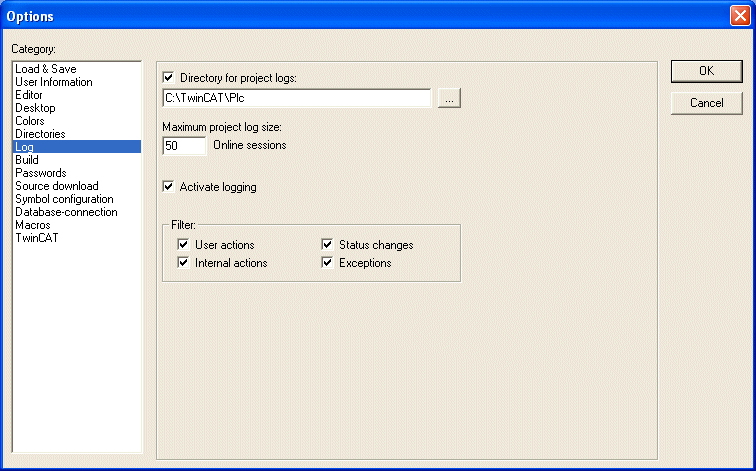
In this dialog, you can configure a file that acts as a project log, recording all user actions and internal processes during Online mode processing.
If an existing project is opened for which no log has yet been generated, a dialog box opens which calls attention to the fact that a log is now being set up that will receive its first input after the next login process.
The log is automatically stored as a binary file in the project directory when the project is saved.
If you prefer a different target directory, you can activate the option Directory for project logs: and enter the appropriate path in the edit field. Use the button to access the “Select Directory” dialog for this purpose.
The log file is automatically assigned the name of the project with the extension .log. The maximumnumber of Online sessions to be recorded is determined by Maximum project log size. If this number is exceeded while recording, the oldest entry is deleted to make room for the newest.
The Log function can be switched on or off in the Option field Activate logging. You can select in the Filter area which actions are to be recorded: User actions, Internal actions, Status changes, Exceptions. Only actions belonging to categories checked here will appear in the Log window and be written to the Log file.
Build
If you choose this category, then you get the following dialog box:
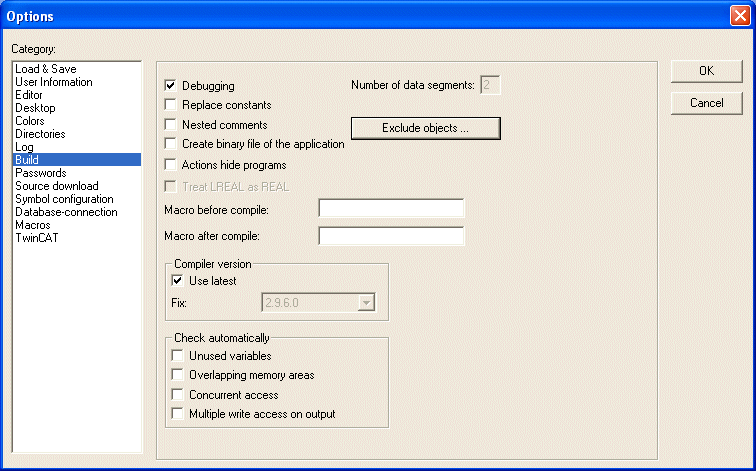
Options dialog box of the category Build
| The Selecting and Deselecting of the options debugging and online changes has no effects in TwinCAT for the PC at the moment. These settings can be made under TwinCAT options! With TwinCAT for Bus Terminal Controller this setting causes that no more breakpoints are possible. In exchange more program memory is available. |
When the Replace constants option is selected, the value of each constant is loaded directly, and in Online mode the constants are displayed in green. Forcing, writing and monitoring of a constant then is no longer possible. If the option is deactivated, the value is loaded into a storage location via variable access (this does in fact allow writing the variable value, but implies longer processing time).
If the Nested comments option is active, comments can be placed within other comments.
Example:
(*
a:=inst.out; (* to be checked *)
b:=b+1;
*)
Here, the comment that begins with the first bracket is not closed by the bracket following “checked,” but only by the last bracket.
Create binary file of the application
If the option Create binary file of the application is activated, a binary image of the generated code (boot project) is created in the project directory during compilation. File name: <project_name>.bin. By comparison, the command 'Online' 'Create Boot project' sets up the boot project on the controller. When an option is activated, a check appears next to the option.
Actions hide programs
This option is activated per default, when a new project is created. It means: If a local action has the same name like a global variable or a program, the following hierarchy is valid: local variable before local action before global variable before program.
| If a project is opened that was created with an earlier TwinCAT PLC Control version, the option is disabled by default. Thus, the previous ranking (local variable before global variable before program before local action) valid at creation is maintained. |
Treat LREAL as REAL:
If this option is enabled (default: not enabled), LREAL values will be treated as REAL values when compiling the project. This can be used to develop projects in a platform-independent way.
Data segments:
By specifying the number of data segments, you can define how many memory segments in the controller should be reserved for the data of your project. This place is necessary so that an online change can also be performed when new variables have been added. If during compilation you get the message "The global variables need too much memory, increase the number entered here. This setting is only relevant for the BCxxxx Bus Controller. In TwinCAT for the PC the number of data segments is constant. However, the size can be set under the TwinCAT options.
Exclude objects:
This button leads to the Exclude objects from build dialog:
Here, select the project function blocks in the displayed tree that are not to be regarded during a compilation run and activate the 'Do not build' option. The excluded function blocks are then displayed in green in the tree. To automatically exclude all function blocks that are not used in the program, press the 'Exclude unused' button.
Macro:
To influence the compiling process, two macros can be specified: the macro in the Macro before compile field is executed before the compilation, the macro in the Macro after compile field is executed after. However, the following macro commands cannot be executed here: file new, file open, file close, file saveas, file quit, online, project compile, project check, project build, debug, watchlist
All settings specified in the Build dialog are saved with the project.
Compiler version:
The compiler version to be used for the translation process can be defined here. In TwinCAT PLC Control versions after V2.9, both the current and the previous compiler versions (for each version / each service pack / each patch) going back to V2.9 are available. If you want a project to be always compiled with the latest compiler version, activate the 'Use latest' option. If you want the project to be automatically compiled with a specific version, set it via the selection field at 'Fix'.
Check automatically:
To check semantic correctness during each compilation of the project, the following options can be enabled:
- Unused variables
- Overlapping memory areas
- Concurrent access
- Multiple write access on output
The results are displayed in the message window. These checks can also be specifically triggered via the 'Check' command menu in the 'Project' menu
All entries in the Build Options dialog are stored with the project.
Passwords:
If you choose this category, then you get the following dialog box:
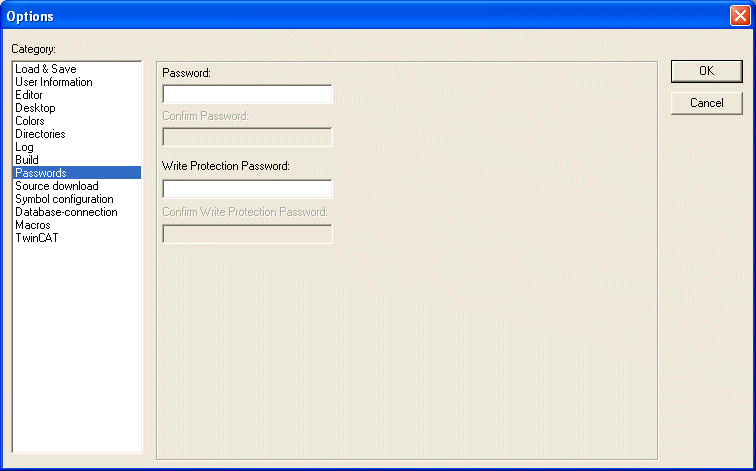
Options dialog box of the category Passwords
To protect your files from unauthorized access TwinCAT PLC Control offers the option of using a password to protect against your files being opened or changed.
Enter the desired password in the field Password. For each typed character an asterisk (*) appears in the field. You must repeat the same word in the field Confirm Password. Close the dialog box with OK. If you get the message:"The password does not agree with the confirmation", then you made a typing error during one of the two entries. In this case repeat both entries until the dialog box closes without a message. If you now save the file and then reopen it, then you get a dialog box in which you are requested to enter the password. The project can then only be opened if you enter the correct password. Otherwise TwinCAT PLC Control reports: "The password is not correct."
Along with the opening of the file, you can also use a password to protect against the file being changed. For this you must enter a password in the field Write Protection Password and confirm this entry in the field underneath. A write-protected project can be opened without a password. For this simply press the button Cancel, if TwinCAT PLC Control tells you to enter the write-protection password when opening a file. Now you can compile the project, load it into the PLC, simulate, etc., but you cannot change it.
Of course it is important that you memorize both passwords. The passwords are saved with the project. In order to create differentiated access rights you can define user groups ("Project" "Object access rights" and "Passwords for user groups").
Source download
If you choose this category, then you get the following dialog box:
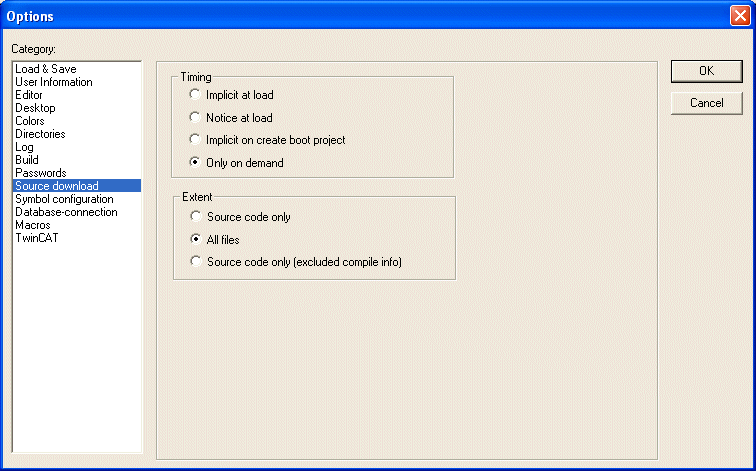
You can choose to which Timing and what Extent the project is loaded into the controller system.
Extent:
- The option Source code only exclusively involves just the project file (extension .pro).
- The option All files also includes files such as the associated library files, visualization bitmaps, configuration files, etc.
- The option Source code only (excluded compile info) involves like above the pure Source code, but without Compile info. Thus this function is a pure source filling. An Online change after the source upload from the PLC is not possible.
This option is interesting for the BX platform, because of the less data range.
Timing:
Using the option Implicit at load allows the selected file range to be automatically loaded into the controller system on the command ‘Online‘ ‘Download'.
Using the option Notice at load offers a dialog, when the command ‘Online‘ ‘Download' is given, with the question ”Do you want to write the source code into the controller system?”. Pressing ‘Yes’ will automatically load the selected range of files into the controller system, or you can alternatively finish with ‘No’.
Using the option Implicit on create boot project allows the selected file range to be automatically loaded into the controller system on the command 'Online' 'Create boot project'.
When using the option Only on demand the selected range of files must be expressly loaded into the controller system by giving the command ‘Online‘ ‘Sourcecode download'.
The project which is stored in the controller system can be retrieved by using ‘File‘ ‘Open' with Open project from PLC. The files will be unpacked in the process. See Chapter 'File' 'Open' for details!
Symbol configuration
This form of symbol management exists only because of compatibility reasons und should only be used for the TwinCAT OPC Server. For all other cases exists a (at each compile) new created XML file with the name <projectname>.tpy
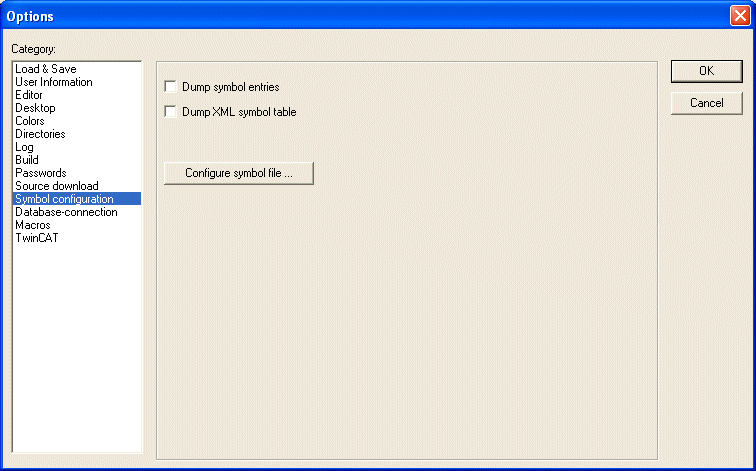
The dialog presented here is used for configuring the symbol file. This will be created as a text file <project name>.sym resp. a binary file <project name>.sdb in the project directory.
If the option Dump symbol entries is selected, then symbol entries for the project variables will be automatically created in a symbol file the file at each compilation of the project.
If additionally the option Dump XML symbol table is activated, then also an XML file containing the symbol information will be created in the project directory. It will be named <project name>.SYM_XML.
If you chose Configure symbol file, the following dialog opens:
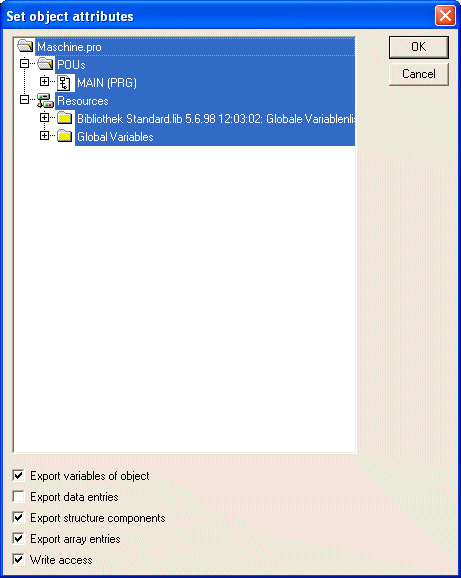
Use the tree-structured selection editor to mark the variables which should be entered in the symbol file. For this purpose you can select a POUs entry (e.g. Global Variables) which automatically will mark all variables belonging to this POU, or you can select single variables which you find listed for each POU in the tree. Then set the desired options in the lower part of the dialog box by clicking the mouse on the corresponding small boxes. Activated options are checked. The following options can be set:
Export variables of object: The variables of the selected object are exported in the symbol file.
The following options can take effect only if the Export variables of object option is activated:
Export data entries: Entries for access to the global variables are created for object's structures and arrays.
Export structure components: An individual entry is created for each variable component of object's structures.
Export array entries: An individual entry is created for each variable component of object's arrays.
Write Access: Object's variables may be changed by the OPC server.
Once the option settings for the currently selected POU are complete, other POUs can be also be selected and can be given an option configuration. This can be carried out for any desired number of POU selections, one after the other. When the dialog box is closed by selecting OK, all configurations carried out since the dialog box was opened are applied.
Database Connection
This dialog is used to define whether the project should be managed in a project data base and to configure the ENI interface correspondingly.
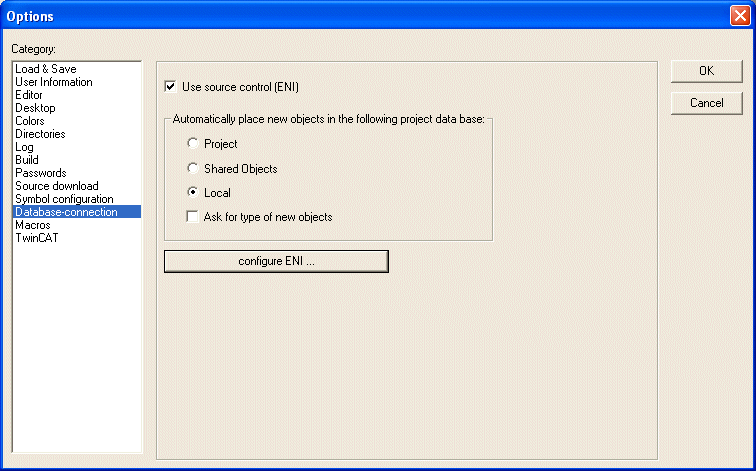
Use source control (ENI): Activate this option, if you want to access a project data base via the ENI Server in order to administer all or a selection of POUs of the project in this data base.
Preconditions: ENI Server and data base must be installed and you must be registered as an user in the database.
If the option is activated, then the data base functions (Check in, Get last version etc.) will be available for handling the project POUs. Then some of the data base functions will run automatically like defined in the options dialogs, and in the menu 'Project' 'Data Base Link' you will find the commands for calling the functions explicitly. Besides that a tab 'Data base-connection' will be added in the dialog Properties, where you can assign a POU to a particular data base category.
Connect new Objects with the following data base:
Here you set a default: If a new object is inserted in the project ('Project' 'Object' 'Add'), then it will automatically get assigned to that object category which is defined here. This assignment will be displayed in the object properties dialog ('Project' 'Object' 'Properties') and can be modified there later. The possible assignments:
Project: The POU will be stored in that data base folder which is defined in the dialog ENI configuration/Project objects in the field 'Project name'.
Shared Objects: The POU will be stored in that data base folder which is defined in the dialog ENI configuration/Shared objects in the field 'Project name'.
Local: The POU will not be managed in a ENI data base, but only will be stored locally in the project.
Besides 'Project objects' and 'Shared objects' there is a third data base category 'Compile files' for such objects which are not created until the project has been compiled. Therefore this category is not relevant for the current settings.
Ask for type of new objects: If this option is activated, then whenever a new object is added to the project, the dialog 'Object' 'Properties' will open, where you can choose to which of the three object categories mentioned above the POU should be assigned. By doing so the standard setting can be overwritten.
configure ENI: This button opens the first of three ENI configuration dialogs:
Each object of a project, which is determined to get managed in the ENI data base, can be assigned to one of the following data base categories: 'Project objects', 'Shared objects' or 'Compile files'. For each of these categories a separate dialog is available to define in which data base folder it should be stored and which presettings should be effective for certain data base functions:
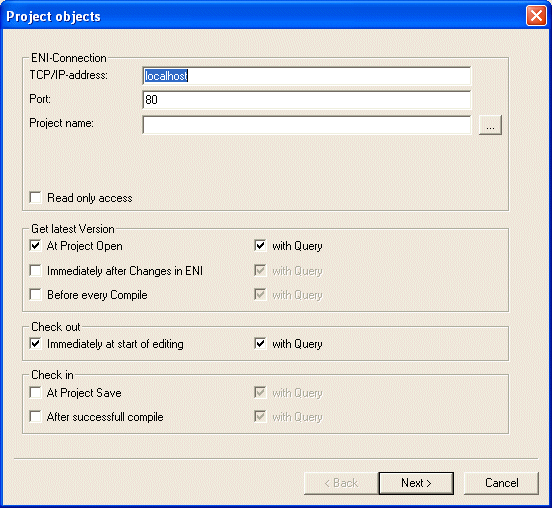
Dialog ENI configuration / Project objects
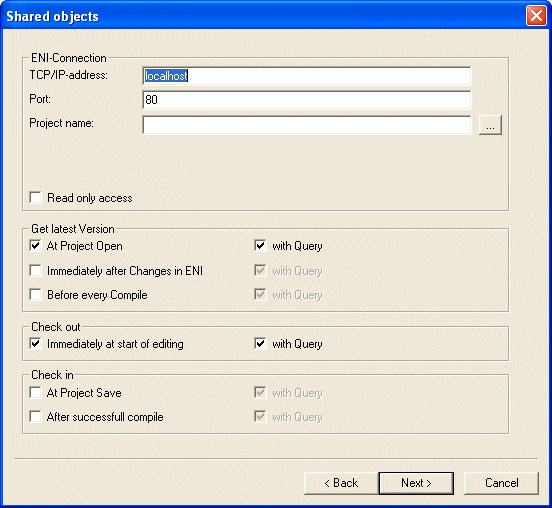
Dialog ENI configuration / Shared objects
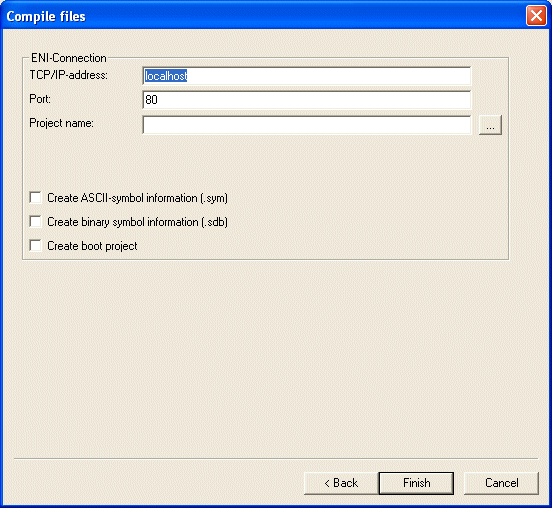
Dialog ENI configuration / Compile files
Each object will be stored also locally (with project) in any case.
The dialog will open one after the other if you are doing a primary configuration. In this case a Wizard (Button Next) will guide you and the settings entered in the first dialog will be automatically copied to the other ones, so that you just have to modify them if you need different parameter values.
If you want to modify an existing configuration, then the three dialogs are combined in one window (three tabs).
If you have not yet logged in successfully to the data base before, then the Login dialog will be opened automatically.
Options for project objects and shared objects regarding the project data base
These dialogs are part of the configuration of the project data base options ('Project' 'Options' 'Project source control'). Here you define the access parameters for the data base categories 'Project objects' und 'Shared objects'. All dialogs contain the same input items.
ENI-Connection
TCP/IP-Address: Address of the computer where the ENI-Server is running
Port: Default: 80; must be the same as set in the configuration parameters of the ENI Server
Project name: Name of the data base folder where the objects of this category should be stored. Press button ... to open a folder tree of the already existing data base projects. If the desired folder already exists, you can select it in this tree and its name will be entered in the 'Project name' edit field. If you had not logged in to the ENI Server until you try to open the folder tree by button ..., then you will first get the Login dialog where you must enter 'User name' and 'Password' as defined in your ENI user account to get access to the three data base categories.
Read only If this option is activated, then only read access is possible to the above defined data base folder.
Options for project objects, shared objects:
Get latest Version:
The data base function 'Get latest Version' (Menu 'Project' 'Data Base Link') copies the latest version of POUs from the above defined data base folder to the currently opened project, whereby the local version of objects will be overwritten. This will be done automatically for all objects, for which the version found in the data base differs from that in the project, as soon as one of the set timing conditions will meet. Activate the desired time options by setting a check mark:
At Project Open: As soon as the project is opened in TwinCAT PLC Control.
Immediately after Changes in ENI: As soon as a newer version of the POU is checked in to the data base (e.g. by another user); then the POU will be updated in the current project immediately and an appropriate message will pop up.
Before any Compile: Before any compile process in TwinCAT PLC Control.
Check out:
The data base function 'Check out' means that the POU will be marked as 'in the works' and will be locked for other users until it will be de-blocked again by a 'Check in' or 'Undo check out' command.
If the option Immediately at start of editing is activated, then an object will be checked out automatically as soon as you start to edit it. If the object is currently already checked out by another user (indicated by a red cross before the object name in the TwinCAT PLC Control. object organizer), then a message will pop up.
Check in:
The data base function 'Check in' means, that a new version of the object will be created in the data base. The older versions will be kept anyway.
You can activate one or both of the following options to define the time of automatic Checking in:
At Project Save: as soon as the project is saved
After successfull compile: as soon as the project has been compiled without errors
For each of the options 'Get last version', 'Check out' and 'Check in' additionally the option with Query can be activated. In this case, before the corresponding action is carried out, a dialog opens where you still can decide to cancel the action or otherwise confirm it.
Only for dialog compile file:
|
|
|---|---|
Create ASCII-symbol information (.sym) Create Binary-symbol information (.sdb) | If this option is activated, then whenever a symbol file *.sym (text format) resp. *.sdb (binary format) will be created, this file will be written to the data base automatically. The entries in the symbol file are created like defined in the Project options category 'Symbol configuration'. |
Create boot project | If this option is activated, then whenever a boot project will be created, this file will be written to the data base automatically . |
Cancel will close the dialog without saving the done modifications in the currently opened dialog (the settings made in the previous dialogs will be kept anyway). You return to the main dialog 'Options' 'Project source control'.
Macros
If you choose this category, then you get the following dialog box:
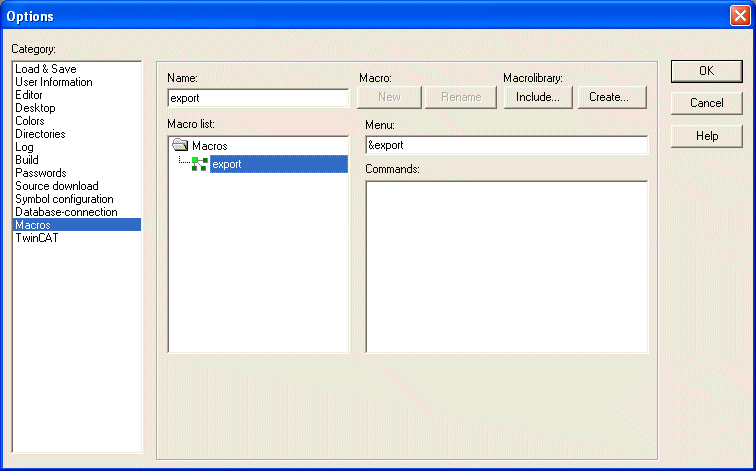
In this dialog, macros can be defined using the commands of the batch mechanism, which can then be called up in the 'Edit' 'Macros' menu.
Perform the following steps to define a new macro:
1. In the input field Name, you enter a name for the macro to be created. After the New button is pressed, this name is transferred into the Macrolist field and marked as selected there. The macro list is represented in a tree structure. The locally defined macros are positioned one below the other. If macro libraries (see below) are integrated, then the library names will be listed and by a mouse-click on the plus- resp. minus-signs in front of those entries you can open or close a list of the library elements.
2. The Menu field is used to define the menu entry with which the macro will appear in the 'Edit' 'Macros' menu. In order to be able to use a single letter as a short-cut, the letter must be preceded by the symbol '&'. Example: the name "Ma&cro 1" generates the menu entry "Macro 1". Example: the name "Ma&cro 1" will create a menu item "Macro 1".
3.In the editor field Commands you define and/or edit the commands that are to constitute the newly created or selected macro. All the commands of the batch mechanism and all keywords which are valid for those are allowed. You can obtain a list by pressing the Help button. A new command line is started by pressing <Ctrl><Enter>. The context menu with the common text editor functions is obtained by pressing the right mouse button. Command components that belong together can be grouped using quotation marks.
4. If you want to create further macros, perform steps 1-3 again, before you close the dialog by pressing the OK-button.
If you want to delete a macro, select it in the macro list and press button <Del>.
If you want to rename a macro, select it in the macro list, insert a new name in the edit field 'Name' and then press button Rename.
To edit an existing macro, select it in the macro list and edit the fields 'Menu' and/or 'Commands'. The modifications will be saved when pressing the OK-button.
As soon as the dialog is closed by pressing the OK-button the actual description of all macros will be saved in the project.
The macro menu entries in the 'Edit' 'Macros' menu are displayed in the order in which they were defined. The macros are not tested until a menu selection is made.
Macro libraries
Macros can be saved in external macro libraries. These libraries can be included in other projects.
· Creating a macro library containing the macros of the currently opened project:
Press button Create. You get the dialog 'Merge project', where all available macros are listed. Select the desired entries and confirm with OK. The selection dialog will close and dialog 'Save Macrolibrary' will open. Insert here a name and path for the new library and press button Save. The library will be created named as <library name>.mac and the dialog will be closed.
· Including a macro library <library name>.mac in the currently opened project:
Press button Include. The dialog 'Open Macrolibrary' will open, which shows files with extension *.mac. Select the desired library and press button Open. The dialog will be closed and the library will be added to the tree of the Macrolist.
| The macros of a project also can be exported ('Project' 'Export'). |
TwinCAT
If you choose this category, then you get the following dialog box:
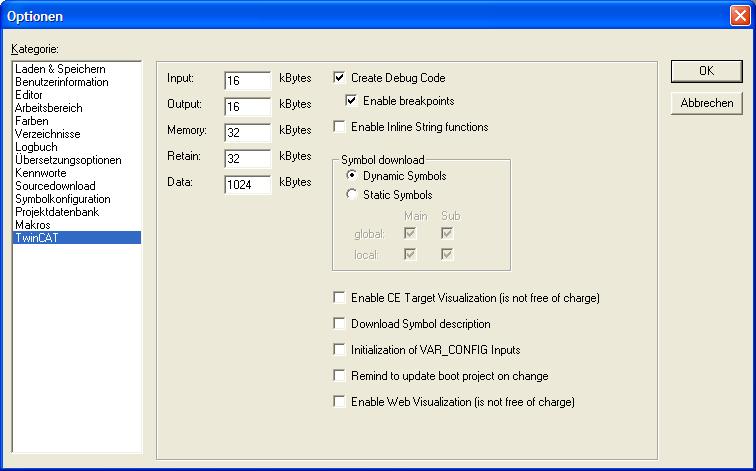
Options dialog box of the category TwinCAT
This menu can be used to set the size of the addressable memory for all input, output and flag variables. Any non-allocated variables are located outside this memory area. The checkbox on the right can be used to decide whether to allow break points or not. If variables from the PLC are to be read by name by a visualization system, all required variable names must be known in the runtime system of the PLC.
Enable Inline String functions:
String functions are not "thread safe": When using tasks, string functions may only be used in a single task. If the same function is used in different tasks, there is a danger of overwriting.
By selecting this functionality the behaviour is changed and the compiler dissolves these string functions directly in the PLC code.
Symbol download:
The use of dynamic symbols is generally recommended. With this type of symbol management, a request for a certain symbol causes the symbol to be assembled dynamically in the runtime system. The advantages are reduced memory requirement compared with static symbol management and shorter compile and download times. The number of handles is limited to 8192. Handles that are not required have to be released again.
If static symbol management is to be used for compatibility reasons, the amount of the variables stored in the runtime system of the PLC can be specified in this menu. Local and global management of variable names can be specified in the rows of a matrix. "Main" only generates structure or field names. "Sub" also generates the variable names for all structure or field components.
Sample:
abc : ARRAY[1..2] OF BOOL;
If you select only Main you get symbols only for 'abc'. If you select Sub you get also symbols for the components 'abc[1]' and 'abc[2]'.
Enable CE Target Visualization:
If this option is selected, the Target-Visualization is active. The library SysLibTargetVisu.lib is included automatically in the library management.
Download symbol description:
If this option is selected, the symbol description is downloaded to the target system. The .tpy file describes the PLC project and is e.g. the input of TwinCAT System Manager or TwinCAT OPC. The file is stored in the boot directory and is named accordingly to the run time system CurrentPlc_1.tpy ... CurrentPlc_4.tpy.
Initialization of VAR_CONFIG inputs:
If this option is active, the input variables VAR_CONFIG are initialised with their initialization values. If the variables VAR_CONFIG are not linked, it is shown via the PLC diagnosis blocks.
| The init value remains exist also if the VAR_CONFIG variables are not linked. |
Remind to update boot project on change:
If this option is activated, you are asked at every download of your PLC project, whether a new boot project shall be produced directly.
Enable Web Visualization:
If this option is selected, the Web-Visualization is active.
Controller Settings
This category will only appear if the runtime system is a bus controller (BCxxxx BXxxxx).
If you choose this category, then you get the following dialog box:
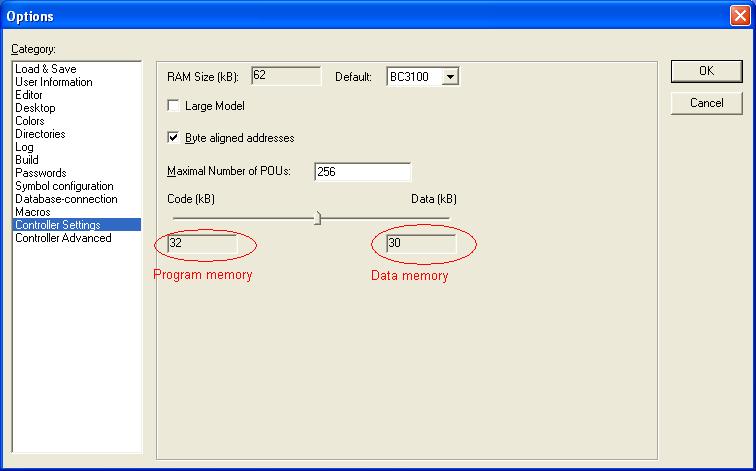
The settings for the program memory and the data memory are adjustable here:
- The data memory can be increased by pushing the slider to the left. The adjusted data memory is shown in the right data field.
- The program memory can be increased by pushing the slider to the right. The adjusted program memory is shown in the left data field
- It is possible to increase the program or the data memory generally, by activating the option "Large Model"