Creating and handling C++ projects and modules
This chapter explains in-depth how to create, access and handle TwinCAT C++ projects. The following list shows all chapters in this article:
- General information about C++ projects
- Creating new C++ projects
- Creating new module within a C++ project
- Opening existing C++ projects
- Creating module instances
- Calling TMC Code Generator
- Calling Publish Modules command
- Setting C++ Project Properties
- Building project
General information about C++ projects
C++ projects are specified by their so-called project template, which are used by the “TwinCAT C++ Project Wizard”. Inside a project multiple modules could be defined by module templates, which are used by the “TwinCAT Class Wizard”.
TwinCAT-defined templates are documented in the Section C++ / Wizards.
The customer could define own templates, which is documented at the corresponding sub-section if C++ Section / Wizards.
Create C++ projects
To create a new C++ project using the Automation Interface, you must navigate to the C++ node and then execute the CreateChild() method with the appropriate template file as a parameter.
Code snippet (C#):
ITcSmTreeItem cpp = systemManager.LookupTreeItem("TIXC");
ITcSmTreeItem cppProject = cpp.CreateChild("NewCppProject", 0, "", pathToTemplateFile);
Code snippet (PowerShell):
$cpp = $systemManager.LookupTreeItem("TIXC")
$newProject = $cpp.CreateChild("NewCppProject", 0, "", $pathToTemplateFile)
To instantiate a driver project, use "TcVersionedDriverWizard" as pathToTemplateFile.
Creating new module within a C++ project
Within a C++ project usually a TwinCAT Module Wizard is used to let the wizard create a module by a template.
Code snippet (C#):
ITcSmTreeItem cppModule = cppProject.CreateChild("NewModule", 1, "", pathToTemplateFile);Code snippet (PowerShell):
$cppModule = $cppProject.CreateChild("NewModule", 0, "", $pathToTemplateFile);
As example for instantiating a Cyclic IO module project please use "TcModuleCyclicCallerWizard " as pathToTemplateFile.
Open existing C++ projects
To open an existing C++ project using Automation Interface, you must navigate to the C++ node and then execute the CreateChild() method with the path of the corresponding C++ project file as a parameter.
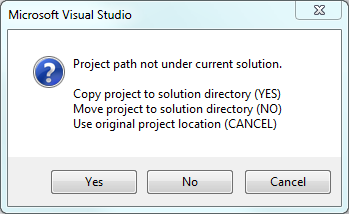
You can use three different values as SubType:
- 0: Copy project to Solution directory
- 1: Move project to the Solution directory
- 2: Use the original project location (specify "" as NameOfProject parameter)
Basically, these values represent the functionalities (Yes, No, Cancel) of the following MessageBox in TwinCAT XAE:
Instead of the template file, you must use the path to the C++ project (or its vcxproj file) that must be added. Alternatively, you can also use a C++ project archive (tczip file).
Code snippet (C#):
ITcSmTreeItem cpp = systemManager.LookupTreeItem("TIXC");
ITcSmTreeItem newProject = cpp.CreateChild("NameOfProject", 1, "", pathToProjectOrTczipFile);
Code snippet (PowerShell):
$cpp = $systemManager.LookupTreeItem("TIXC")
$newProject = $cpp.CreateChild("NameOfProject", 1, "", $pathToProjectOrTczipFile)
Please note that C++ projects cannot be renamed, so the original project name must be specified. (cf. Renaming TwinCAT C++ projects)
Creating module instances
TcCOM Modules could be created at the System -> TcCOM Modules node. Please see documentation there.
The same procedure could also be applied to the C++ project node to add TcCOM instances at that place ($newProject at the code on top of this page.).
Calling the TMC Code Generator
The TMC Code Generator can be called to generate the C++ code according to the changes in the TMC file or the C++ project.
Code snippet (C#):
string startTmcCodeGenerator = @"<?xml version=""1.0"" encoding=""UTF-16""?>
<TreeItem>
<CppProjectDef>
<Methods>
<StartTmcCodeGenerator>
<Active>true</Active>
</StartTmcCodeGenerator>
</Methods>
</CppProjectDef>
</TreeItem>";
cppProject.ConsumeXml(startTmcCodeGenerator);
Code snippet (PowerShell):
$startTmcCodeGenerator = @"<?xml version=""1.0"" encoding=""UTF-16""?>
<TreeItem>
<CppProjectDef>
<Methods>
<StartTmcCodeGenerator>
<Active>true</Active>
</StartTmcCodeGenerator>
</Methods>
</CppProjectDef>
</TreeItem>"
$cppProject.ConsumeXml($startTmcCodeGenerator)
Calling the Publish Modules command
The publication covers the development of the project for all platforms. The compiled module is made available for export as described in the section Module handling for C++.
Code snippet (C#):
string publishModules = @"<?xml version=""1.0"" encoding=""UTF-16""?>
<TreeItem>
<CppProjectDef>
<Methods>
<PublishModules>
<Active>true</Active>
</PublishModules>
</Methods>
</CppProjectDef>
</TreeItem>";
cppProject.ConsumeXml(publishModules);
Code snippet (PowerShell):
$publishModules = @"<?xml version=""1.0"" encoding=""UTF-16""?>
<TreeItem>
<CppProjectDef>
<Methods>
<PublishModules>
<Active>true</Active>
</PublishModules>
</Methods>
</CppProjectDef>
</TreeItem>"
$cppProject.ConsumeXml($publishModules)
Setting C++ project properties
C++ projects offer various options for the build and deployment process.
These can be set via the Automation Interface.
Code snippet (C#):
string projProps = @"<?xml version=""1.0"" encoding=""UTF-16""?>
<TreeItem>
<CppProjectDef>
         <BootProjectEncryption>Target</BootProjectEncryption>
         <TargetArchiveSettings>
             <SaveProjectSources>false</SaveProjectSources>
         </TargetArchiveSettings>
         <FileArchiveSettings>
             <SaveProjectSources>false</SaveProjectSources>
         </FileArchiveSettings>
</CppProjectDef>
</TreeItem>";
cppProject.ConsumeXml(projProps);
Code snippet (PowerShell):
$projProps = @"<?xml version=""1.0"" encoding=""UTF-16""?>
<TreeItem>
<CppProjectDef>
         <BootProjectEncryption>Target</BootProjectEncryption>
         <TargetArchiveSettings>
             <SaveProjectSources>false</SaveProjectSources>
         </TargetArchiveSettings>
         <FileArchiveSettings>
             <SaveProjectSources>false</SaveProjectSources>
         </FileArchiveSettings>
</CppProjectDef>
</TreeItem>"
$cppProject.ConsumeXml($projProps)
The values "None" and "Target" are valid for the BootProjectEncryption.
Both other settings are "false" and "true" values.
Set up project
To build the project or solution, you can use the corresponding classes and methods of the Visual Studio API.