Test signing
Overview
Implementing TwinCAT 3 C++ modules for x64 platforms requires signing the driver with a certificate.
This article describes how to create and install a test certificate for testing a C++ driver.
 | Note the procedure when creating test certificates Developers may have a wide range of tools for creating certificates themselves. Please follow this description exactly to activate the test certificate mechanism. |
The following commands must be executed from a command line that has been opened in either way:
- Command prompt from Microsoft Visual Studio 2010 / 2012 with administrator rights. (Via: All Programs -> Microsoft Visual Studio 2010/2012 -> Visual Studio Tools -> Visual Studio Command Prompt, then right-click Run as administrator)
- Developer Command Prompt from Microsoft Visual Studio 2017 / 2019 with administrator rights.. (Via: All Programs -> Visual Studio 2017 -> Visual Studio Command Prompt for VS 2017/2019, then right-click on Run as administrator)
- Only if the WINDDK has been installed:
Normal prompt (Start ->Command Prompt) with administrator rights, then change to directory %WINDDK7%\bin\x86\, which contains the corresponding tools.
- 1. On XAE:
In the engineering system, enter the following command in the Microsoft Visual Studio 2010 / 2012 command prompt with administrator rights (see note above):makecert -r -pe -ss PrivateCertStore -n CN=MyTestSigningCert MyTestSigningCert.cer
(If you do not have access rights to the PrivateCertStore, you can use a different storage location. This must also be used in the PostBuild event .) - This is followed by creation of a self-signed certificate, which is stored in the file "MyTestSigningCert.cer" and in the Windows Certificate Store.
- Check the result with mmc (Use File->Add/Remove Snap-in->Certificates):
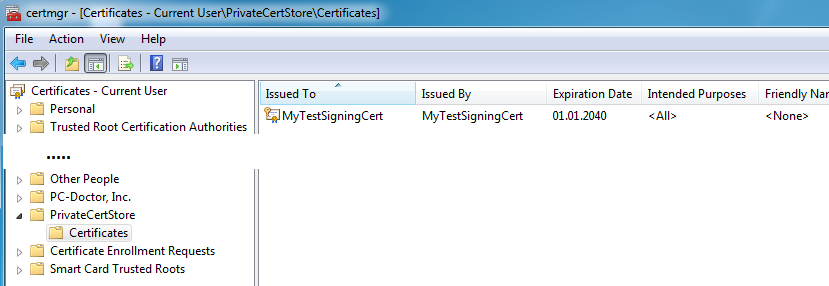
- 2. On XAE:
configure the certificate so that it is recognized by TwinCAT XAE on the engineering system.
Set the environment variable TWINCATTESTCERTIFICATE to "MyTestSigningCert" in the engineering system or edit the post build event of Debug|TwinCAT RT (x64) and Release|TwinCAT RT (x64).
The name of the variable is NOT the name of the certificate file, but the CN name (in this case MyTestSigningCert).
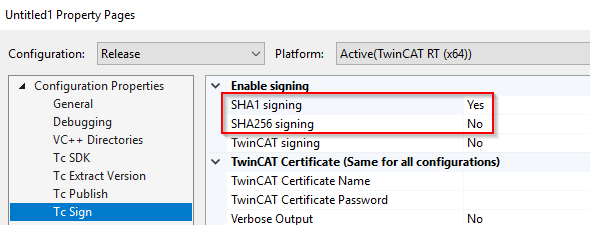
| From TwinCAT 3.1 4024.0, the configuration of the certificate to be used is carried out under Tc Sign in the project properties. To use signing via the operating system, as described here, please pay attention to the project settings. |
On XAR (and XAE, if it is a local test), activate the test mode so that the operating system can accept the self-signed certificates. This can be done on both engineering systems (XAE) and runtime systems (XAR).
For Windows
Use the administrator prompt to execute the following:bcdedit /set testsigning yesand reboot the target system.
You may have to switch off "SecureBoot" for this, which can be done in the bios.
If test signing mode is enabled, this is displayed at the bottom right of the desktop. The system now accepts all signed drivers for execution.

After the respective procedure, the system accepts all signed drivers for execution.
- 1. Test whether a configuration with a TwinCAT module implemented in a TwinCAT C++ driver can be enabled and started on the target system.
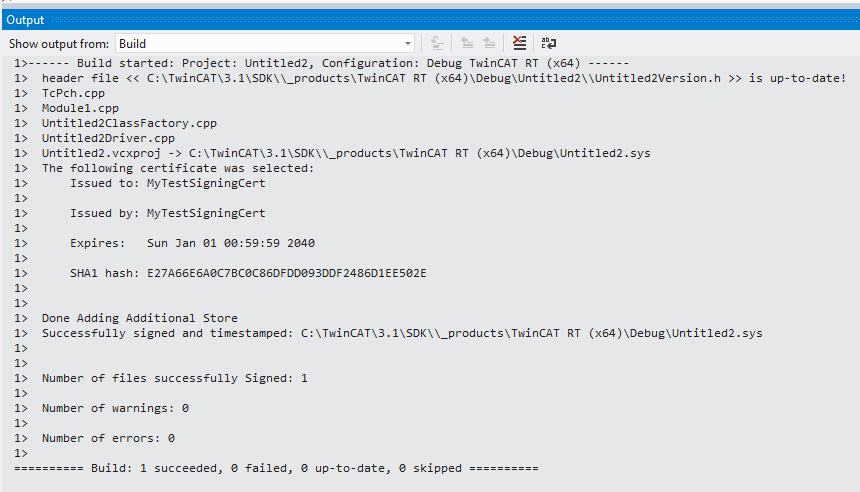
- Compilation of the x64 driver generates the following output:
References:
MSDN, MakeCert test certificates (Windows drivers),
https://docs.microsoft.com/en-us/windows-hardware/drivers/install/makecert-test-certificate