Creating and handling EtherCAT devices
This article explains how to build an EtherCAT topology via TwinCAT Automation Interface. It consists of the following topics:
- General information
- Creating an EtherCAT device
- Creating EtherCAT boxes and insert into topology
- Creating EtherCAT terminals and insert into topology
- Exceptions to the ItemSubType 9099
- Changing the "Previous Port" of an EtherCAT terminal
- Adding EtherCAT slaves to a HotConnect group
- How to add EtherCAT SyncUnits
- Handle EtherCAT junction boxes (CU1128)
All of these topics cover the case of an offline configuration, which means the real addresses of all devices ar not know at the time of config creation. The last chapter of this article therefore also explains how to
- Activate the configuration
General information
This documentation should give you an overview avout how to create and handle EtherCAT devices and their corresponding topology via Automation Interface. For an in-depth understanding about how EtherCAT works and how it is generally integrated in TwinCAT SystemManager/XAE, please consult the EtherCAT System Documentation and the corresponding chapter about EtherCAT configuration in TwinCAT. EtherCAT boxes and terminals, which are connected to an EtherCAT Master, share a common way of creation, which is explained in a separate article about E-Bus sub types.
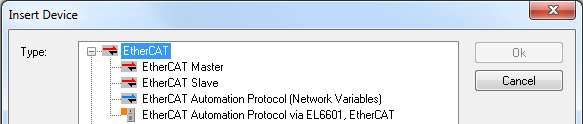
Creating an EtherCAT device
The first step in creating a TwinCAT EtherCAT configuration is to create an EtherCAT device, which may involve creating an EtherCAT master, slave or automation protocol (e.g. to use network variables, as described in a separate article). To create an EtherCAT master/slave, simply use the ITcSmTreeItem::CreateChild() method with the corresponding parameter for SubType (EtherCAT master = 111, EtherCAT slave = 130).
EtherCAT master - code snippet (C#)
ITcSmTreeItem devices = systemManager.LookupTreeItem("TIID");
ethercatMaster = devices.CreateChild("EtherCAT Master", 111, null, null);
EtherCAT master - code snippet (PowerShell)
$devices = $systemManager.LookupTreeItem("TIID")
$ethercatMaster = $devices.CreateChild("EtherCAT Master", 111, $null, $null)
EtherCAT slave - code snippet (C#)
ITcSmTreeItem devices = systemManager.LookupTreeItem("TIID");
ethercatSlave = devices.CreateChild("EtherCAT Slave", 130, null, null);
EtherCAT slave - code snippet (PowerShell)
$devices = $systemManager.LookupTreeItem("TIID")
$ethercatSlave = $devices.CreateChild("EtherCAT Slave", 130, $null, $null)
Creating EtherCAT Boxes
The second step involves the creation of EtherCAT Boxes, for example an EK1100 EtherCAT Coupler. As explained in the article on E-bus SubTypes, all subordinate Tree Items (there are a few exceptions, see below) of an EtherCAT master use a common SubType (9099) and they are identified via the product revision, which must be passed as the vInfo parameter of the ITcSmTreeItem::CreateChild() method.
Code snippet (C#)
ITcSmTreeItem ethercatMaster = systemManager.LookupTreeItem("TIID^EtherCAT Master");
ethercatMaster.CreateChild("EK1100", 9099, "", "EK1100-0000-0017");
Code snippet (PowerShell)
$ethercatMaster = $systemManager.LookupTreeItem("TIID^EtherCAT Master")
$ethercatMaster.CreateChild("EK1100", 9099, "", "EK1100-0000-0017") 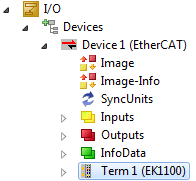
Please note: In addition to a complete product revision, you can also use a placeholder. If you only specify "EK1100" as vInfo, Automation Interface automatically captures the latest revision number and uses it. Example:
Code snippet (C#):
ITcSmTreeItem ethercatMaster = systemManager.LookupTreeItem("TIID^EtherCAT Master");
ethercatMaster.CreateChild("EK1100", 9099, "", "EK1100");
Code snippet (PowerShell):
$ethercatMaster = $systemManager.LookupTreeItem("TIID^EtherCAT Master")
$ethercatMaster.CreateChild("EK1100", 9099, "", "EK1100")
Creating EtherCAT Terminals and inserting them into the topology
The creation of EtherCAT Terminals is based on the same concepts as the creation of EtherCAT Boxes. All terminals also share a common SubType and are identified by the product revision, which must be passed as a vInfo parameter to the ITcSmTreeItem::CreateChild() method. The parameter bstrBefore allows you to determine the position at which the terminal is inserted into the configuration.
Code snippet (C#):
ITcSmTreeItem ek1100 = systemManager.LookupTreeItem("TIID^Device 1 (EtherCAT)^EK1100");
ek1100.CreateChild("Term 4 (EL2004)", 9099, "Term 3 (EL2004)", "EL2004-0000-0017");
Code snippet (PowerShell):
$ek1100 = $systemManager.LookupTreeItem("TIID^Device 1 (EtherCAT)^EK1100")
$ek1100.CreateChild("Term 4 (EL2004)", 9099, "Term 3 (EL2004)", "EL2004-0000-0017") 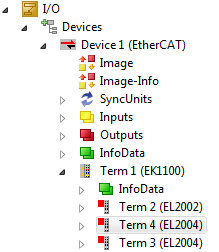
Please note: If problems occur when using the bstrBefore parameter, please try inserting the terminal at a "device level", for example:
Code snippet (C#):
ITcSmTreeItem device= systemManager.LookupTreeItem("TIID^Device 1 (EtherCAT)");
device.CreateChild("Term 4 (EL2004)", 9099, "Term 3 (EL2004)", "EL2004-0000-0017");
Code snippet (PowerShell):
$device= $systemManager.LookupTreeItem("TIID^Device 1 (EtherCAT)")
$device.CreateChild("Term 4 (EL2004)", 9099, "Term 3 (EL2004)", "EL2004-0000-0017")
The new terminal is then inserted before "Term 3 (EL2004)" under the last EtherCAT Box inserted.
Please note: In addition to a complete product revision, you can also use a placeholder. If you only specify "EL2004" as vInfo, Automation Interface automatically captures the latest revision number and uses it. Example:
Code snippet (C#):
ITcSmTreeItem ek1100 = systemManager.LookupTreeItem("TIID^Device 1 (EtherCAT)^EK1100");
ek1100.CreateChild("Term 4 (EL2004)", 9099, "Term 3 (EL2004)", "EL2004");
Code snippet (PowerShell):
$ek1100 = $systemManager.LookupTreeItem("TIID^Device 1 (EtherCAT)^EK1100")
$ek1100.CreateChild("Term 4 (EL2004)", 9099, "Term 3 (EL2004)", "EL2004")
Exceptions to the ItemSubType 9099
There are a few exceptions to the ItemSubType 9099, e.g. the RS232 terminals EP6002 (ItemSubType 9101) and EL600X (ItemSubType 9101). The following table gives an overview about all exceptions and their corresponding ItemSubType.
|
I/O |
ItemSubType |
|---|---|
|
EP6002 |
9101 |
|
EL6001 |
9101 |
|
EL6002 |
9101 |
|
EP6001-0002 |
9101 |
|
EP6002-0002 |
9101 |
|
EL6021 |
9103 |
|
EL6022 |
9103 |
|
EL6021-0021 |
9103 |
|
BK1120 |
9081 |
|
ILXB11 |
9086 |
|
EL6731 |
9093 |
|
EL6751 |
9094 |
|
EL6752 |
9095 |
|
EL6731-0010 |
9096 |
|
EL6751-0010 |
9097 |
|
EL6752-0010 |
9098 |
|
EL6601 |
9100 |
|
EL6720 |
9104 |
|
EL6631 |
9106 |
|
EL6631-0010 |
9107 |
|
EL6632 |
9108 |
|
EL6652-0010 |
9109 |
|
EL6652 |
9110 |
Changing the "Previous Port" of an EtherCAT Terminal
The previous connection of an EtherCAT Terminal determines the position of the terminal within the EtherCAT topology.

In TwinCAT XAE, the drop-down list box automatically includes all available Previous Ports. To configure this setting via the Automation Interface, you can use the methods ITcSmTreeItem::ProduceXml() and ITcSmTreeItem::ConsumeXml() to edit the XML description of the corresponding EtherCAT Terminal. The XML description contains one or more XML nodes <PreviousPort>, where its (their) attribute "Selected=1" defines which previous port is currently selected. Each previous connection device is identified by its physical address.
Example (XML description)
<TreeItem>
  <EtherCAT>
    <Slave>
      <PreviousPort Selected="1">
        <Port>B</Port>
        <PhysAddr>1045</PhysAddr>
      </PreviousPort>
      <PreviousPort>
        <Port>B</Port>
        <PhysAddr>1023</PhysAddr>
      </PreviousPort>
    </Slave>
  <EtherCAT>
</TreeItem>
If you want to change the previous connection, you must know the <PhysAddr> of the desired device, which can also be determined via the XML description.
When inserting children into an EtherCAT configuration, the parameter bstrBefore of the ImportChild or CreateChild method can be used to specify the previous element when calling the ImportChild or CreateChild method on a slave. On an EtherCAT master, this setting must be specified via the XML description from above.
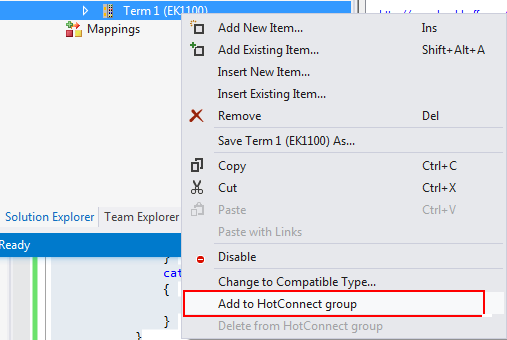
Adding EtherCAT slaves to a HotConnect group
EtherCAT HotConnect allows pre-configured sections to be added to or removed from the data traffic before the system is started or during operation. Further information about EtherCAT HotConnect can be found in our EtherCAT system documentation.
In TwinCAT XAE, an EtherCAT slave can be added to a HotConnect group by clicking on the corresponding option in the context menu of the device.
In the TwinCAT Automation Interface, the same can be achieved by using the following XML structure on the EtherCAT slave:
Example (XML description):
<TreeItem>
<EtherCAT>
<Slave>
<HotConnect>
    <GroupName>Term 1 (EK1101)</GroupName>
    <GroupMemberCnt>4</GroupMemberCnt>
    <IdentifyCmd>
     <Comment>HotConnect-Identität lesen</Comment>
     <Requires>cycle</Requires>
     <Cmd>1</Cmd>
     <Adp>0</Adp>
     <Ado>4096</Ado>
     <DataLength>2</DataLength>
     <Cnt>1</Cnt>
     <Retries>3</Retries>
     <Validate>
     <Data>0000</Data>
     <Timeout>5000</Timeout>
     </Validate>
    </IdentifyCmd>
</HotConnect>
</Slave>
</EtherCAT>
</TreeItem>
Please note:
- The <GroupMemberCnt> tag must specify the exact number of terminals plus the device itself.
How to set EtherCAT Sync Units
EtherCAT SyncUnits can be set via ITcSmTreeItem::ConsumeXml() and by using the following XML description.
Example (XML description):
<TreeItem>
  <EtherCAT>
    <Slave>
      <SyncUnits>
        <SyncUnit>SyncUnit1</SyncUnit>
      </SyncUnits>
    </Slave>
  </EtherCAT>
</TreeItem>
Handle EtherCAT junction boxes (CU1128)
EtherCAT junction boxes can be handled similar to all other tree items. The following sample code shows how to add a CU1128 box and then add two EK1100 boxes below:
Code Snippet (C#)
ITcSmTreeItem cu1128 = ethercatMaster.CreateChild("CU1128", 9099, null, "CU1128");
ITcSmTreeItem cu1128_devA = cu1128.get_Child(1);
ITcSmTreeItem cu1128_devB = cu1128.get_Child(2);
ITcSmTreeItem ek1100_1 = cu1128_devA.CreateChild("EK1100-1", 9099, null, "EK1100");
ITcSmTreeItem ek1100_2 = cu1128_devB.CreateChild("EK1100-2", 9099, null, "EK1100");
Code Snippet (Powershell)
$cu1128 = $ethercatMaster.CreateChild("CU1128", 9099, $null, "CU1128")
$cu1128_devA = $cu1128.get_Child(1)
$cu1128_devB = $cu1128.get_Child(2)
$ek1100_1 = $cu1128_devA.CreateChild("EK1100-1", 9099, $null, "EK1100")
$ek1100_2 = $cu1128_devB.CreateChild("EK1100-2", 9099, $null, "EK1100")
Activate the EtherCAT configuration
To activate a created TwinCAT configuration via Automation Interface, the ITcSysManager::ActivateConfiguration() method may be used. However, the previous chapters only explained how to create an offline configuration, which means that every device created does not have real addresses, e.g. the EtherCAT Master has not been linked to a physical network interface card yet. Before activating the configuration you therefore need to configure each device with online addresses. To determine the real addresses, you can run a ScanDevices on the online system, determine the real addresses via the XML description (ITcSmTreeItem::ProduceXml()) and then import the address information via ITcSmTreeItem::ConsumeXml() into the created (offline) configuration. There are two HowTo samples which help you exactly with this kind of configuration:
- Scan Devices via Automation Interface