BaMessageSystem
If undesirable operating behavior occurs, this can be rectified quickly if service personnel are notified. However, without a management system, error messages remain in the PLC or in the building controller, so that it is necessary to actively check the controller to find out why it is not regulating optimally. Errors are therefore only noticed when a side effect occurs. A possible side effect can be an incorrect room temperature, which leads to discomfort. From this point on, the service personnel will be informed and the error messages will be checked in the controller. In order to detect malfunctions earlier and prevent negative effects, error messages from the building controller should be sent to the responsible personnel as soon as they occur.
The TF2000 HMI extension BaMessageSystem helps users by enabling error messages from the building controller to be sent directly to the relevant groups of people. This makes it possible to optimize the search for a source of error after an undesired operating behavior of a controller.
Description of the application
After successful configuration of the extension, events received by the TF8040 and connection interruptions between automation stations and the HMI are forwarded to registered personnel.
Explanation of terms
- Events: see TF8040 Infosys
- Secure Socket Options: Options to connect to an SMTP server (see Mailkit Wiki )
Event classes
Incoming events are assigned to an event class. These classes have an integer as ID and a description. In the user configuration, a user can subscribe to one or more event classes so that this user is notified of events in this class (see User Configuration).
The following groups are available:
Groups for internal events have negative IDs:
- -99: Get all
Serves as a distribution list.
If this group is assigned to a person, this person receives all outgoing messages. This includes the maintenance messages, disconnections and events of the TF8040 and the HMI server. - -1: Connection Issues
A message is sent to this notification class if a previously connected device loses the connection or a device is not connected within approx. 2.5 minutes after being added. The notification class also receives a message if one of the above events has occurred and the device has been successfully reconnected. - -2: TcHmiSrv
If an extension is entered under the "Monitoring" tab and is not executed, an event of this event class is sent. - -3: Maintenance
When maintenance is being carried out in the building, notifications may be undesirable.
The sending of notifications can be suppressed using maintenance mode.
This mode can be enabled and disabled in the HMI configuration. See chapter Maintenance mode.
Groups with positive IDs (0-255) are read from the TF8040 PLC. They represent the BACNet notification classes configured in the PLC. For example, an event class "10: Danger to life" can exist.
Installation
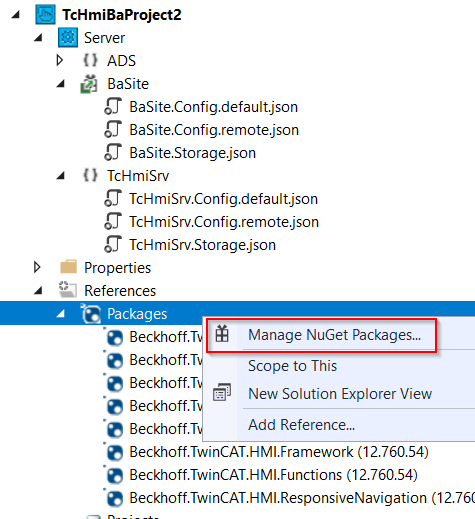
The NuGet package must be installed to integrate the extension into the project.
- 1. To do this, right-click on the Packages node.
- 2. A pop-up will open, select Manage NuGet packages ....
- 3. Select the package source depending on the installation type:
1. Workload TF8040 for TwinCAT 4026: tcpkg install TF8040.BuildingAutomation.XAE
2. TcPkg package TwinCAT 4026: tcpkg install TwinCAT.HMI.BA.MessageSystem
Select the entry BaMessageSystem. - An information window opens on the right-hand side containing the Install button.
- 4. Click Install.
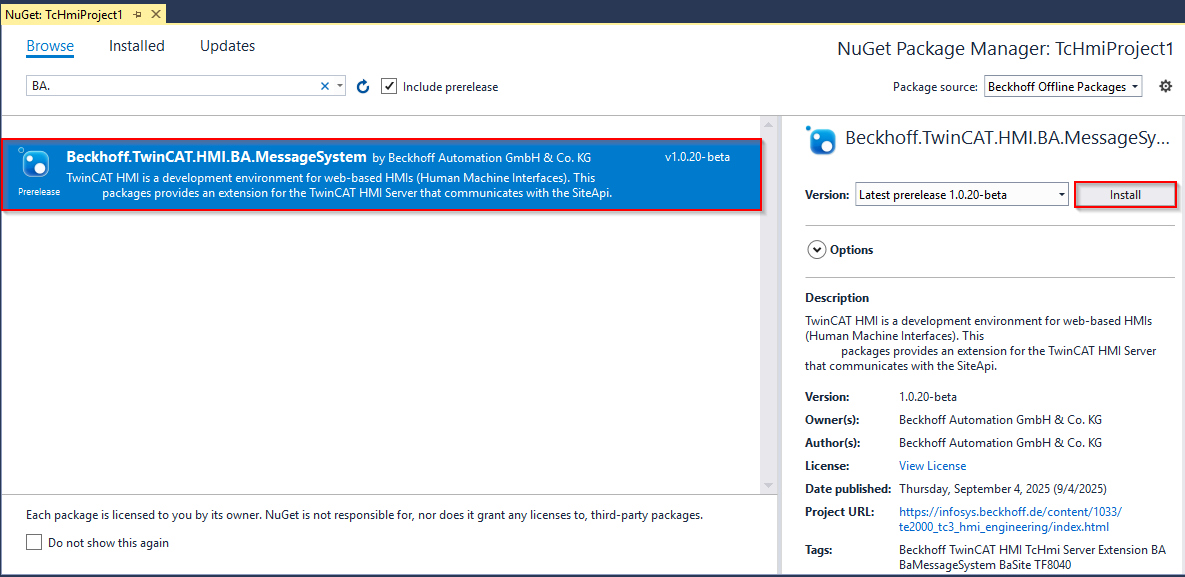
- The extension is installed in the project.
Configuration
The configuration takes place in the configuration page of the HMI.
This is done either in the "TwinCAT HMI Server Configuration" of the XAE HMI project or on the following configuration page in the browser: http://localhost:1010/Config (replace localhost with your server address).
These instructions refer to the "TwinCAT HMI Server Configuration".
Open the "TwinCAT HMI Server Configuration" and click on the BaMessageSystem tab:
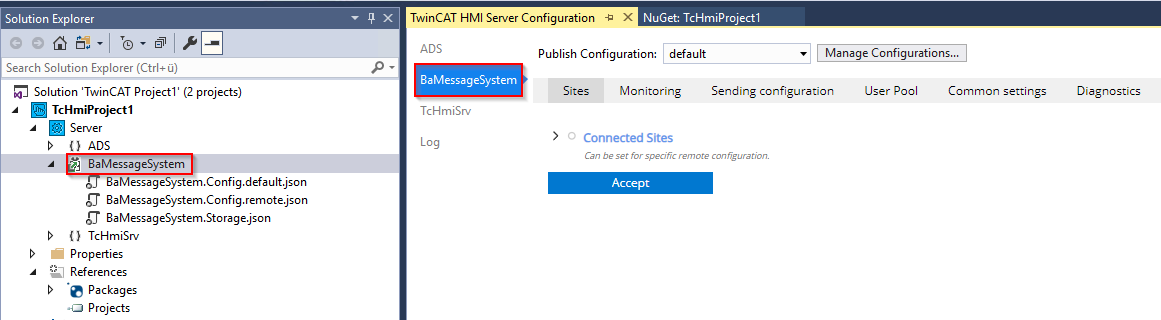
Six tabs are now visible (depending on the language EN/DE):
English | German |
|---|---|
Sites | Sites |
Monitoring | Überwachung |
Sending configuration | Sendeeinstellungen |
User Pool | Benutzerkonfiguration |
Common settings | Allgemeine Einstellungen |
Diagnostics | Diagnose |
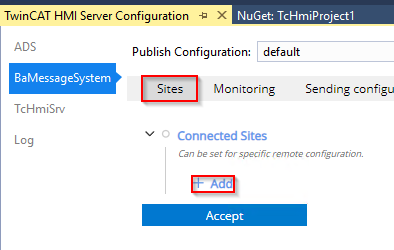
Sites
Sites are added, removed and changed here.
- 1. To add a site, click on +Add.
- 2. A dialog opens in which you enter a name, the AmsNetId and the port of the TF8040 project.
You can also enter a building name to identify the site in the e-mails. This is noted in the subject line (e.g. "[Building B] ...").
With Enabled = true, this site is marked as to be connected. - 3. If all the information is correct, you can create the site by clicking Add.

- 4. Once the device has been added, the name can be changed using the pencil icon
 . A window opens where you can make the change with Rename. The entry can be deleted with the red X icon
  .
.
Monitoring
The monitoring of other server extensions is configured in this tab.
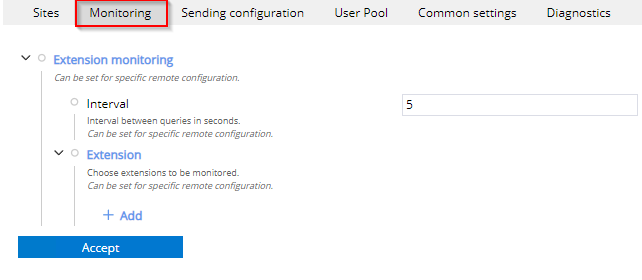
The function sends a message to the users of the group "-2: TcHmiSrv" and "-99: Get all" as soon as configured extensions are no longer executed.
When the BaMessageSystem extension is started, this function is suspended for one minute, as other extensions may not yet be loaded and this can lead to a false positive error message.
If no extension is specified in the settings, the service is not executed and is only restarted if the configuration is changed.
Setting | Function |
|---|---|
Interval | The interval in seconds at which the status of the extensions is queried. |
Extensions | Extensions that are to be monitored can be added and enabled here. |
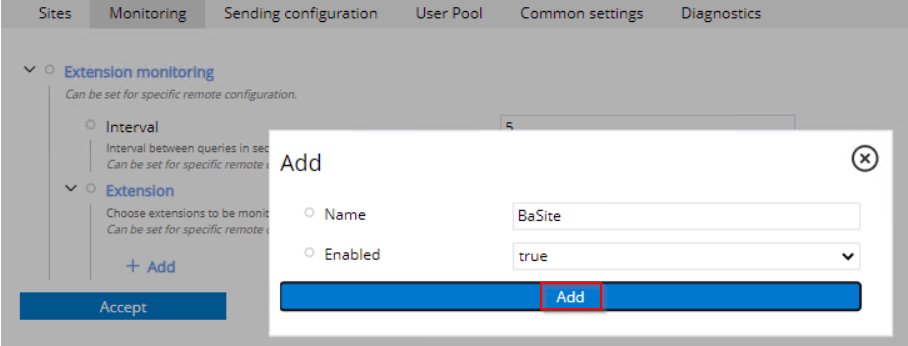
Add extensions
- 1. Under the Extensions node, click + Add to create a new entry.
- A dialog opens.
- 2. Enter the name of the desired extension in the Name field.
If the input field is selected, a list of all extensions that are entered in the HMI server appears. Server-specific extensions are excluded from this preselection.
If the selected suggestion is changed, the extension will not be monitored because the name differs. - 3. For monitoring, set the Enabled field to true.
The Enabled field can be used to stop monitoring without removing the entry. - 4. Once you have chosen an extension, add the entry by clicking the blue Add button.
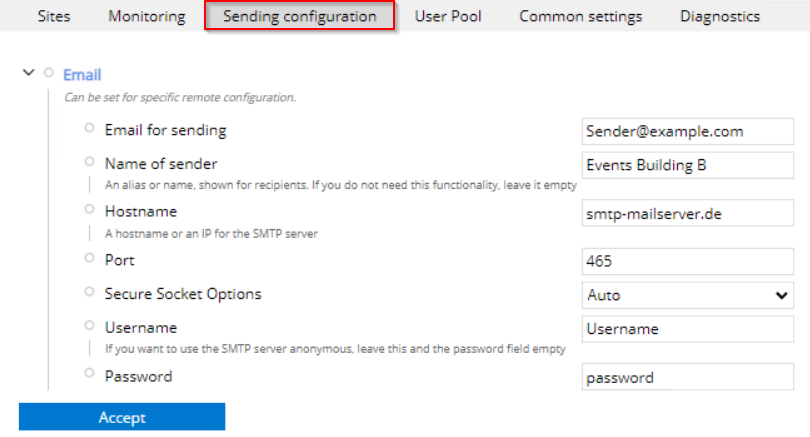
Sending configuration
Settings for sending messages. It is possible to send messages via SMTP (e-mail).
Setting | Function |
|---|---|
Email for sending | The address from which the e-mail is to be sent. |
Name of sender | The name to be displayed as the sender name in the e-mail. |
Hostname | Either the IP or the address of the SMTP server. Please do not enter a port here! |
Port | The port of the SMTP server. |
Secure Socket Options | The method how to connect to the SMTP server. (see Mailkit Wiki ) |
Username | The username to be used to log in to the SMTP server. If the SMTP server is to be used anonymously, please leave this field empty or disable it. |
Password | The password to be used to log in to the SMTP server. If the SMTP server is to be used anonymously, please leave this field empty or disable it. |
 | The e-mail address must not contain any umlauts! |
| Please ask your administrator or the respective provider about the SMTP server settings beforehand! |
| If the "Name of sender" field is empty or disabled, the character string before the @ of the email for sending is used. Consequently, the name of sender for an email would be "Sender" if the "Name of sender" field is empty. |
User Pool
- 1. To enable users to be notified of events, add them under the User Pool category:
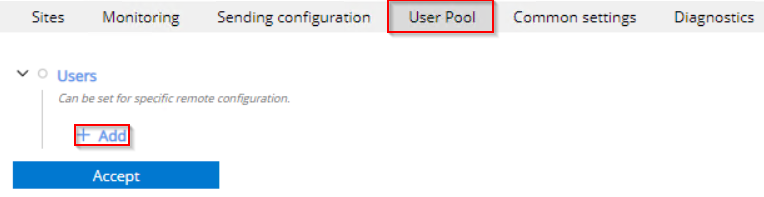
- 2. Enter the name of the person and the addresses for the messages here.
It is currently only possible to enter an email address.
The two entries Starting Hour and Ending Hour specify the period in which this user is notified.
If both entries are the same, messages are delivered throughout the day.
If, for example, 7 is entered as the start and 16 as the end, messages are delivered from 7:00 a.m. to 4:00 p.m.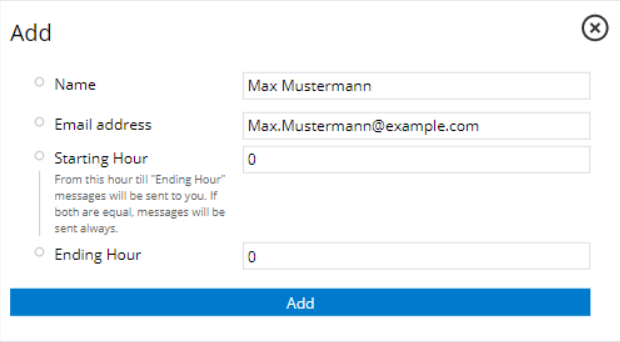
- Once the user has been created, it is possible to expand the entry.
- 3. Here you can again edit the person's name with the pencil icon and delete it with the red X.
- 4. To assign one or more event classes to the user, expand Event classes to be notified at.
- 5. Add a new entry by clicking on +Add.
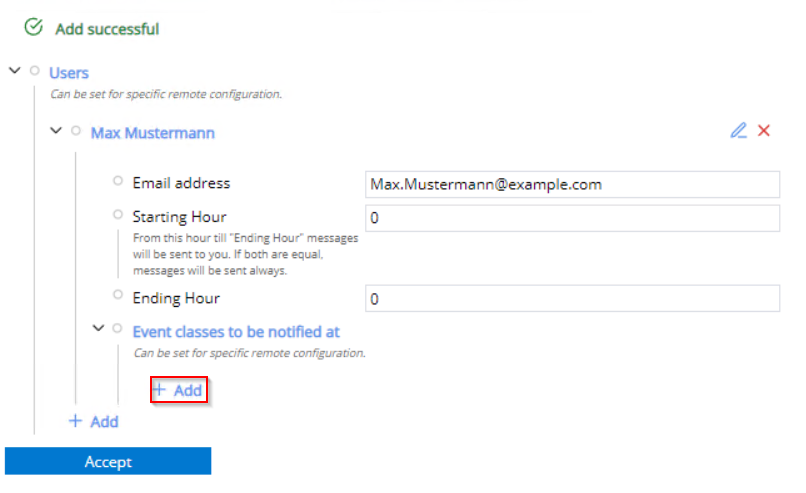
- A dialog opens.
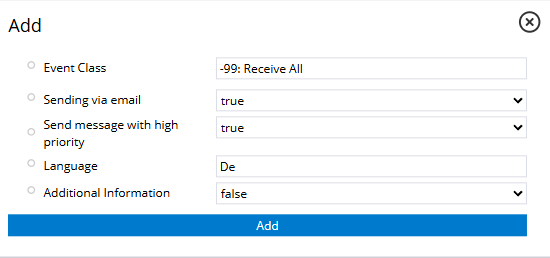
- The event class is entered in the Name field.
- 6. Clicking on the empty field opens a drop-down menu with all event classes found on the connected devices.
- There are three further event classes that are added internally by the extension.
Selection of the event class to be added to a person.
There are also further setting options in this dialog:
Setting | Function |
|---|---|
Event Class | Name of the event class to be assigned. |
Sending via email | If enabled, notifications are sent to the registered email address. |
Send message with high priority | It is possible to set the priority for emails. A distinction is made here between high and normal priority. |
Language | The language in which the message is sent. German and English are currently selectable. |
Additional Information | If enabled, additional information such as version numbers are also sent for the event class for messages. For the complete list see Appendix - Additional Information |
- 7. Create the event class via Add.
The event class is edited or deleted using the pencil or the red cross.
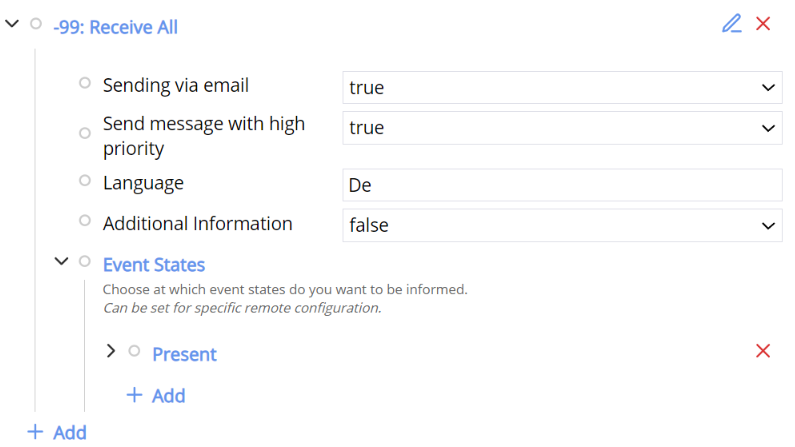
States of the event classes
States can be named for each event class for which the user is notified.
The following states are valid and can be extended after adding the event class:
"Present", "Present|Acked", "Gone", and "Gone Acked".
Users are only notified of the state entered.
If the event class is added, the Present state is automatically added:
Common settings
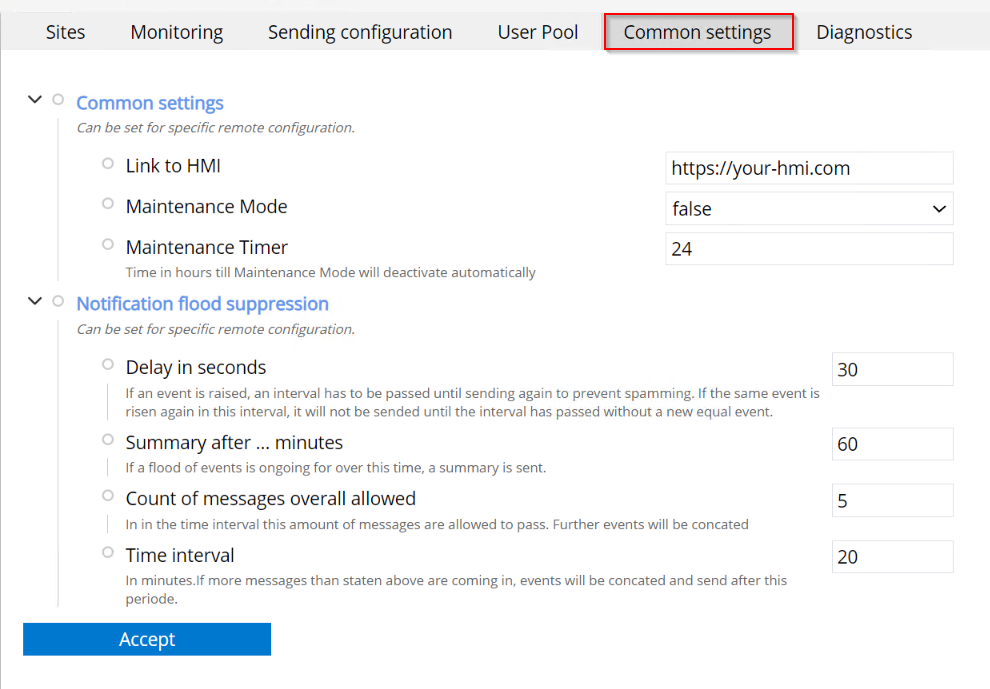
There are three options under the common settings:
Setting | Function |
|---|---|
Link to HMI | Here, you can optionally specify a link to the TF8040 HMI, which will be sent in every email. However, this field can also be empty or disabled. This link allows service personnel to quickly access the HMI and view further information. |
Maintenance Mode | If disabled, no events are forwarded. An email is sent to the group / event class "0: Get All" once when it is enabled or disabled. If maintenance is being carried out on the building and a large number of events are being sent, this option should be enabled. Factory setting: FALSE. |
Maintenance Timer | The time in hours after which maintenance mode is automatically disabled can be set here. Minimum: 0 -> No automatic reactivation. Factory setting: 24. |
There are four options under "Notification flood suppression":
Setting | Function |
|---|---|
Delay in seconds | When an event occurs, the defined time is waited for before it is sent. If, during this time, an event with the same event class and symbol arrives, it will not be sent until the time has elapsed again. The events are only sent when this delay time expires without the event arriving again, or until the subsequent collection interval has elapsed. |
Summary after ... minutes | If a notification flood lasts longer than this period, the number of identical events that have occurred is reported collectively. |
Count of messages overall allowed | Number of messages that are delivered in the following time interval until events are delivered collectively to avoid a flood of messages. |
Time interval | In minutes If more messages than specified occur in this time interval, they are combined and delivered together at the end of the interval. |
Appendix
TF8040 Events and notification flood
The setting determining whether a user receives standard or extended information is made for the respective user (see chapter User Pool).
If this option is selected, the 'Extended' template will be loaded if it is created and found.
If the email is generated statically, the following information is included if the user has specified "Extended":
Information | Standard | Extended |
|---|---|---|
Time | x | x |
Object name | x | x |
Object description | x | x |
Message event texts | x | x |
Status flags | x | x |
Event state | x | x |
Symbol path |
| x |
Lock prio |
| x |
Versions |
| x |
HMI Extensions
Information | Standard | Extended |
|---|---|---|
Time | x | x |
Config versions | x | x |
Attached debugger |
| x |
Errors |
| x |
Extension name | x | x |
GUID |
| x |
Licensed |
| x |
Package version |
| x |
Remote |
| x |
Required |
| x |
State | x | x |
Third party |
| x |
Updated |
| x |
Version | x | x |
Visibility |
| x |
Troubleshoot
First of all, it is helpful to look at the excerpt from the log.
This is to ensure that all settings are correct.
Extension cannot be started
This can have several causes:
.NET runtime not found:
The following error message is entered in the log of the HMI server:
Die Erweiterung 'BaMessageSystem' konnte nicht geladen werden, da .NET Core Desktop Runtime 8.0.0 oder höher nicht gefunden wurde.
or
Die Erweiterung 'BaMessageSystem' konnte nicht geladen werden, da .NET Core Runtime 8.0.0 oder höher nicht gefunden wurde.
This error message indicates that no .NET 8 runtime is installed on the operating system.
This is required by the extension for the function.
| Please install the .NET 8 runtime later! |
Message is not sent
This can have several causes:
- The HMI server is not connected to the SMTP server.
Check whether the information in the “Sending configuration” tab is correct and whether a connection to the SMTP server can be established. - The "email for sending" is empty or incorrect.
You must ensure that the addresses of registered users are not empty or incorrect.
If a sending method is not to be used, the address field for this method can remain empty, but the option must not be enabled when entering a notification class for a person. - The notification class is not entered for the user.
This must be entered if a user is to be notified.
Site is not connected
It must be ensured that the controller is running, TwinCAT is in Run Mode and there is a connection between the controller and the HMI server.
The controller must also be configured correctly in the settings.
Sender email address not correct
Email addresses must not contain umlauts or special characters. Check the sender address!
This can occur if the SMTP server does not check the sender address and/or has no authentication.
Example: GebäudeB <xn--gebudeb-7wa @beckhoff.com>