Set the pressure controller
Select load type
- Pressure/force control can be activated via the PLC;
see Programming a PLC using function blocks
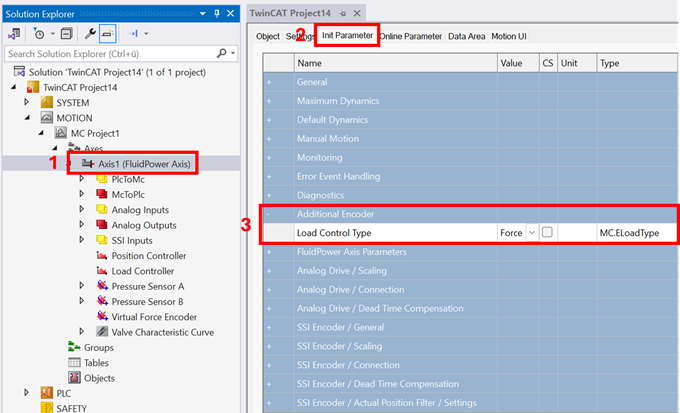
- 1. Double-click the Axis object (1).
- 2. Open the Init Parameter (2) tab.
- 3. Select Load Control Type (3) in the Additional Encoder group.
 | For explanations of the parameters, see Values. |
Start pressure/force control via PLC
- Enable the axis.
- Move the axis to its end position or until it reaches the point of contact with the opposing force.
- Start the pressure/force control.
Set the controller
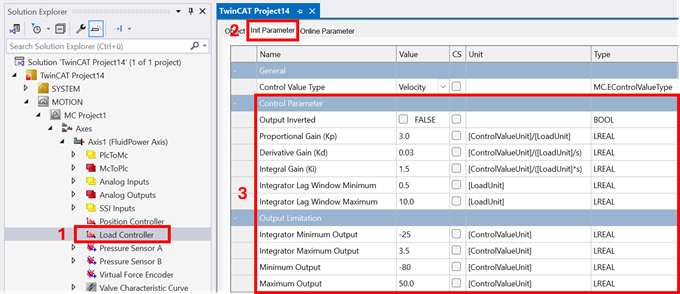
- 4. Double-click the Load Controller object (1).
- 5. Open the Init Parameter (2) tab.
- 6. Optimize the control parameters (see also Init Parameter).
Possible measures:
- If necessary, invert the control signal using Output Inverted.
- Set Integral Gain and Derivative Gain to 0.0
- Increase the Proportional Gain until the output signal begins to oscillate
- Slight reduction of the Proportional Gain
- If necessary, adjust the Derivative Gain to attenuate the control signal during setpoint jumps
- Set Integral Gain to reduce the residual error in the target load
- Limiting the Integrator Lag Window Minimum / Maximum of the I-component to prevent residual oscillation when holding the target load.
The recommended value for the Integrator Lag Window Minimum is 4 times the resolution of the pressure/force sensor.
The Integrator Lag Window Maximum is related to the residual lag error in pure P-control.