Track networks and collision avoidance
Tracks and track networks
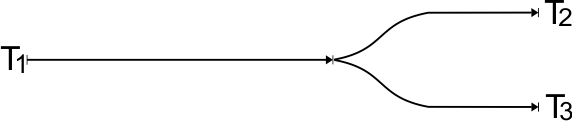
Tracks are user-specified static paths on the stator surface. Multiple tracks can be connected continuously (including direction and curvature) at one point so that movers can switch from one track to another. If more than two tracks are connected at one point in such a way, a switch is created there. This allows you to create a network of contiguous tracks.
A mover can move both forward and backward on a single track. A transition to another track can only be done from a track end to a track start, not the other way around.
Collision avoidance in a track network
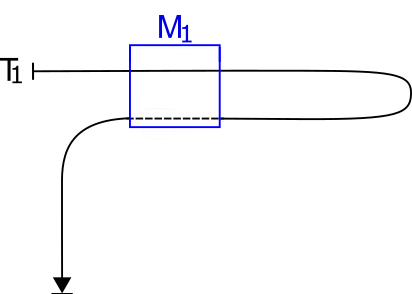
Movers that move on a track network avoid collisions with other movers in the same track network. Excluded from this are places where tracks cross without a switch or pass too close to each other or lead past themselves (see illustrations). Such configurations should be avoided.
Negative examples:


Each mover has a minimum gap set for it, which it must maintain to the mover in front of it on its path. This gap is measured between the positions of the movers on the track and can be reset with each travel command.
In the vicinity of a switch, a mover must, if necessary, additionally pay attention to potential collisions with movers that are located on other tracks connected to the switch, even if these tracks are not part of the planned path of the mover. Whether this additional collision avoidance is active for a mover at a point in time depends on four factors:
- the current position of the mover,
- the earliest possible resting position of the mover (resulting from the current dynamics and dynamic limits),
- the set gap of the mover,
- the corresponding Collision Range parameter of the current track.
If the distance between the current position and the earliest possible resting position of the mover is at any point less than Gap + Collision Range from the switch, the additional collision avoidance for this mover is active. If this is the case, all other movers for which this condition is also met are included in the dynamic planning.
Definition of the Collision Ranges
The importance of the Collision Range parameters for collision avoidance was described in the previous section. “Collision Range at start” refers to the distance to the switch at the starting point of the track and “Collision Range at end” refers to the distance to the switch at the end point of the track.
A more intuitive understanding of the Collision Range parameters arises from the following recommendation: the Collision Range should be set so that a mover that is at this distance from the associated switch (at the start or end of the track) cannot collide with movers on other tracks that connect to the switch.
In order to simplify the configuration, the corresponding values for the Collision Ranges are automatically calculated and applied when the “Collision range mode” parameter is set to “Automatic”. If “Manual” is selected instead of “Automatic”, the values entered by the user are used instead. If these are set too small, this may result in collisions. If, on the other hand, they are set much too large, movers may block one another on different tracks that are actually far apart and cannot collide at all.
If a track at the starting point (end point) either has no switch, or if no other tracks start (end) at the switch, the corresponding Collision Range can be set to 0.
Examples and illustrations:
In this example, the “Collision range at end” for track 1 can be set to zero, because, although two other tracks start at the switch, no other tracks end. The parameter “Collision range at start” for tracks 2 and 3 should be set so that a mover with this distance to the switch cannot collide with movers on the respective other track.

Example of the determination of meaningful Collision Range parameters (T1, T2 and T3 end at the start of T4): If R is the maximum mover radius of movers on the track, a “hose” with radius 2*R can be placed around a track (in this case around track 2) in order to determine a minimum for the Collision Ranges on the other tracks. In this example, track 1 has a smaller “Collision range at end” as it quickly moves away from the other tracks and track 3 and track 2 have a larger “Collision range at end” as they run close together for longer.

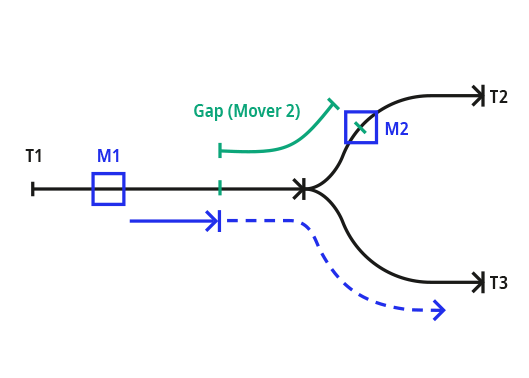
In this example, the additional collision avoidance at the switch is active for Mover 1, since its distance to the switch alone is smaller than the set Collision Range.
Mover 2 is standing still in this example and is further away from the switch than Gap or Collision Range. The additional collision avoidance is therefore not active and the two movers do not have to take each other into consideration at this time.

In this example, mover 1 is on track 1 within the Collision Range, so mover 1 blocks the movement of mover 2 to track 3. Mover 2 stops exactly at the start of the Collision Range of track 2, as this is the last safe stopping point. If the gap between mover 1 and mover 2 would allow it, mover 2 would move to a correspondingly later stop.

In this example, mover 1 is on track 1 within the Collision Range, so mover 1 blocks the movement of mover 2 to track 3. Mover 2 stops exactly at the distance of its gap to the end of track 2. If the gap between mover 1 and mover 2 would allow it, mover 2 would move to a correspondingly later stop.
In the last two examples, mover 2 moves on when mover 1 has moved so far forward that both movers have a minimum distance that is greater than the gap between the two movers.

In this example, mover 2 is further away from the switch than the Gap or Collision Range, so mover 1 can drive onto track 3 unhindered. If mover 2 moves back, a blockage may occur if the distance to the switch is less than the Gap or Collision Range.
In this example, mover 2 is closer to the switch than Gap, so mover 1 cannot move to track 3. Mover 1 is thus blocked on its way to track 3 on track 1 and stops as long as mover 2 is not moved any further away from the switch. If mover 2 is moved so that its Gap no longer includes the node, mover 1 can reach its destination on track 3. If the Gap is reduced by mover 2, mover 1 can continue (possibly even to its destination on track 3).
This is an example of a design to be avoided where the end of a track (in this case T2) affects the Collision Range at the start of another track (T3) (and vice versa). In the case of Automatic Collision Range Mode, such a situation is not detected. If it is still desired, however, a manual adjustment of the Collision Ranges is necessary here. However, Tracks with such tight curves as T2 in this example are also strongly discouraged due to the strong limitation of the dynamics (tight curves generate large centrifugal forces even when driving through at low velocities).