Quick start
Convert model (optional)
An ML description file (KerasMLPExample_cos.XML) is provided in the ZIP of the Quick start sample. This file can be used directly for integration into TwinCAT, or optionally converted to a binary format (BML).
The method of converting a description file is shown below by way of an example. The same procedure also applies to the more usual case where an ONNX file is to be converted.
- The Machine Learning Model Manager is open.
Menu bar: (Extensions)* > TwinCAT > Machine Learning > Machine Learning Model Manager
* Only with Visual Studio 2019
- 1. Use the Convert tool.
- 2. Click Select file and select the file KerasMLPExample_cos.XML.
- 3. In the drop-down menu, select Convert to *.bml
- 4. Click Convert files.
- The corresponding BML appears under <TwinCATpath>\Functions\TF38xx-Machine-Learning\ConvertToolFiles
 | You can change the default path for saving converted ML description files in the Machine Learning Model Manager with Select Target Path. The change is persistent. |
| You can also convert several files at once by means of multi-selection. |
Integration in TwinCAT via the PLC API
The procedure to load the ML description file into TwinCAT and to run it cyclically is described below. The PLC API is dealt with first.
- First of all, create a TwinCAT project and a PLC project
- Add the PLC library Tc3_MLL under the References node
In the Declaration, please create an instance of FB_MllPrediction. In this simple case, the description file contains an MLP with one input and one output of the type FP32; accordingly, variables for input and output are created as REAL. A more generally accepted possibility to handle the inputs and outputs can be found in the Samples for PLC API.
In addition, create a string variable that contains the file name incl. path to the ML description file (path on the target system). Copy the corresponding file to this location on the target system (FTP, RDP, Shared Folder, …).
Further information on this step can be found here.
Notice | |
Path of the description file on the target system Pay attention to the settings of the File Writer and the writing rights on the target system. |
PROGRAM MAIN
VAR
   fbPredict  :  FB_MllPrediction;      // ML Interface
   nInputDim, nOutputDim : UDINT := 1;
   fDataIn, fDataOut : REAL;
   sModelName   : T_MaxString  := 'C:/TwinCAT/3.1/Boot/ML_Boot/KerasMLPExample_cos.xml';
   hrErrorCode  : HRESULT;
   bLoadModel   : BOOL;
   nState       : INT := 0;
END_VAR
In the Implementation part you create a state machine, for example, which enables you to switch between the Idle state, Config state, Predict state and Error state.
In the first state you initially wait for the command to load a description file. Subsequently, the Configure method of the fbPredict function block is called until TRUE is returned. This is present for one cycle and means that the configuration has been completed. A check is then done to establish whether an error occurred. If no error occurred, the state is switched to the next state, which is the Predict state. The state machine remains in the Predict state as long as no error occurs or a (new) model is to be loaded.
CASE nState OF
    0: // idle state
      IF bLoadModel THEN
         bLoadModel := FALSE;
         nState := 10;
      END_IF
   10: // Config state
      fbPredict.stPredictionParameter.MlModelFilepath := sModelName; // provide model path and name
      IF fbPredict.Configure() THEN // load model
         IF fbPredict.bError THEN
            nState := 999;
            hrErrorCode := fbPredict.hrErrorCode;
         ELSE // no error -> proceed to predict state
            nState := 20;
         END_IF
      END_IF
   20: // Predict state
      fbPredict.Predict(
         pDataInp := ADR(fDataIn),
         nDataInpDim := nInputDim,
         fmtDataInpType := ETcMllDataType.E_MLLDT_FP32_REAL,
         pDataOut := ADR(fDataOut),
         nDataOutDim := nOutputDim,
         fmtDataOutType := ETcMllDataType.E_MLLDT_FP32_REAL,
         nEngineId := 0,
         nConcurrencyId := 0);

      IF fbPredict.bError THEN // error handling
         nState := 999;
         hrErrorCode := fbPredict.hrErrorCode;
      ELSIF bLoadModel THEN // load (updated) model
         bLoadModel := FALSE;
         nState := 10;
      END_IF;
   999: // Error state
       // add error handling here
END_CASE
The Predict method of fbPredict is used in the Predict state. This runs the loaded model. The method is informed of the input variables via the first three parameters of the method – pointer to a PLC variable, number of inputs and associated data type. The same is to be specified for the output variables (parameters 4 to 6). nEngineId and nConcurrencyId are not required in this simple example and are always transferred with the value zero. Details for these parameters can be found in the samples Detailed example and Parallel, non-blocking access to an inference module.
Before activating the project on a target, you must select the TF3810 license manually on the Manage Licenses tab under System>License in the project tree, as you wish to load a multi-layer perceptron (MLP).
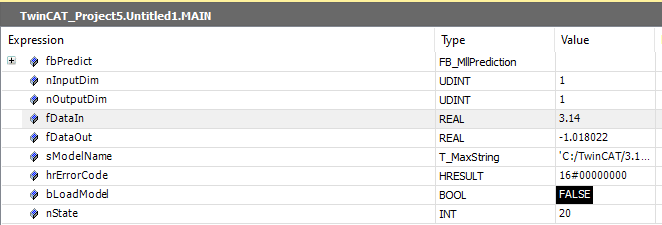
You can now activate the configuration. Log into the PLC and start the program. By setting the bLoadModel variable in the online view to TRUE, the model is now loaded and begins with the prediction. You can manipulate the input variable fDataIn and view the results in the output fDataOut. The multi-layer perceptron loaded approximately maps a cosine function in the input range of [-pi, pi] to the value range [-1,1]. Outside of the range [-pi, pi] the function increasingly diverges from the cosine function.
You can download the sample described above here.
Incorporation of a model by means of TcCOM object
This section deals with the execution of machine learning models by means of a prepared TcCOM object. A detailed description can be found here. This interface offers a simple and clear way of loading models, executing them in real-time and generating appropriate links in your own application by means of the process image.
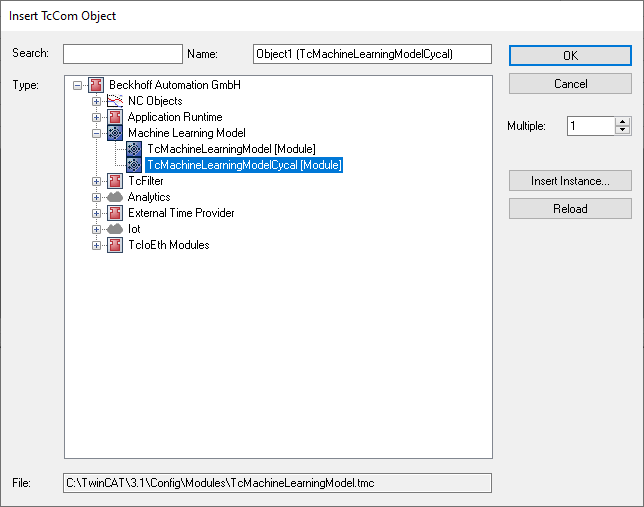
Generate a prepared TcCOM object TcMachineLearningModelCycal
- 1. To do this, select the node TcCOM Objects with the right mouse button and select Add New Item…
Under Tasks, generate a new TwinCAT task and assign this task context to the newly generated instance of TcMachineLearningModelCycal
- 2. To do this, open the Context tab of the generated object.
- 3. Select your generated task in the drop-down menu.
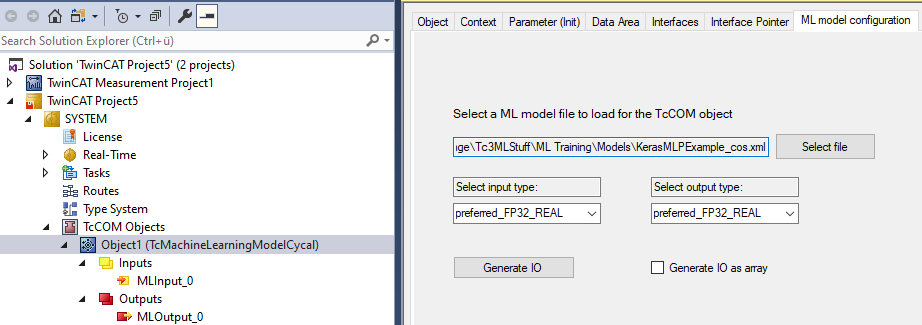
- The instance of TcMachineLearningModelCycal has a tab called ML model configuration where you can load the description file of the ML algorithm (XML or BML) and the available data types for the inputs and outputs of the selected model are then displayed.
- The file does not have to be on the target system. It can be selected from the development system and is then loaded to the target system on activating the configuration.
- A distinction is made between preferred and supported data types. The only difference is that a conversion of the data type takes place at runtime if a non-preferred type is selected.
This may lead to slight losses in performance when using non-preferred data types. - The data types for inputs and outputs are initially set automatically to the preferred data types. The process image of the selected model is created by clicking Generate IO. Accordingly, by loading KerasMLPExample_cos.xml, you get a process image with an input of the type REAL and an output of the type REAL.
Activating the project on the target
- 1. Before activating the project on a target, you must select the TF3810 license manually on the Manage Licenses tab under System>License in the project tree, as you wish to load a multi-layer perceptron (MLP).
- 2. Activate the configuration.
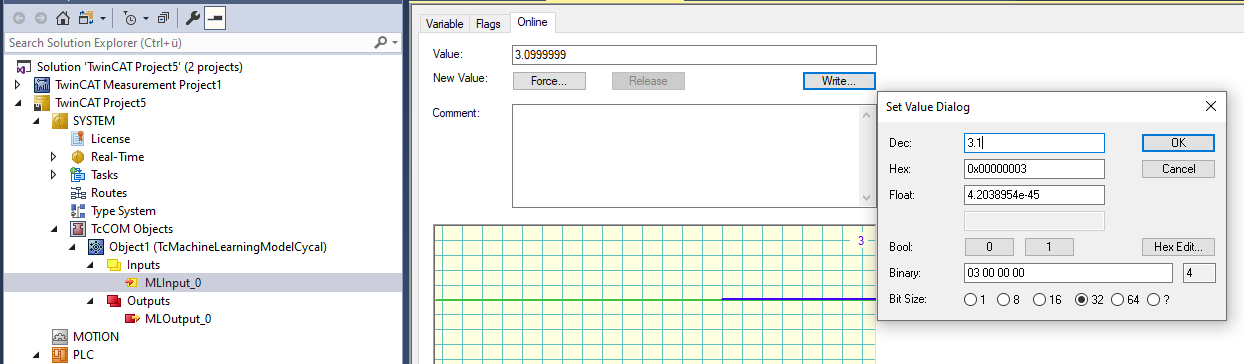
- You can now test the model by manually writing at the input.