Recording list
Multiple recordings can be managed in one Realtime Monitor project. These are displayed in the recording list.
Context menu entries in the recording list
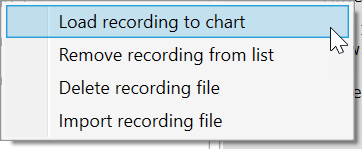
The following table shows all context menu entries:
Command | Meaning |
Load Recording to Chart | Loads the selected recording into the display window. |
Remove Recording from List | Removes the recording from the list. The recording file is retained on the hard disk. |
Delete Recording File | Removes the recording from the list and deletes the corresponding file from the hard disk. |
Saving a recording
After you have finished a recording with the Realtime Monitor, you can save the data as a recording within the project by clicking the button (Save collected data within project) in the toolbar.
Adding a recording
To add already recorded data to a Realtime Monitor project, use the "Import Recording" menu entry in the Project menu. The recording is then added to the end of the list and numbered accordingly in ascending order.
The data files of the Realtime Monitor contain only the name of the project. The data files themselves have no name, only a timestamp. So, if recordings are removed from the project and added again later, the displayed names (e.g. the displayed recording number) will differ. The start and end time of a loaded recording is displayed in the properties of the project (see Project node). |
Removing a recording
If a recording is to be removed from the project but not deleted from the hard disk, select this recording in the recording list so that it is highlighted. Then use the context menu item "Remove Recording from List".
Deleting a recording
If you want to delete a recording from the project as well as from the hard disk, select this recording in the recording list so that it is marked. Then use the context menu item "Delete Recording File".
Requirement:
Recording functionality is available on Realtime Monitor version 1.2.