Axes - Dialog: Functions
Especially in the time of the initial commissioning of axes, one is dependent on aids from the software or hardware side. The advantage of e.g. a software controlled, direct raw value output to the drive, instead of using a battery box, is obvious.
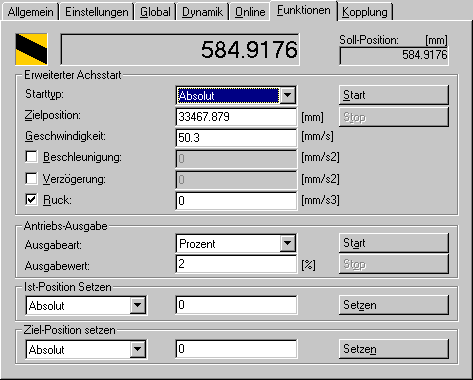
Set position
In addition to the actual position (large display field), the current target position of the drive is also displayed.
Extended axis start
Start type: here, a distinction is made between relative, absolute, modulo, etc... start of the axis.
Target position: desired target position of the axis.
Velocity: desired positioning velocity after axis start-up.
Acceleration: if no automatically calculated acceleration is desired, the checkbox can be used to activate the acceptance of the value entered on the right.
Deceleration: the checkbox activates the acceptance of the deceleration value entered on the right, if its manual entry is desired.
Jerk: the checkbox activates the acceptance of the value entered on the right for the jerk (in the example no value is entered yet).
Start: starts the axis positioning with the entered or calculated values.
Stop: stops the execution of the axis positioning.
Drive output
Output type: only a percentage output (e.g. corresponding to 100% = 10V) to the drive can be selected here.
Output value: percentage setpoint of the maximum possible output value of the terminal or the Mxxxx module.
Start: starts the output of the set value to the drive. Safety mechanisms, such as software end position monitoring etc.. are not considered.
Stop: stops the output of the set value to the drive.
Set actual position
Here you can manually set the actual position of the axis (as absolute, relative or modulo value).
Set target position
This function can be used to manually set the target position of the axis (as an absolute, relative or modulo value).