Sample Machine with Microsoft Silverlight and JavaScript
Microsoft Silverlight is a web presentation technology that can be displayed by all popular browsers (Internet Explorer 6/7, Mozilla Firefox, Apple Safari and Opera) through a corresponding plugin.
Target platforms
- Windows XP, XPE, WES
- Windows Vista
- Windows 7
Implementation
- JavaScript
Required software:
- Runtime:
- Microsoft Silverlight 1.0
- Microsoft Silverlight 1.1
Which runtime you need depends on whether you want to render a Silverlight 1.0 or 1.1 application in your browser.
- Developer Tools:
- Microsoft Visual Studio 2008 Beta 2
- Microsoft Silverlight Tools Alpha Refresh for Visual Studio (July 2007)
- or
- Microsoft Visual Studio 2005
- Microsoft Silverlight 1.0 Software Development Kit
Microsoft Visual Studio 2005 was used for this sample.
- Designer Tools:
- Expression Blend 2 August Preview
- Others:
- TwinCAT 2.10
- Browser (e.g. Internet Explorer 7 or Mozilla Firefox)
- Microsoft .NET Framework Version 3.0
First steps...
Step by step you will learn how to develop a Silverlight application and how to integrate the TwinCAT ADS Web Service using an example.
1. Creating a new project:
Start Microsoft Expression Blend 2 and create a new interface via 'Menu → File → new Project...' . The 'Create New Project' dialog box opens and the type, name, location and programming language can be selected. In this sample, select the type 'Silverlight Application (JavaScript)' and the name 'Machine'.

2. Creating a user interface:
Only a few controls are available for creating the user interface. You can create a RadioButton with a Textbox and two ellipses packed into a Canvas. The Progressbar can be created with three Rectangles, which can be put into a separate Canvas.
The interface settings are stored in the Page.xaml file.
Note that you do not set the size to 'Auto' for any object. This can otherwise lead to errors later on.
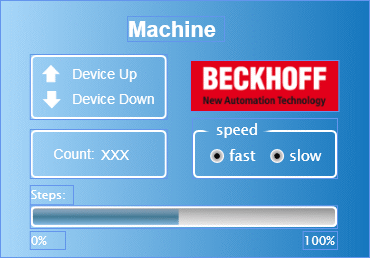
In the upper left you see the two outputs that are also output to the Bus Terminals. The bottom left shows the variable for counting the workpieces. The cycle speed of the motor can be changed via the Speed field on the right. The Steps display shows the number of cycles that are output on output 1.
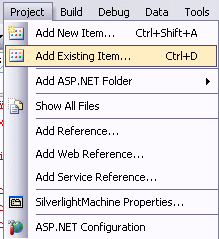
3. Add XMLHTTP.JS
In Visual Studio via 'Project → Add Existing Item...' add the file 'XMLHTTP.JS'. This file contains general methods for reading and writing PLC variables, as well as for converting data types.
4. Editing the source code
Open the Default.html file in Visual Studio and include the 'XMLHTTP.JS' file in the header.
<scripttype="text/javascript"src="xmlhttp.js"></script>
In the HTML page, add a JavaScript area in the HEAD section. The following source code must be inserted there:
First, the most important variables must be declared.
<script type="text/javascript">//enter URL to webservice here:var url = "http://localhost/TcAdsWebService/TcAdsWebService.dll";
     //enter netId here:var netId = "172.16.2.63.1.1";
     //enter the port here:var port = 811;
     //send soap request every x seconds:var refresh = 1000;

     var inuse = false;var b64s, success, errors, req;

     var vUp, vDown, vProgressbar, vCount, vFast, vSlow;

...
You have to adjust the URL of the TcAdsWebService as well as the NetID and the port accordingly.
The objects of the user interface cannot be easily accessed. For this to work, the objects are assigned to the variables already declared above after the application is started.
function Load(sender, eventArgs)
{
     vUp = sender.findName("pathUp");
     vDown = sender.findName("pathDown");
     vProgressbar = sender.findName("recProgressbar");
     vCount = sender.findName("txbCount");
     vFast = sender.findName("ellPointFast");
     vSlow = sender.findName("ellPointSlow");
}
The Load method does involve assigning the variables, but it is never called until now. This is done by changing the XAML code of the interface in Expression Blend 2. To do this, add Loaded="Load" to the topmost canvas.
<Canvasxmlns="http://schemas.microsoft.com/client/2007"
     xmlns:x="http://schemas.microsoft.com/winfx/2006/xaml"
     Width="368" Height="256"
     x:Name="Page"
     Loaded="Load"
>
...
function loop(x)
{
     Read(netId, port, '16416', '0', '86'); //send soap read request via xmlhttprequest
     window.setTimeout("loop("+x+")", x);
}
Reading a PLC variable
Read(netId, nPort, indexGroup, indexOffset, cbLen)
- netId: string that specifies the AMS Net ID on which the PLC can be found
- nPort: port number of the runtime system
- indexGroup: IndexGroup of the PLC variable
- indexOffset: first byte to be written to
- ncbLen: number of bytes to be written
function init()
{
     b64s = "ABCDEFGHIJKLMNOPQRSTUVWXYZabcdefghijklmnopqrstuvwxyz0123456789+/=";
     success = 0;
     errors = 0;
     loop(refresh); //send request every x seconds
}
Add onload="init()" to <body> so that the method is executed during loading.
<body onload="init()" >
The next function ensures that the values are read and output. It is important here that the address of the variable is correctly specified by Machine.pro for reading.
function processReqChange()
{
    /*
    readyStates:
    0 = uninitialized
    1 = loading
    2 = loaded
    3 = interactive
    4 = complete
    */ if (req.readyState == 4)
    {
    // only if "OK"if (req.status == 200)
    {
        response = req.responseXML.documentElement;

        inuse = false;

        try//check if there was an error in the request
        {
        errortext = response.getElementsByTagName('faultstring')[0].firstChild.data;
        try
        {
            errorcode = response.getElementsByTagName('errorcode')[0].firstChild.data;
        }
        catch (e){errorcode="-";}
            alert(errortext + " ("+errorcode+")");
        return;
        }
        catch (e)
        {
        errorcode=0;
        }

        var data;
        try//if the server returns a <ppData> element decode it, otherwise (write request) do nothing
        {
        data = response.getElementsByTagName('ppData')[0].firstChild.data;
        mode = "read";
        }
        catch (e)
        {
        data = "";
        mode = "";
        }

        if (mode=="read")
        {
        try
        {
            data = b64t2d(data); //decode result string

            steps = toInt(data.substr(1, 2));

            bool = toInt(data.substr(5,2));
            bool2 = toInt(data.substr(4,2));

            count = toInt(data.substr(3, 2));

            speed = toInt(data.substr(6, 2));
        }
        catch (e)
        {
            alert("Parsing Failed:" + e);
            return;
        }

        vProgressbar.Width = 306.321/100*steps*4;

        if (bool2 != "1")
            { vCount.Text = count.toString();}

        if (bool == "1")
            { vUp.Opacity=1.0;
              vDown.Opacity=0.0; }
        else if (bool2 == "1")
            { vUp.Opacity=0.0;
              vDown.Opacity=1.0; }
        else
            { vUp.Opacity=0.0;
              vDown.Opacity=0.0; }

        if (speed == "0")
           { vFast.Opacity=1.0;
             vSlow.Opacity=0.0; }
        else
           { vSlow.Opacity=1.0;
             vFast.Opacity=0.0; }

        }
    }
    else alert(req.statusText+" "+req.status); //cannot retrieve xml data
    }
}
In the last two methods, the PLC variable used to control the speed of the machine is set to zero and one, respectively.
function Fast_MouseLeftButtonDown(sender, eventArgs)
{
     Write(netId, port, '16416', '6', '2', '0', 'int');
}
function Slow_MouseLeftButtonDown(sender, eventArgs)
{
     Write(netId, port, '16416', '6', '2', '1', 'int');
}
Writing PLC variables
Write(netId, port, indexGroup, indexOffset, cbLen, pwrData, type)
- netId: string that specifies the AMS Net ID on which the PLC can be found
- nPort: port number of the runtime system
- indexGroup: IndexGroup of the PLC variable
- indexOffset: first byte to be written to
- ncbLen: number of bytes to be written
- pwrData: array containing the data to be written
- type: "bool", "int" or "string"
As with the 'Load' function, you need to switch to Expression Blend 2 to make the two methods the 'click event' of their two buttons in the appropriate lines.
<Canvas x:Name="canvasFast" MouseLeftButtonDown="Fast_MouseLeftButtonDown" ...
<Canvas x:Name="canvasSlow" MouseLeftButtonDown="Slow_MouseLeftButtonDown" ...
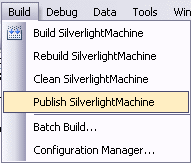
5. Testing:
First, debug your application. You will find that it does not work as you expect it to. Then go via 'Build → Publish'.
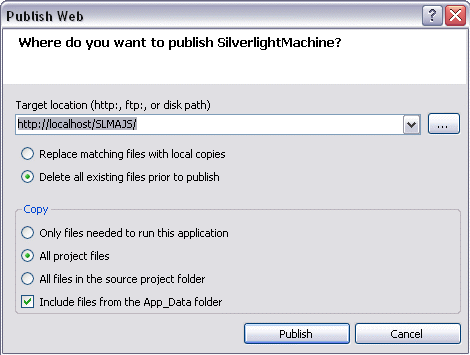
In the dialog box, select the 'Target location', and under 'Copy' select 'All project files'.
If the bottom left of the status bar says 'Publish succeded', you can run and test your application in a browser.