Example: machine with Microsoft Visual C++ .NET
Microsoft Visual Studio 2005 is a development environment for creating C++ projects. The machine example is used for familiarisation with the integration of the TwinCAT ADS DLL .LIB component with the programming language C++.
Required software:
- Microsoft .NET Framework Version 2.0, for more information click here
- Microsoft Visual Studio 2005
- TwinCAT 2.10
Before you can start the C++ program, TwinCAT and the PLC program must be active. If Microsoft Visual Studio 2005 is not installed on your computer, please install Microsoft .NET Framework Version 2.0. This sets up the required DLLs on your system.
First steps...
Step by step familiarisation with the development of a C++ program and integration of the TwinCAT ADS DLL .LIB component based on an example.
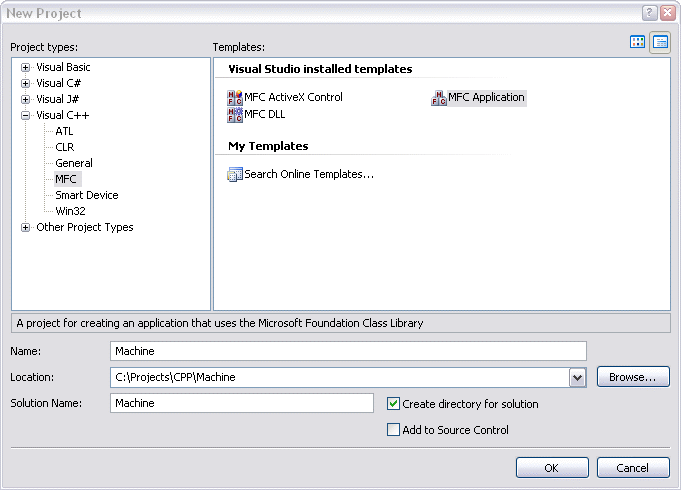
1. Create new project:
Create a new project by clicking 'File -> New -> Project...' in the menu. A new project based on different templates can be created via the dialog box 'New Project'. Under 'Project Types' select the programming language 'Visual C++', 'MFC', and under the templates select 'MFC Application'. Enter a new name for your project, in this case please enter 'Machine'. Then select the directory path for your project under 'Location'.
After the wizard welcome window please accept the following settings: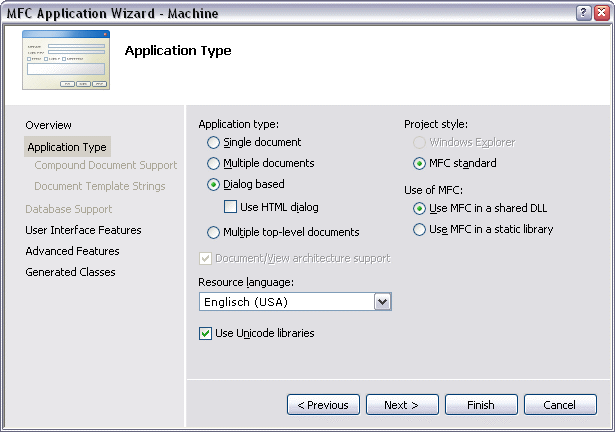
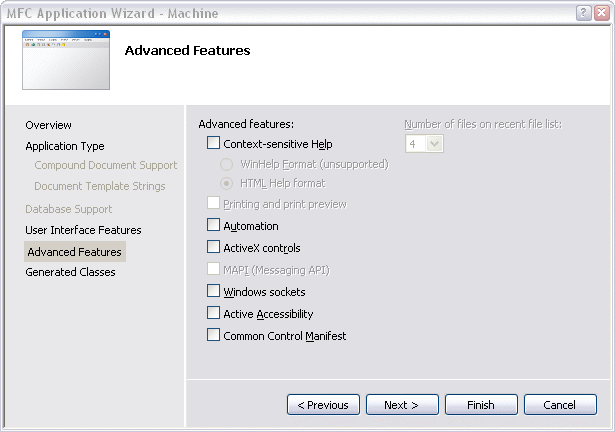
No further features are required.
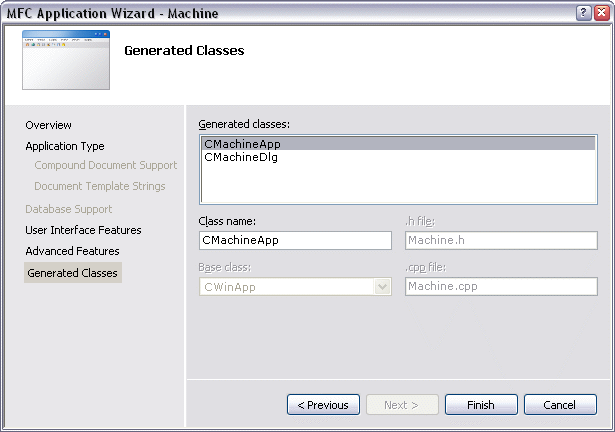
Last step in the wizard. No changes are required here.
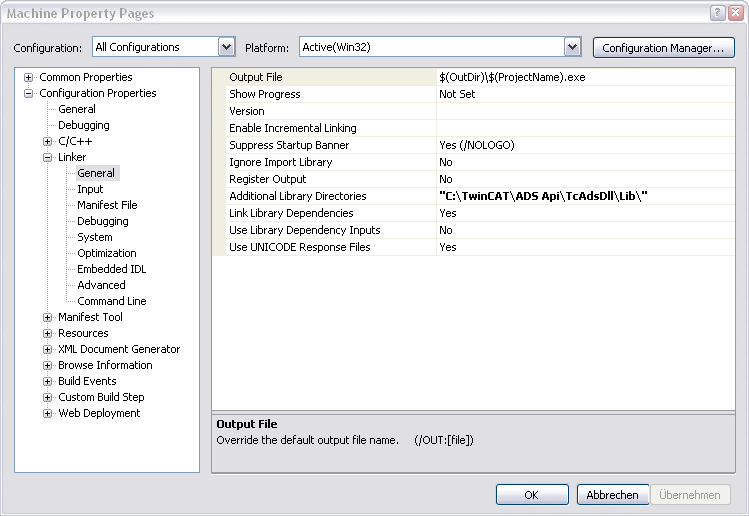
Finally, link the required TcAdsDll.lib. Enter the path under 'Project -> Machine Properties... -> Configuration Properties -> Linker -> General -> Additional Library Directories'.
An additional entry is required under 'Project -> Machine Properties... -> Configuration Properties -> Linker -> Input -> Additional Dependencies'.
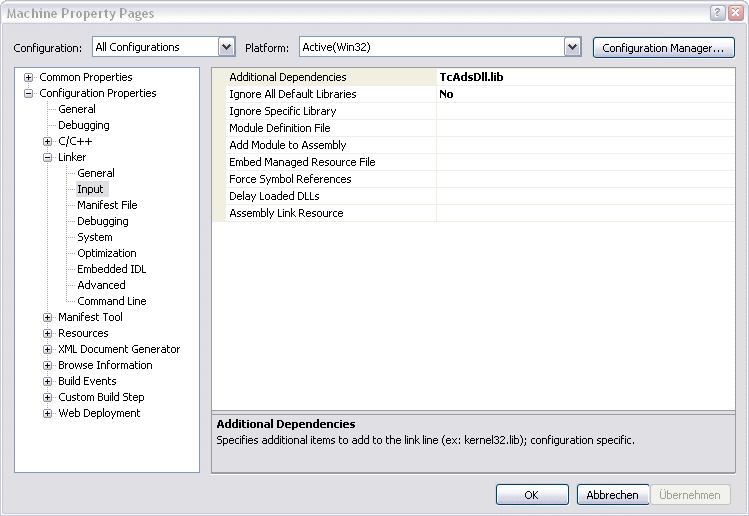
Please ensure that at the top left under 'Configuration:''All Configurations' is selected.
2. Creating a user interface
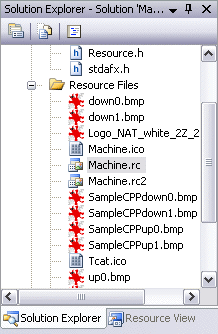
First create an interface in the design mode of the form 'Machine.rc' with the toolbox. Open 'Machine.rc' by double-clicking in the 'Solution Explorer'.
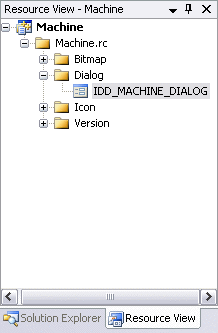
You are now in 'Resource View'. A further double-click on 'IDD_MACHINE_DIALOG' brings up the form for positioning all required controls (such as 9 static texts, 3 picture boxes, 2 radio buttons, 1 progress bar, group boxes...).
The result should look similar to this.
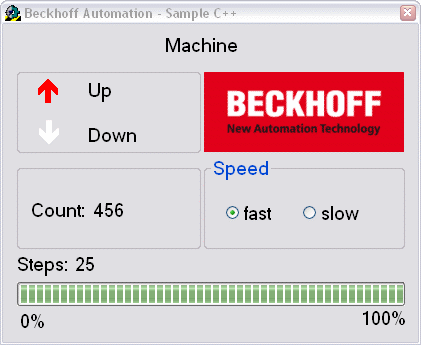
In the upper left you see the two outputs that are also output to the Bus Terminals. The bottom left shows the variable for counting the workpieces. The cycle speed of the motor can be changed via the 'Speed' field on the right. The 'Steps' display shows the number of cycles that are output on output 1.
3. Edit source text
Once the interface has been created and the TwinCAT DLL.LIB component has been integrated, you can change to the C++ source text. Declarations are implemented in the lower area of the source text for 'MachineDlg.h'.
[…]

// Variablen des Programms// Variables of the programmprivate:
     // Variablen der Bitmaps// Variables of the bitmaps
     CBitmap CbmUp0, CbmUp1, CbmDown0, CbmDown1;
private:
     // Timerfunktion und Variablen// Timerfunction and variablesvoid OnTimer(UINT nIDEvent);
     UINT_PTR m_nTimer;
     UINT nIDEvent;
private:
     // Membervariable der Statusanzeige// Member variable of the progressbar
     CProgressCtrl     m_ctrlBar;
private:
     // Membervariablen der Controls// Member variables of the controls
     CStatic       m_ctrlCount;
     CStatic       m_ctrlSteps;
     CStatic       m_ctrlEngine;
     CStatic       m_Up;
     CStatic       m_Down;
     CStatic       m_rdoFast;
private:
     // Implementierung der Radio Buttons// Implementation of the radio buttons
     afx_msg void OnBnClickedRadio1();
     afx_msg void OnBnClickedRadio2();
private:
     // Allgemeine Variablendeklarationen// General declarations of variables
     CButton       *pRB;
     short         sCount;
     byte          bySteps;
     CString       sOutput;
     AmsAddr       Addr;
     PAmsAddr      pAddr;
     long          nErr, nSwitch, nNotify, nPort;
     bool          bEngine, bUp, bDown, bSwitch, bNotify;
     ULONG         hEngine, hDeviceUp, hDeviceDown, hSteps, hCount, hSwitch, hNotify;
};
The method 'CMachineDlg::OnInitDialog()' is called when the MFC application is started. It is used for generating instances of different classes, establishing a connection with runtime system 1 of component TcAdsDll.lib via port 801, loading required bitmaps and creating the handles for PLC variables.
BOOL CMachineDlg::OnInitDialog()
{
     CDialog::OnInitDialog();

     […]

     // Kommunikationsport für lokale SPS (Laufzeitsystem 1) öffnen// Open the communication port for the SPS (Runtime system 1)
     pAddr = &Addr;
     nPort = AdsPortOpen();
     nErr = AdsGetLocalAddress(pAddr);
     pAddr->port = AMSPORT_R0_PLC_RTS1;

     // Timer initialisieren// Timer initialization
     m_nTimer = CDialog::SetTimer( 1, 40, NULL );
     m_ctrlBar.SetRange( 0, 25 );

     // Laden der Bitmaps// Loading of the bitmaps
     CbmUp0.LoadBitmapW( IDB_UP0 );
     CbmUp1.LoadBitmapW( IDB_UP1 );
     CbmDown0.LoadBitmapW( IDB_DOWN0 );
     CbmDown1.LoadBitmapW( IDB_DOWN1 );

     // Einen Pointer auf ein CButton Objekt holen// Get a pointer to CButton Object
     pRB = (CButton*)GetDlgItem( IDC_rdoFast );

     // Setzt den Radio Button auf "checked"// Set the radio button on checked state
     pRB->SetCheck(1);

     // Abfrage vom SPS-Switch-Status// Inquiry of the SPS switch status
     nNotify = AdsSyncReadWriteReq( pAddr, ADSIGRP_SYM_HNDBYNAME, 0x0, sizeof(ULONG), &hNotify, 8, ".switch" );
     nNotify = AdsSyncReadReq ( pAddr, ADSIGRP_SYM_VALBYHND, hNotify, 8, &bNotify );
     if ( bNotify )
     {
       pRB = ( CButton* )GetDlgItem( IDC_rdoFast ); pRB->SetCheck(1);
       pRB = ( CButton* )GetDlgItem( IDC_rdoSlow ); pRB->SetCheck(0);
     }
     else
     {
       pRB = ( CButton* )GetDlgItem( IDC_rdoFast ); pRB->SetCheck(0);
       pRB = ( CButton* )GetDlgItem( IDC_rdoSlow ); pRB->SetCheck(1);
     }
     nNotify = AdsSyncWriteReq( pAddr, ADSIGRP_SYM_RELEASEHND, 0x0, sizeof(ULONG), &hNotify );

     // Handles für die SPS-Variablen holen// Get handles for the SPS variables
     nErr = AdsSyncReadWriteReq( pAddr, ADSIGRP_SYM_HNDBYNAME, 0x0, sizeof(ULONG), &hDeviceUp, 10, ".deviceUp" );
     nErr = AdsSyncReadWriteReq( pAddr, ADSIGRP_SYM_HNDBYNAME, 0x0, sizeof(ULONG), &hDeviceDown, 12, ".deviceDown" );
     nErr = AdsSyncReadWriteReq( pAddr, ADSIGRP_SYM_HNDBYNAME, 0x0, sizeof(ULONG), &hSteps, 7, ".steps" );
     nErr = AdsSyncReadWriteReq( pAddr, ADSIGRP_SYM_HNDBYNAME, 0x0, sizeof(ULONG), &hCount, 7, ".count" );
     nNotify = AdsSyncReadWriteReq( pAddr, ADSIGRP_SYM_HNDBYNAME, 0x0, sizeof(ULONG), &hNotify, 8, ".switch" );

     return TRUE;  // return TRUE  unless you set the focus to a control
}
Output PLC variables:
Variable output is organised in 'CMachineDlg::OnTimer()'. The parameter 'nElapse' of the 'SetTimer()' method (already specified in 'CMachineDlg::OnInitDialog()') determines the time (in ms) that should pass before the timer is executed again.
void CMachineDlg::OnTimer(UINT nIDEvent)
{
     //--> Ausgabe der SPS-Variablen <--////--> Output of the SPS variables <--/////////////////////////////////////////////////////////////////////////////////////////////// Auslesen der SPS-Variablen// Reading the SPS variables
     nErr = AdsSyncReadReq( pAddr, ADSIGRP_SYM_VALBYHND, hDeviceUp, 10, &bUp );
     // Bitmap für den "Up"-Zustand setzen// Sets the Bitmap of the "Up" positionif( bUp == 0 ){ m_Up.SetBitmap(CbmUp0); }
     else{ m_Up.SetBitmap(CbmUp1); }
     //---------------------------------------------------------------------------------------//
     nErr = AdsSyncReadReq( pAddr, ADSIGRP_SYM_VALBYHND, hDeviceDown, 12, &bDown );
     // Bitmap für den "Down"-Zustand setzen// Sets the Bitmap of the "Down" positionif( bDown == 0 ){ m_Down.SetBitmap(CbmDown0); }
     else{ m_Down.SetBitmap(CbmDown1); }
     //---------------------------------------------------------------------------------------//
     nErr = AdsSyncReadReq( pAddr, ADSIGRP_SYM_VALBYHND, hSteps, 7, &bySteps );
     // Anzahl der Schritte in das Control schreiben// Writes the number of steps in the control
     sOutput.Format( _T("%d"), bySteps );
     m_ctrlSteps.SetWindowText( sOutput );
     m_ctrlBar.SetPos( bySteps );
     //---------------------------------------------------------------------------------------//
     nErr = AdsSyncReadReq( pAddr, ADSIGRP_SYM_VALBYHND, hCount, 7, &sCount );
     // Zählerstand in das Control schreiben// Writes the count in the control
     sOutput.Format( _T("%i"), sCount );
     m_ctrlCount.SetWindowText( sOutput );
     //---------------------------------------------------------------------------------------//// Anpassen der "Switch"-Variable, bei Veränderung in der SPS// Fits the switch variable if it is changing
     nNotify = AdsSyncReadReq( pAddr, ADSIGRP_SYM_VALBYHND, hNotify, 8, &bNotify );
     if ( bNotify )
     { pRB = (CButton*)GetDlgItem( IDC_rdoFast ); pRB->SetCheck(1);
       pRB = (CButton*)GetDlgItem( IDC_rdoSlow ); pRB->SetCheck(0);
     }
     else
     { pRB = (CButton*)GetDlgItem( IDC_rdoFast ); pRB->SetCheck(0);
       pRB = (CButton*)GetDlgItem( IDC_rdoSlow ); pRB->SetCheck(1);
     }
     nNotify = AdsSyncWriteReq( pAddr, ADSIGRP_SYM_RELEASEHND, 0x0, sizeof(ULONG), &hNotify );
     ///////////////////////////////////////////////////////////////////////////////////////////

     CDialog::OnTimer(nIDEvent);
};
The method 'AdsSyncReadWriteReq()' was used for linking the variables.
long AdsSyncReadWriteReq(
PAmsAddr pAddr, ULONG  nIndexGroup, ULONG nIndexOffset, ULONG nReadLength, PVOID pReadData, ULONG nWriteLength,
 PVOID pWriteData );
- pAddr: Structure with NetId and port number of the ADS server.
- nIndexGroup: Index group.
- nIndexOffset: Index offset.
- nReadLength: Length of data returned by the ADS device in bytes.
- pReadData: Buffer with data returned by the ADS device.
- nWriteLength: Length of data written to the ADS device in bytes.
- pWriteData: Buffer with data being written to the ADS device.
The method 'AdsSyncReadWriteReq()' was also used for linking the variable 'hSwitch'. The only difference is that 'AdsSyncReadReq()' (reading of variables) is used instead of 'AdsSyncWriteReq()' (writing of variables).
long AdsSyncReadReq( PAmsAddr pAddr, ULONG nIndexGroup, ULONG nIndexOffset, ULONG nLength, PVOID pData );
- pAddr: Structure with NetId and port number of the ADS server.
- nIndexGroup: Index group.
- nIndexOffset: Index offset.
- nLength: Length of the data, in bytes, written to the ADS server.
- pData: Pointer to data written to the ADS server.
Lastly, we require two methods for controlling the machine speed. To this end simply change to Design view, double-click on the radio button for 'fast' and 'slow' and enter the associated code.
Code for 'fast' radio button.
void CMachineDlg::OnBnClickedRadio1()
{
     // Anpassen der "Switch"-Variable, bei klick auf Radio Button "fast"// Fits the switch variable if the radio button "fast" was clicked
     bSwitch = true;
     nSwitch = AdsSyncReadWriteReq( pAddr, ADSIGRP_SYM_HNDBYNAME, 0x0, sizeof(ULONG), &hSwitch, 8, ".switch" );
     nSwitch = AdsSyncWriteReq( pAddr, ADSIGRP_SYM_VALBYHND, hSwitch, 0x1, &bSwitch );
     nSwitch = AdsSyncWriteReq( pAddr, ADSIGRP_SYM_RELEASEHND, 0x0, sizeof(ULONG), &hSwitch );
}
Code for 'slow' radio button.
void CMachineDlg::OnBnClickedRadio2()
{
     // Anpassen der "Switch"-Variable, bei klick auf Radio Button "slow"// Fits the switch variable if the radio button "slow" was clicked
     bSwitch = false;
     nSwitch = AdsSyncReadWriteReq( pAddr, ADSIGRP_SYM_HNDBYNAME, 0x0, sizeof(ULONG), &hSwitch, 8, ".switch" );
     nSwitch = AdsSyncWriteReq( pAddr, ADSIGRP_SYM_VALBYHND, hSwitch, 0x1, &bSwitch );
     nSwitch = AdsSyncWriteReq( pAddr, ADSIGRP_SYM_RELEASEHND, 0x0, sizeof(ULONG), &hSwitch );
}
Deleting handles:
Finally, delete the handles created during the process. To this end, open the form 'Properties' and switch from 'Properties' to 'Messages' in the small icons at the top. Then select the 'WM_CLOSE' message in the lower window and select '<Add> OnClose' in the dropdown menu.
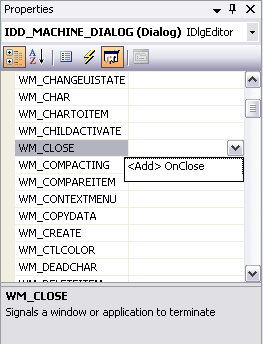
This takes you directly to the point in the code where the following code has to be added.
void CMachineDlg::OnClose()
{
     // Handles der SPS-Variablen freigeben und Port schließen// Release the handles of the SPS variables and close the port
     nErr = AdsSyncWriteReq( pAddr, ADSIGRP_SYM_RELEASEHND, 0, sizeof(ULONG), &hDeviceUp );
     nErr = AdsSyncWriteReq( pAddr, ADSIGRP_SYM_RELEASEHND, 0, sizeof(ULONG), &hDeviceDown );
     nErr = AdsSyncWriteReq( pAddr, ADSIGRP_SYM_RELEASEHND, 0, sizeof(ULONG), &hSteps );
     nErr = AdsSyncWriteReq( pAddr, ADSIGRP_SYM_RELEASEHND, 0, sizeof(ULONG), &hCount );
     nErr = AdsPortClose();
The PLC programMachine_Final.proshould start on runtime system 1, and the created C++ programMachine.execan be tested.