Following Program Flow
TwinCAT Scope View is used for recording and analysis of the program.
Open TwinCAT Scope View:
Scope View can only be opened through the start menu.
Use the mouse to select 'Start' -> 'Programs' -> 'TwinCAT System' -> 'TwinCAT Scope View'.
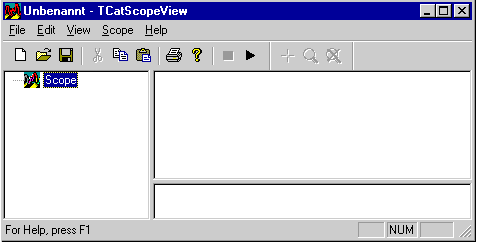
The elements of TwinCAT Scope View:
The window of TwinCAT Scope View is similar to that of TwinCAT PLC Control. In the first line is the name of the project, among them is the commend line and the toolbar. The three large windows are empty. In the left window you can configure the Scope.
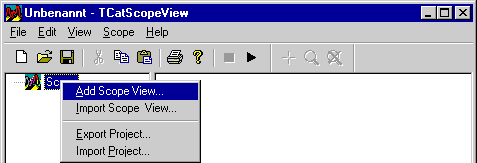
Start TwinCAT Scope View:
You must first add a Scope View, or in other words a project, in order to be able to start the example program Maschine.pro. To do this, click with the right mouse button on Scope, choose 'Add Scope View' there, and confirm with 'OK'.
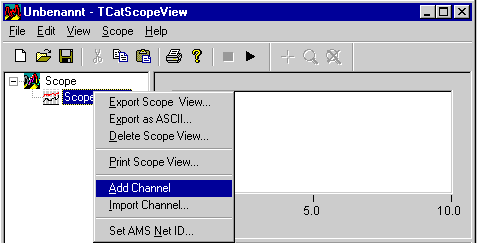
Insert channel:
In order to display the individual signals it is necessary to create the associated channels.
To do this, click with the right mouse button on 'Scope View 1', choose 'Add channel', and confirm with 'OK'.
The following tabs then appear, with which the variables whose values are to be recorded are described.
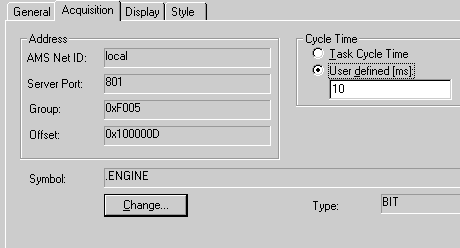
A clear display is obtained by setting the user-defined sampling time to 10 ms.
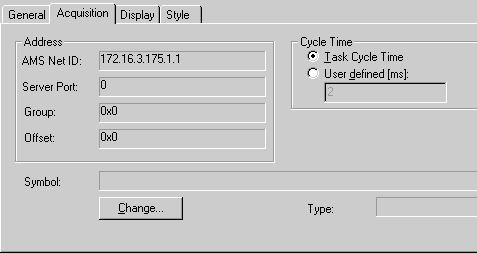
Set up server port:
The next step is to set up the server port. Under Acquisition click on 'Change', enter the number, and confirm with 'OK'. (The server port can be found from PLC Control, see under Selecting the target system.)
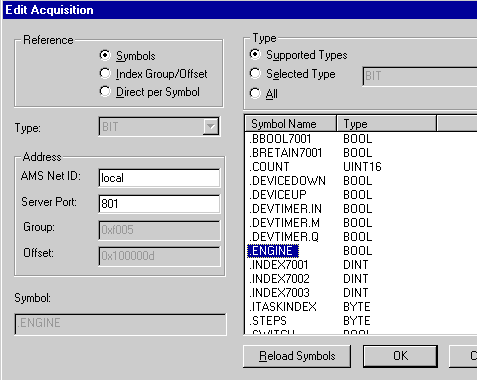
Assign channel:
Assign the signal .ENGINE to Channel 1 by clicking on 'Change' again, and confirm this action with 'OK'.
Settings
The tab then shows the following settings:
Renaming a channel:
A slow double click on 'Channel1' allows it to be renamed to ENGINE.
Add more channels:
You can assign the other channels in the same way.
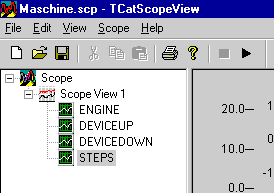
Channel2=.DEVICEUP
Channel3=.DEVICEDOWN
Channel4=.STEPS
The server port and sampling time remain the same for all the channels.
When you have created and renamed the four channels, save the Scope View via the 'File' menu, selecting 'Save as' and giving Maschine.scp as the name.
In order to be able to distinguish the various curves from one another, each channel can be given a different colour, form or axis. This is done with the aid of the Style or Display tabs.
Start recording:

Recording is started by selecting 'Start Scope' from the 'Scope' menu.
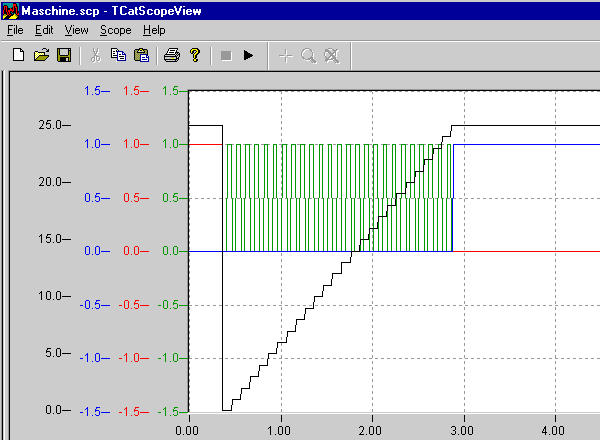
Maschine.pro
The sample program then looks like this: