Editors
All editors for POUs (Program Organization Units) consist of a declaration part and a body. These are separated by a screen divider that can be dragged as required by clicking it with the mouse and moving it up or down. The body can consist of other a text or a graphic editor; the declaration portion is always a text editor.
Print margins
The vertical and horizontal margins that apply when the editor contents are printed, are shown by red dashed lines if the 'Show print range' option in the project options in the dialog 'Workspace' was selected. The properties of the printer that was entered apply, as well as the size of the print layout selected in the 'File' 'Printer Setup' menu. If no printer setup or no print layout is entered, a default configuration is used (Default.DFR and default printer). The horizontal margins are drawn as if the options 'New page for each object' or 'New page for each sub-object' were selected in 'Documentation settings'. The lowest margin is not displayed.
 | An exact display of the print margins is only possible when a zoom factor of 100% is selected. |
Comment
User comments must be enclosed in the special symbol sequences „(*“ and „*)“. Example: (*This is a comment.*)
Comments are allowed in all text editors, at any location desired, that is in all declarations, the IL and ST languages and in self-defined data types. If the Project is printed out using a template, the comment that was entered during variable declaration appears in text-based program components after each variable.
In the FBD and LD graphic editors, comments can be entered for each network. To do this, search for the network on which you wish to comment and activate 'Insert' 'Comment'. In CFC there are special comment POUs which can be placed at will.
In SFC, you can enter comments about a step in the dialog for editing step attributes.
Nested comments are also allowed if the appropriate option in the 'Project' 'Options' 'Build Options' dialog is activated. In Online mode, if you rest the mouse cursor for a short time on a variable, the type and if applicable the address and comment of that variable are displayed in a tooltip.
Zoom to POU
With this command a selected POU is loaded into its editor. The command is available in the context menu (<F2>) or in the 'Extras' menu, if the cursor is positioned on the name of a POU in a text editor or if the POU box is selected in a graphic editor. If you are dealing with a POU from a library, then the library manager is called up, and the corresponding POU is displayed.
Open instance
This command corresponds to the command 'Project' 'Open instance'. It is available in the context menu or in the 'Extras' menu, if the cursor is positioned on the name of a function block in a text editor or if the function block box is selected in a graphic editor.
Intellisense Function
If the option 'List components' is activated in the project options dialog for category 'Editor', then the "Intellisense" functionality will be available in all editors, in the Watch- and Receiptmanager, in the Visualization and in the Sampling Trace:
- If you insert a dot "." instead of an identifier, a selection box will appear, listing all local and global variables of the project. You can choose one of these elements and press 'Return' to insert it behind the dot. You can also insert the element by a doubleclick on the list entry.
- If you enter a function block instance or a structure variable followed by a dot, then a selection box listing all input and output variables of the corresponding function block resp. listing the structure components will appear, where you can choose the desired element and enter it by pressing 'Return' or by a doubleclick.
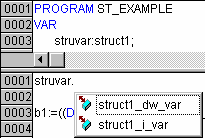
Example:
Insert "struvar." -> the components of structure struct1 will be offered