TwinCAT C++ development
Overview of the development environment
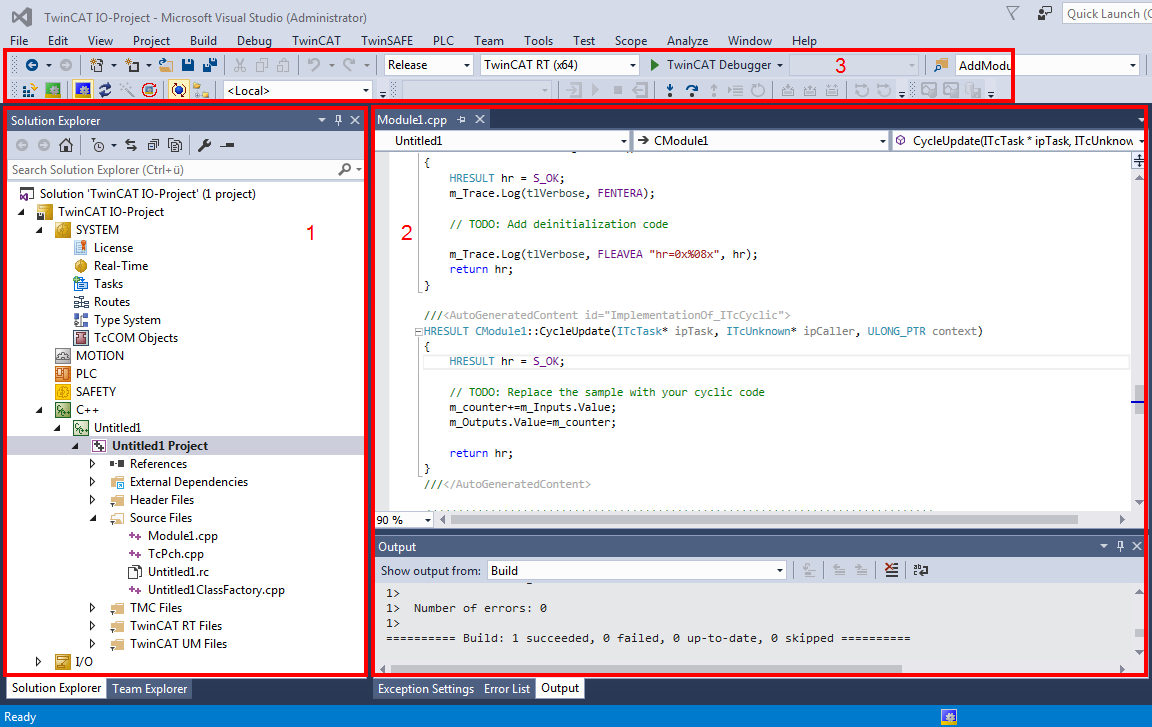
The layout of Visual Studio is flexible and adaptable, so that only a brief overview of a common configuration can be provided here. The user is free to configure windows and arrangements as required.
- In the TwinCAT solution, a TwinCAT C++ project can be created by right-clicking on the C++ icon. This project contains the sources (“Untitled Project”) of perhaps several modules, and module instances ("Untitled1_Obj1 (CModule1)") can be created. The module instances have inputs/outputs, which can be linked in the usual way ("Link"). There are further options for module interaction.
- The Visual Studio editor for Visual C++ is used for programming. Note in particular the drop-down boxes for fast navigation within a file. In the lower section the result of the compile process is output. The user can switch to TwinCAT messages (cf. Module messages for the Engineering (logging / tracing)).
The usual features such as breakpoints (cf. Debugging) can be used in the editors. - The freely configurable toolbar usually contains the toolbar for TwinCAT XAE Base. Activate Configuration, RUN, CONFIG, Choose Target System (in this case <Local>) and several other buttons provide fast access to frequently used functions. The TwinCAT Debugger is the button for establishing a connection to the target system with regard to C++ modules (the PLC uses an independent debugger). Like in other C++ programs, and in contrast to PLC, in TwinCAT C++ a distinction has to be made between "Release" and "Debug". In a build process for "Release", the code is optimized to such an extent that a debugger may no longer reliably reach the breakpoints, and incorrect data may be displayed.
Procedure
This section describes the processes for programming, compiling and starting a TwinCAT C++ project.
It provides a general overview of the engineering process for TwinCAT C++ projects with reference to the corresponding detailed documentation. The quick start guide describes the individual common steps.
- 1. Type declaration and module type:
The TwinCAT Module Class Editor (TMC) and TMC code generator is used for the definition of data types and interfaces, and also for the modules that use these.
The TMC code generator generates source code based on the processed TMC file and prepares data types / interfaces for use in other projects (like PLC).
Editing and starting the code generator can take place as often as you like – the code generation pays attention to programmed user code and saves it. - 2. Programming
The familiar Visual Studio C++ programming environment is used for the development and debugging of the user-defined code within the code template. - 3. Instantiating modules
The program describes a class, which is instantiated as objects. The TwinCAT Module Instance Configurator is used for configuring the instance. General configuration elements are: assign task, download symbol information for runtime (TwinCAT Module Instance (TMI) file) or define parameter/interface pointer. - 4. Mapping of variables
The input and output variables of an object can be linked with variables of other objects or PLC projects, using the standard TwinCAT System Manager. - 5. Building
During the building (compilation and linking) of the TwinCAT C++ project, all components are compiled for the selected platform. The platform is determined automatically when the target system is selected. - 6. Publishing (see Export to TwinCAT 3.1 4022.xx / Import up to TwinCAT 3.1 4022.xx)
During publishing of a module, the drivers for all platforms are created, and the module is prepared for distribution. The created directory can be distributed without the need to transfer the source code. Only binary code with the interface description is transferred. - 7. Signature (see Driver signing)
The TwinCAT drivers must be signed for x64 run times, since 64-bit Windows versions require that kernel modules are signed. Therefore, this applies both to the x64 creation and to the publication of modules, because these modules contain the x64 binary codes (if not deactivated).
The signature process can be user-defined. - 8. Activation
The TwinCAT C++ driver can be activated like any other TwinCAT project via Activate Configuration. The dialog then requests to switch TwinCAT to RUN mode.
Debugging in real-time (which is familiar from IEC61131-based systems) and the setting of (conditional) breakpoints is possible for TwinCAT C++ modules.
- The module runs under real-time conditions.