Scripting Container: ScriptingTestContainer
This article describes the basic structure of the ScriptingTestContainer project and consists of the following topics:
- The Graphical User Interface (GUI)
- Early and late bound script samples
- Location of sample scripts ("Where's the Automation Interface code???" )
- Behind the scenes: Class structure
- Behind the scenes: Method structure
- Behind the scenes: Implementing own samples
The Graphical User Interface (GUI)
After you have started the Scripting Container application, its GUI will look as follows:
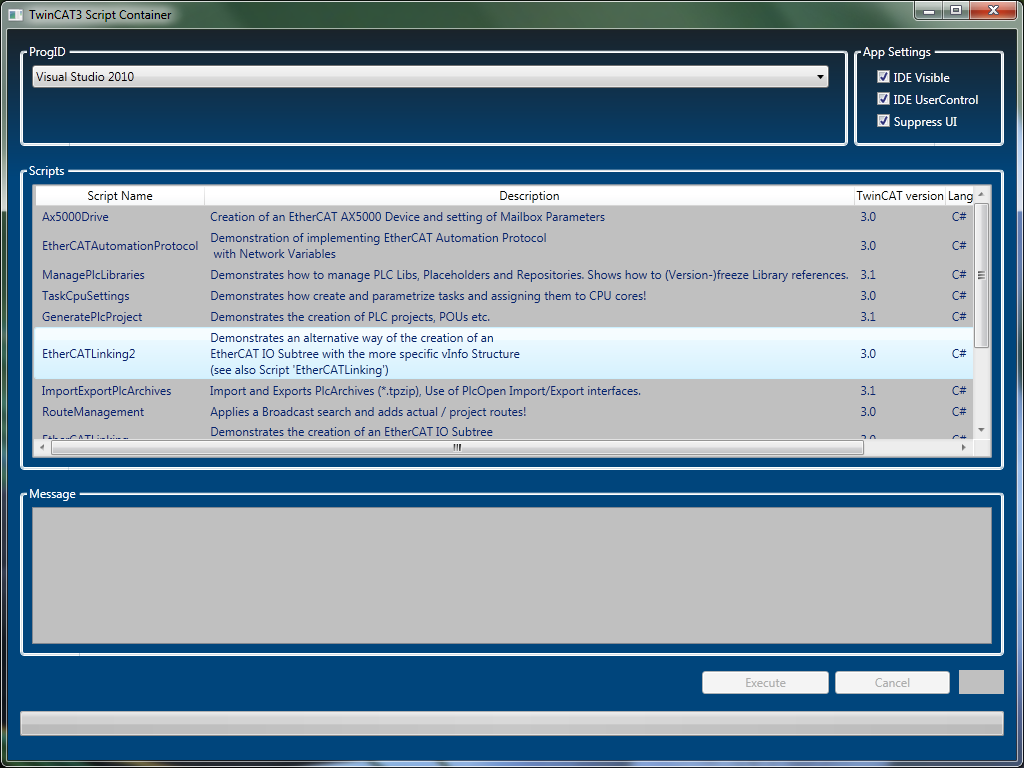
The dropdown box at the top of the window lets you choose the version of Visual Studio that you would like to use to create the TwinCAT configuration.
There are a variety of sample scripts available, which can be selected in the table at the center of the window.
To execute a script, simply select it from the table and click on "Execute". During code execution, the script displays status information in the message logging window below the script table.
To change the visibility behavior of Visual Studio, you can switch the checkboxes in the upper right corner of the window. By default, Visual Studio is shown during script execution and not closed after the script finishes.
Early and late bound script samples
This application contains both - early and late bound - script samples. Late bound samples make use of the .NET data type "dynamic" and therefore determine an objects data type during runtime whereas early bound scripts use the corresponding data type of an object during the creation of an object. Both ways have their advantages and disadvantages and it depends on the developer and project which type handling is to be prefered.
Location of sample scripts ("Where's the Automation Interface code???")
All script samples - early and late bound - are located in an own project container within the Visual Studio solution: Scripting.CSharp.Scripts for early bound and Scripting.CSharp.ScriptsLateBound for late bound sample code.
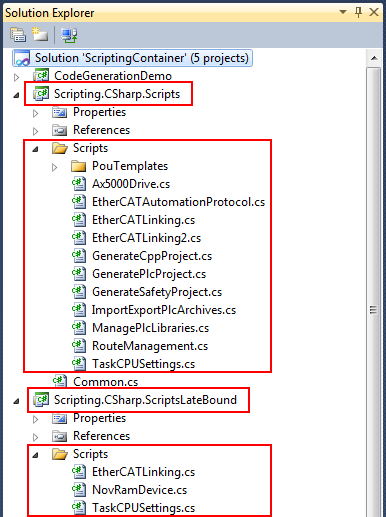
Each script file implements a method OnExecute() in which the TwinCAT Automation Interface script code is implemented.
Behind the scenes: Class structure
Each code sample is represented by an own class which derives either from the abstract class "ScriptEarlyBound" or "ScriptLateBound" - depending on the data type handling used in the sample. The difference between these two classes is that the ScriptEarlyBound class uses static typing for the DTE and Solution objects. The ScriptLateBound class uses dynamic typing instead. The following UML diagram explains the class hierarchy in more detail. The grey classes represent the actual sample scripts, which either derive from class ScriptEarlyBound (when static typing should be used) or from class ScriptLateBound (when dynamic typing should be used).
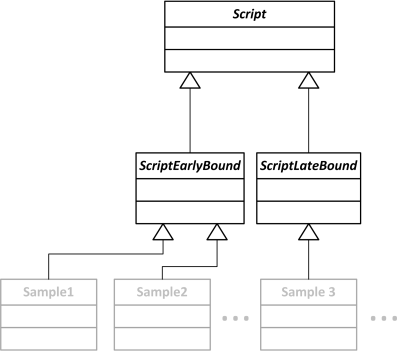
The abstract class "Script" defines methods and attributes which are common for both the ScriptEarlyBound and ScriptLateBound classes.
Behind the scenes: Method structure
Each sample class contains three methods which are used in the Scripting Container to execute the Automation Interface code. The following table shows their meaning.
|
Signature of derived method |
Description |
|---|---|
|
OnInitialize (dynamic dte, dynamic solution, IWorker worker) |
The OnInitialize() method is usually used for Automation Interface code which opens or prepares a new TwinCAT XAE configuration. |
|
OnCleanUp (IWorker worker) |
The OnCleanUp() method may be used to clean-up the TwinCAT XAE configuration after code execution. |
|
OnExecute (IWorker worker) |
This method is executing the actual Automation Interface script code. |
Please also compare the implementation of existing sample scripts to get a better understanding about how each method works.
Behind the scenes: Implementing own samples
It is easily possible to implement own Automation Interface samples into the Scripting Container. To implement own Automation Interface code, a developer only needs to decide which binding he would like to use and then implement a new class which derives from one of the main classes (ScriptEarlyBound or ScriptLateBound) and then implement the derived methods.