Distributed Clocks settings in the Beckhoff TwinCAT System Manager (2.10)
Different configuration dialogs are used for the EtherCAT master and the slaves with distributed clock support.
Note | |
Attention! No plausibility check takes place! The mentioned notes and information should be used advisedly. |
 | Validity of the following settings The setting options described below refer to Beckhoff TwinCAT 2.10 Build 1320. More recent editions can have a different user interface design; however, usage remains analogously the same. |
Master settings
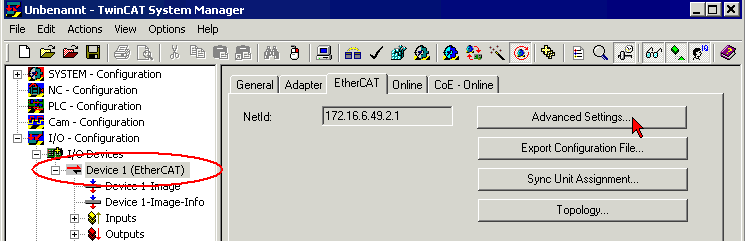
Each EtherCAT device in the System Manager offers access (via Advanced Settings) to the Distributed Clocks settings, if EtherCAT slaves are present in the configuration:

-
Sync Slave
If activated, this EtherCAT device/EtherCAT strand is a Sync Slave to another EtherCAT strand in the same PC, the Sync Master – this contains the reference clock and regulates the real time on the PC. There is no reference clock in the Sync Slave EtherCAT strand. -
Sync Master
Default setting – this EtherCAT device (here: device 1) regulates the PC real time; the reference clock is located in this EtherCAT strand and is in this example the EtherCAT slave "Terminal 3", an EL1502. -
Shift time (µs)
This is the automatic shift time calculated automatically by the System Manager for all EtherCAT slaves. In this case all local Distributed Clocks in the EtherCAT slaves trigger their SYNC 13.2 µs after the real-time tick. This applies to slaves declared as input or output module.
The user can intervene with an additional value and shift the SYNC pulses in positive or negative direction. -
Input shift time (µs)
This shift time only applies to slaves that are declared as input module (see XML device description). Manual modification is possible. -
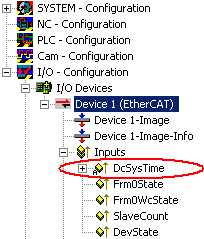
Show DC system time (64-bit)
If activated, the new 64-bit input variable DcSysTime appears in the process image of the EtherCAT master; see Fig. DcSysTime input variable (can be activated). It is a copy of the time in the EtherCAT reference clock.
| Precision of the variable DcSysTime The time from the reference clock is read without the need for uniform sampling. It is intended as rough guidance for the user to indicate the current time range of the EtherCAT system. It is scanned cyclically, although the value may jitter by up to +/- 1 cycle time due to "soft" sampling. |
Note | |
Attention! No plausibility check takes place! The mentioned notes and information should be used advisedly. Unless specified otherwise in the associated slave documentation, we strongly advise against changing the automatic settings. |
Slave settings
| Validity of the following settings DC functionality is explained using the EL1202-0100 terminal as an example. Each EtherCAT slave with distributed clock support uses this feature on an individual basis as described in the associated documentation. |
Note | |
Attention! No plausibility check takes place! The mentioned notes and information should be used advisedly. |
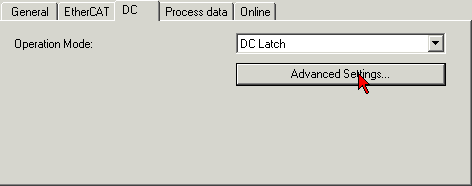
“DC” tab
If an EtherCAT slave supports distributed clock functionality, a "DC" tab appears for the parameterization. If an EtherCAT slave offers several operation modes, the required mode can be selected here. The EL1202-0100 can only be used in one mode, which is why no selection is possible here.
Click "Advanced Settings" to enter the advanced extended distributed clock dialog:
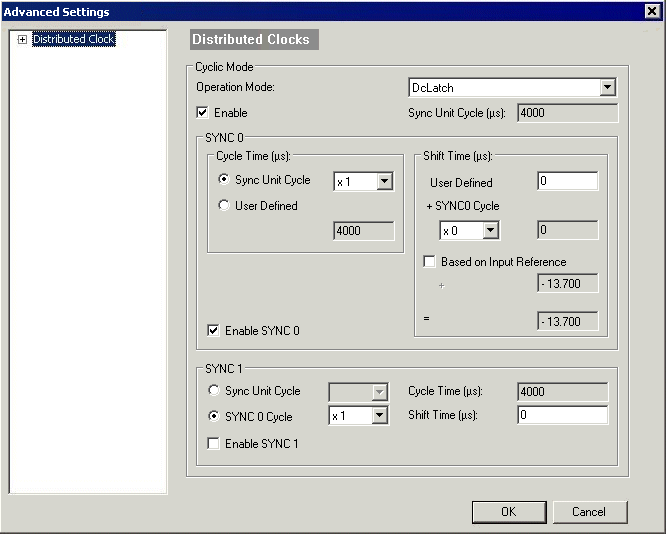
The basic side of any EtherCAT slave with distributed clocks can be seen in Fig. Distributed clocks dialog in the EtherCAT slave (TwinCAT 2.10, build 1320):
-
Operation mode
Same functionality as in the higher-level dialog. -
Cyclic mode/enable
Activates distributed clocks. NOTICE
-
Sync unit cycle (µs)
Basic cycle of the EtherCAT slave - corresponds to the current EtherCAT cycle time of the EtherCAT slave. In this example a task with a cycle time of 4 ms (4000 µs) scans the EL1202-0100. If several tasks with different cycle times are operated on the same EtherCAT strand, the cycle time of the task that is currently exchanging process data with the slave is shown here. If several tasks are active on the same slave, the fastest task cycle time is shown here.
The following two sections describe the interrupt signals generated by the distributed clock unit in the ESC.
-
Enable SYNC0
Activates the SYNC0 signal. -
SYNC0 cycle time
A multiple or a fraction of the basic cycle described above can be set. The result appears in the window below (here: 4000 µs for factor 1). At these intervals the SYNC0 signal is generated by the ESC, if SYNC0 or distributed clock are activated. -
User-defined
Alternative any value can be specified. -
Shift Time
As described in the general introduction to distributed clocks, the SYNC pulse of an EtherCAT slave can be shifted forward or back by a constant time (S0 user shift time). The EL1202-0100 is associated with the input modules, which is why the -
Based on input reference
from the global Distributed Clocks setting of the EtherCAT master is applied to this slave. Both - User defined and
- Multiple of the SYNC0 cycle time are 0 by default. In the example the time components of this EL1202-0100 add up to a
- Total SYNC0 shift time of -13.7 µs.
A somewhat reduced dialog is available for setting the SYNC1 signal:
-
Enable SYNC1
Activates the SYNC1 signal. -
SYNC1 cycle time
The SYNC1 cycle time can either be derived from a multiple/a fraction of the basic cycle or the SYNC0 cycle time. -
Shift time (µs)
A constant shift time between the SYNC0 and the SYNC1 signal can be entered here (in µs).
| Relationship between SYNC0 and SYNC1 In contrast to the SYNC0 signal the SYNC1 signal is not a fully independent interrupt, as indicated by the reduced and different property dialogs. Further information can be found at www.ethercat.org, e.g. under ESC specifications. |
Note | |
Attention! No plausibility check takes place! The mentioned notes and information should be used advisedly. |
Time-related cooperation with other terminals
The final section of this introduction uses a further example to illustrate the application of distributed clocks in an EtherCAT system.
The task is to sample an analog input value in the range +/- 10 V at precise intervals of 50 µs and to transmit it to the controller; see Fig. Sample application for a manual shift time on SYNC0.
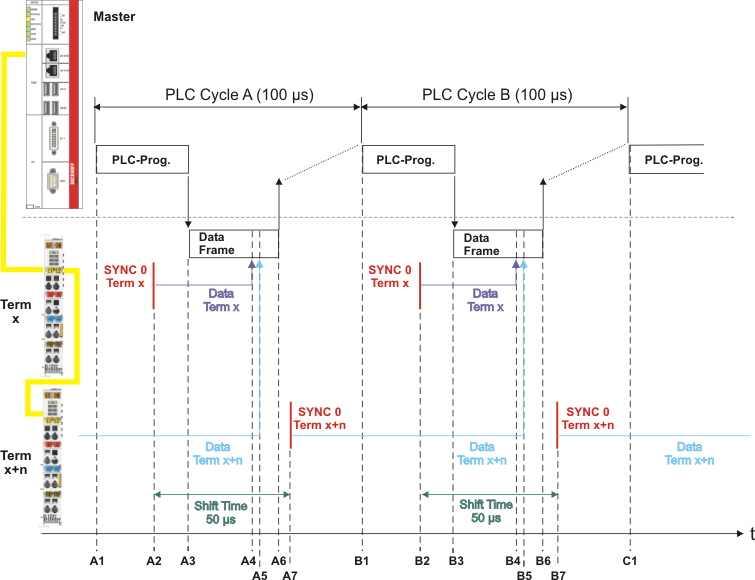
In this example a fast analog input module (e.g. Beckhoff EL3702) is used in conjunction with an EtherCAT cycle time of 50 µs. A different analog input module with an analog/digital conversion time of 60 µs is used. An EtherCAT cycle time of 50 µs is therefore not appropriate.
The following solution is available: Two such input modules are operated side by side (referred to as "Term x" and "Term x+1" here) and subjected to the same input signal. If the cycle time is 100 µs (A1 to B1) each input module has enough time (100 µs > 60 µs) for converting the analog input value. Conversion of the SYNC0 signal in the input modules is triggered at an interval of 100 µs at time A2, B2 etc. as standard. The situation at "Term x" is as follows: At time A2 the SYNC signal triggers conversion of the input values (the analog/digital converter is started). The lead time (A2 to A4) is dimensioned such that adequate time is available for converting the data and making them available in the slave, until at time A4 the slave "Term x" couples its input data into the passing Ethernet frame. At time A6 the frame has arrived back at master. The next data processing cycle commences at time B1.
In order to achieve the required time resolution of 50 µs, the user manually enters a constant user shift time of 50 µs for the SYNC0 signal in the second input module, as shown in the above dialogs. "Term x+1" always converts its input signals 50 µs after "Term x" at time A7, B7, etc. "Term x+1" then couples the data determined at time A7 into the Ethernet frame at time B5, shortly after B4, since in this example "Term x+1" is located after "Term x".
Fig. Sample application for a manual shift time on SYNC0 provides no information about the position of the data in the Ethernet frame – only the time axis is shown to the right!
Both input modules therefore cyclically convert the input value every 100 µs with a tolerance of < 100 ns, but with a constants offset of 50 µs. The user now has to interpret the process data generated in this way in the right time order within the PLC program. The associated terminals can support this process through a timestamp for process data, as described in the respective documentation.