EtherCAT configuration
The EP9300 is an EtherCAT master with automatic configuration, i.e. all EtherCAT terminals must always be present when switching on the system. Since the boot-up of the EP9300 generally takes considerably longer than the start-up of the EtherCAT slave devices, the latter can be operated on the same power supply. With decentralized EtherCAT slaves, care must be taken that they are switched on earlier or at the same time as the supply voltage.
Switching EtherCAT devices on or off during the runtime
If one or more EtherCAT devices should fail during the operating phase, a plug alarm is sent; EP9300-0022 remains in data exchange. The input data of all EtherCAT devices are then invalid and are set to FALSE or ZERO; the output data are no longer accepted. This also applies to the devices that are still in operation on EP9300-0022. If you wish to use the option to plug in or unplug devices during the runtime, a further “Sync Unit” must be configured. This is not possible with EP9300-0022. In this case use a CX8093.
EtherCAT devices that don’t exist in the GSDML
Some EtherCAT devices are not included in the GSDML and thus cannot be used (yet). The CX8093 can be used here, since it supports all EtherCAT devices in principle.
EtherCAT topology
All EtherCAT devices must be entered in the order in which they map themselves on EP9300-0022 and thus on the EtherCAT master. EtherCAT devices are addressed automatically; with a few exceptions all EtherCAT devices are equipped with an EtherCAT ASIC, which then has to be entered in the system, i.e. the Profinet controller. EtherCAT devices without an ASIC are, for example, EL9400, EL9070 and other EL9xxx. You can identify these EtherCAT devices using the technical data “Message to E-bus”. If there is a “-” here, then this EtherCAT device does not have to be entered in the Profinet controller.
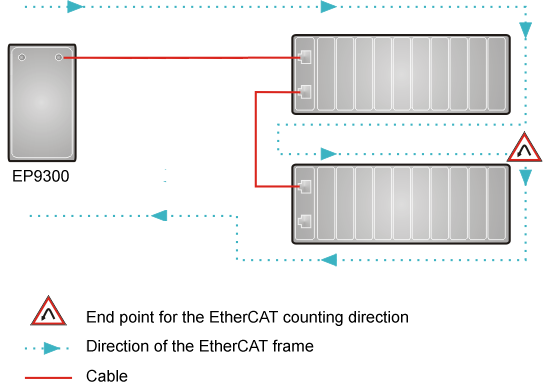
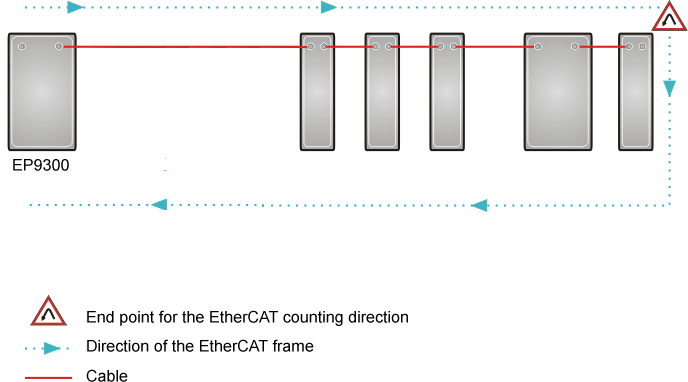
EtherCAT devices are registered in the direction of the EtherCAT telegram.
Example configuration with EK1100 EtherCAT coupler
Example configuration with EPxxxx EtherCAT Box
Example configuration with EK1122 2-port EtherCAT junction
The counting direction is to be observed when using an EK1122. If EtherCAT junction 1 on the EK1122 is connected, then the EtherCAT frame is forwarded here first (1); if junction 1 is not connected the frame on junction 2 is sent (2), only after that does the sequence continue with the E-bus on the right-hand side (3).
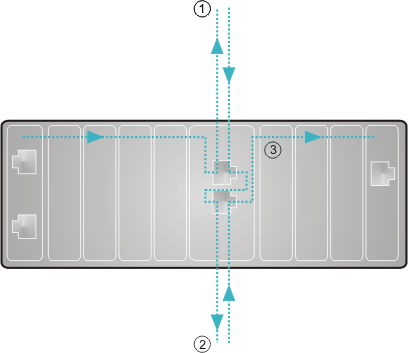
If both junctions are not used, then junction 1 and 2 are short-circuited as it were and the EtherCAT frame continues directly from the terminal to the right.
Note that in the PROFINET controller the modules are entered in the direction of the EtherCAT frame.
Example configuration with EP1122 2-port EtherCAT junction
The counting direction is to be observed when using an EP1122; it is comparable with the EK1122. If EtherCAT junction 1 on the EP1122 is connected, then the EtherCAT frame is forwarded here first (1); if junction 1 is not connected the frame on junction 2 is sent (2), only after that does the sequence continue with the EC-bus on the right-hand side (3).
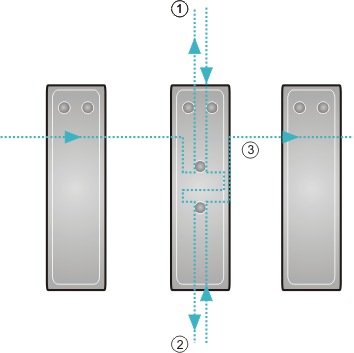
If both junctions are not used, then junction 1 and 2 are short-circuited as it were and the EC frame continues directly from the terminal to the right.
Note that in the PROFINET controller the modules are entered in the direction of the EtherCAT frame.
 | Connection during operation You cannot use the EP1122 and EK1122 for Hot Swap or connect or disconnect them during operation. |