Calibration and adjustment
The term "calibration" can be applied in 3 different ways to the EP3356-0022:
- Sensor calibration: once-only calibration of the employed sensor (strain gauge) during commissioning of the system
- Self-calibration: continuously repeated self-calibration of the box for the improvement of the measuring accuracy
- Tare: repeated gross/net compensation by taring
Sensor calibration
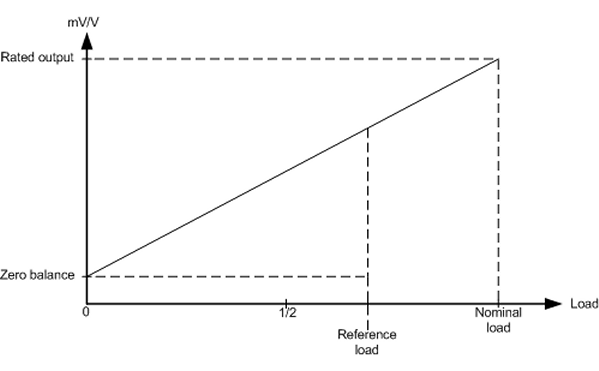
The EP3356-0022 is matched to the characteristic curve of the sensor element by means of the calibration. Two values are required for this procedure: the initial value without a load ("zero balance") and fully loaded ("rated output"). These values can be determined by a calibration protocol or by a calibration using calibration weights.
Calibration by means of compensation in the system
In the "practical" calibration, measurement takes place first with the scales unloaded, then with a defined load on the scales. The EP3356-0022 automatically calculates the existing sensor characteristic values from the measured values.
Sequence:
- 1. Perform a CoE reset with object 0x1011:01, see Restoring the delivery state
- 2. Set scale factor to 1000 (0x8000:27) (for declaration of weight in g)
- 3. Set gravity of earth (0x8000:26) if necessary (default: 9.806650)
- 4. Set gain to (0x8000:21) = 1
- 5. Set tare to 0 (0x8000:22)
- 6. Set the filter (0x8000:11) to the strongest level: IIR8
- 7. Specify the nominal load of the sensor in 0x8000:24 ("Nominal load")
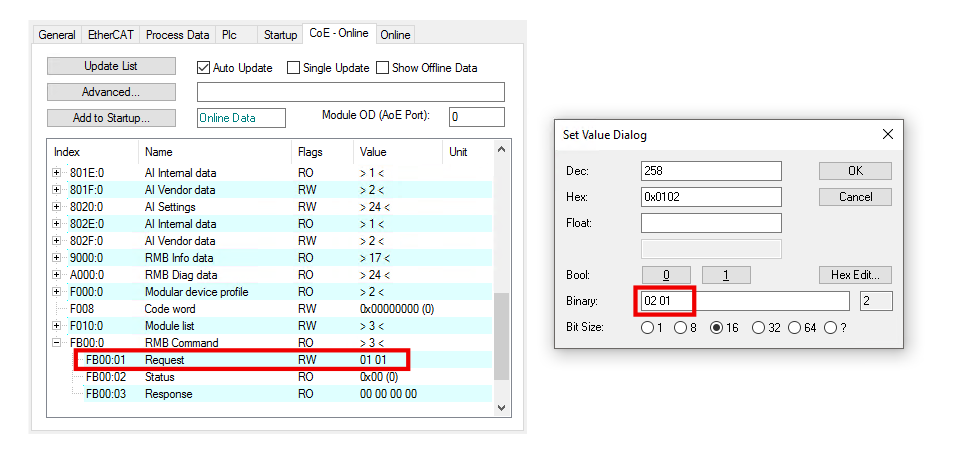
- 8. Zero balance: Do not load the scales. As soon as the measured value indicates a constant value for at least 10 seconds, execute the command "0x0101" (257dec) on CoE object 0xFB00:01. This command causes the current mV/V value (0x9000:11) to be entered in the "Zero balance" object. Check: CoE objects 0xFB00:02 and 0xFB00:03 must contain "0" after execution

- 9. Load the scales with a reference load. This should be at least 20 % of the rated load. The larger the reference load, the better the sensor values can be calculated. In object 0x8000:28 ("Reference load"), enter the load in the same unit as the rated load (0x8000:24). As soon as the measured value indicates a constant value for at least 10 seconds, execute the command "0x0102" (258dec) on CoE object 0xFB00:01. By means of this command the EP3356-0022 determines the output value for the nominal weight ("Rated output") Check: CoE objects 0xFB00:02 and 0xFB00:03 must contain "0" after execution.
- 10. Reset: execute the command "0x0000" (0dec) on CoE object 0xFB00:01.
- 11. Set the filter to a lower stage.
Calibration according to the sensor calibration protocol (theoretical calibration)
The sensor characteristic values according to the manufacturer's certificate are communicated here directly to the EP3356-0022, so that it can calculate the load.
- Perform a CoE reset with object 0x1011:01, see Restoring the delivery state
- Set scale factor to 1000 (0x8000:27) (for declaration of weight in g)
- Set gravity of earth (0x8000:26) if necessary (default: 9.806650)
- Set gain to (0x8000:21) = 1
- Set tare to 0 (0x8000:22)
- Specify the nominal load of the sensor in 0x8000:24 ("Nominal load")
- Adopt the "Rated output" (mV/V value 0x8000:23) from the calibration protocol
- Adopt the "Zero balance" (0x8000:25) from the calibration protocol
 | Calibration The calibration is of great importance for the accuracy of the system. In order to increase this, the filter should be set as strong as possible over the entire calibration phase. It may take several seconds before a static value is obtained. |
| Local storage The values modified during the theoretical and practical calibration are stored in a local EEPROM. This can be written to up to 1 million time. In order to prolong the life of the EEPROM, therefore, the commands should not be executed cyclically. |
Self-calibration of the measuring amplifiers
The measuring amplifiers are periodically subjected to examination and self-calibration. Several analog switches are provided for this purpose, so that the various calibration signals can be connected. It is important for this process that the entire signal path, including all passive components, is examined at every phase of the calibration. Only the interference suppression elements (L/C combination) and the analog switches themselves cannot be examined. In addition, a self-test is carried out at longer intervals.
The self-calibration is carried out every 3 minutes in the default setting.
Self-calibration
- The time interval is set in 100 ms steps with object 0x8000:31; default: 3 min. Duration approx. 150 ms
Self-test
- is additional carried out together with every nth self-calibration. The multiple (n) is set with object 0x8000:32; default: 10 additional duration approx. 70 ms.
By means of the self-calibration of the input stages at the two operating points (zero point and final value), the two measuring channels are calibrated to each other.
Interface for controller
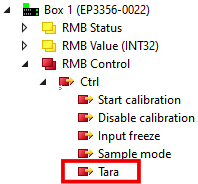
The self-calibration takes place automatically at the defined intervals. In order to prevent calibration during a time-critical measurement, the automatic calibration can be disabled via the "Disable calibration" bit in ControlWord, also permanently. If it should be additional necessary to carry out a manual test, this is started by a rising edge of the "Start manual calibration" bit in the process image.
While the box is performing a self-calibration or a self-test, the "Calibration in progress" bit is set in the process image. Once started, a self-calibration/self-test cannot be aborted.
If the self-calibration has been disabled by "Disable calibration", it can nevertheless be started by the "Start calibration" process data bit.
| Self-calibration The self-calibration takes place for the first time directly after starting up the box. At this point the external reference voltage must already be applied. If the reference voltage is only applied later, the self-calibration must be manually initiated (process data bit: „Start calibration“). The self-calibration must be executed at least once after each start-up. The supply voltage must be applied during the self-calibration, since otherwise the necessary reference voltages cannot be generated. A lower measuring accuracy is to be expected if the self-calibration is disabled for a longer period or permanently. |
After a change of the settings in the CoE (range x80nn), a self-calibration will be executed in each case (also for DisabledCalibration = TRUE), because the settings have an influence to the measuring procedure. CoE settings should be done as far as possible out of running measuring procedures.
Taring
When taring, the scales are "zeroed" using an arbitrary applied load; i.e. an offset correction is performed. This is necessary for the gross/net compensation of goods that cannot be weighed without a container that has a mass of its own.
The EP3356-0022 supports 2 tarings; it is recommended to set a strong filter when taring.
Temporary tare
- The correction value is NOT stored in the box and is lost in the event of a power failure. To this end the command "0x0001" is executed on CoE object 0xFB00:01 (binary dialog in the System Manager: "01 00"). This sets the tare object (0x8000:22) such that the display value is 0. Note: in the case of a device restart (INIT → OP) the tare is not deleted. In addition this tare can be executed via the control word:
Permanent tare
- The correction value is stored locally in the boxes EEPROM and is not lost in the event of a power failure. To this end the command "0x0002" is executed on CoE object 0xFB00:01 (binary dialog in the System Manager: "02 00"). This sets the tare object (0x8000:22) such that the display value is 0.
| Local storage The values modified during the theoretical and practical calibration are stored in a local EEPROM. This can be written to up to 1 million time. In order to prolong the life of the EEPROM, therefore, the commands should not be executed cyclically. |
Commands
The functions discussed above are carried out by means of commands in the standardized object 0xFB00.
Index | Name | Comment |
|---|---|---|
FB00:01 | Request | Entry of the command to be executed |
FB00:02 | Status | Status of the command currently being executed 0: Command executed without error 255: Command is being executed |
FB00:03 | Response | Optional response value of the command |
The function blocks FB_EcCoESdoWrite and FB_EcCoESdoRead from the TcEtherCAT.lib (contained in the standard TwinCAT installation) can be used in order to execute the commands from the PLC.
Commands of the EP3356-0022
The following commands can be transferred to the box via the CoE entry 0xFB00:01.
Command | Comment |
|---|---|
0x0101 | Execute zero balance |
0x0102 | Execute calibration |
0x0001 | Execute tare procedure (value is NOT saved in the boxes EEprom) |
0x0002 | Execute tare procedure (value is saved in the boxes EEprom) |