Notes on connection technology
| |
Risk of electric shock and damage of device! Bring the bus terminal system into a safe, powered down state before starting installation, disassembly or wiring of the bus terminals! |

Anschlussbauform: Push-In mit Wartungsstecker
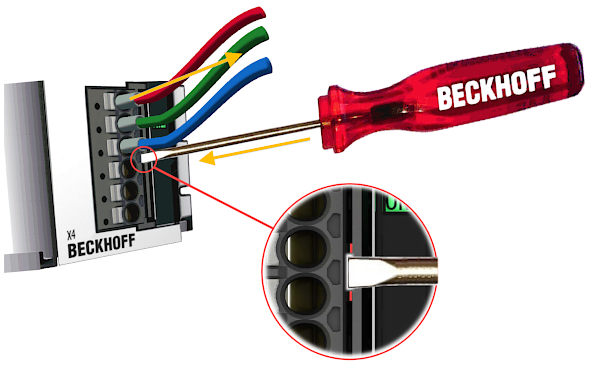
The wires are plugged in directly; for solid wires no tools are required, i.e. after the insulation has been stripped, the wire is simply pushed into the contact point. The same principle applies for the ferrule. Free stranded wire ends can also be connected in this way; in this case the wire clamping mechanism has to be opened by operating the pushing device.
Like in standard terminals, the wires are released via the contact release device, using a screwdriver or pushing device.
The cables must not be pulled/ pushed live or under load.
For maintenance purposes, e.g. during service, the entire plug-in body can be removed from the Beckhoff terminal without releasing the individual wires. Use a screwdriver (e.g. Beckhoff ZB8700) to release the central release device and pull the cables to release the connector body.
Additionally the service plug don’t have specified switching power, also it must not be pulled/ pushed live or under load, too.
The permitted conductor cross-sections and the strip length are shown in the following table.
Wire cross-section (solid wire) | 0.2 ... 1.5 mm2 |
Wire cross-section (stranded wire) | 0.2 ... 1.5 mm2 |
Wire cross-section (stranded) | 0.25 ... 0.75 mm2 (with ferrule with plastic collar) |
Wire cross-section (stranded wire) | 0.25 ... 1.5 mm2 (with ferrule without plastic collar) |
Current rating, permanent | 5 A |
Conductor (AWG) | 24 – 14 | 14: THHN, THWN |
Strip length | 8 ... 9 mm / 0.31 – 0.35 in |
Releasing the contact
The push-in connector is supplied with the terminal.
The push-in connector is designed as a service plug.
Maximum number of mating cycles: 10
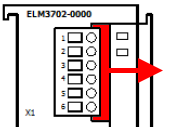
The connector with connected wires can be removed by pushing the unlocking tab (red) in the direction of the arrow, e.g. with a screwdriver, thereby releasing the unlocking device.
Meticulous cleanliness must be ensured when the connector is re-inserted. Do not touch the pins in the device tray. Push in the connector until it latches audibly and the front of the plug is flush with the ELM housing.