EL 6652-0010 configuration
The most important settings for establishing a connection with an EtherNet/I master or a scanner are IP address, the assembly instance number and thus the length of the data and the correct task cycle time.
The IP address can be freely assigned and is transferred to the terminal during the EtherCAT start-up. The assembly instance numbers are permanently assigned and must be correctly set in the master. This also always includes the number of data or the size of the process image. The maximum length of the data can differ from master to master. Enquire to the manufacturer of the master for this information. The task time with which the EtherNet/IP is to be operated must be at least just as large on the EtherCAT terminal as on the master side. However, it can also be many times smaller. For example, you can set 10 ms on the master side. The task of the EtherNet/I slave may then be 10, 5, 2, and 1 ms for example.
In terms of communication, "Unicast" or "Multicast" can be used on the master side – the EL6652-0010 supports both modes of operation. In the case of Multicast, pay attention to the high network load that this causes, especially in systems with many or short cycle times. A high network load may possibly impair communication.
No configuration data are necessary for the EL6652-0010; the configuration must usually be specified, but the length of configuration data is to be set to "zero".
Commissioning: Insertion of the EL6652-0010
Insert the EL6652-0010 into your EtherCAT system. You can perform the online scan as usual or manually add the terminal.
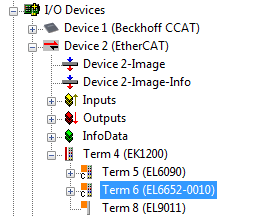 Fig.129: Inserting the EL6652-0010 in TwinCAT 2.1x
As soon as you have appended the terminal you must also create the "EtherNet/IP" device in the System Manager. Go onto "I/O devices" and append a further device.
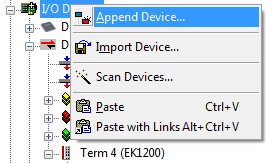 Fig.119: Insert a device "EtherNet/IP" in "I/O devices"
Under "EtherNet/IP" you will find the adapter "EtherNet/IP adapter (EL6652-0010)". Select this.
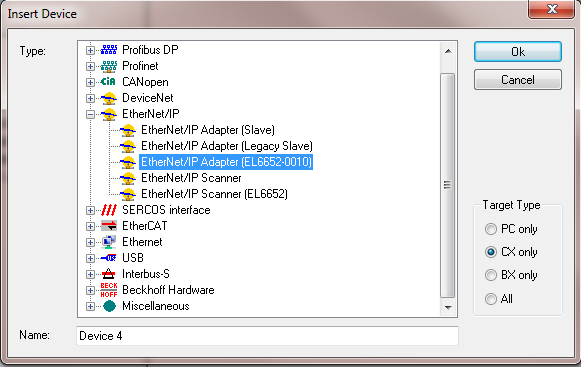 Fig.131: Selection of adapter "EtherNet/IP adapter (EL6652-0010)"
If you have only one EL6652-0010 in your system, the System Manager links it automatically.
You should nevertheless check this (see fig. "Searching for the EL6652-0010 terminal") by going onto the "EtherNet/IP Device" (1), "Adapter" (2) and then finding the terminal in the "Device Name". If that is not the case, go onto "Search" (3) and then select the correct terminal (4).
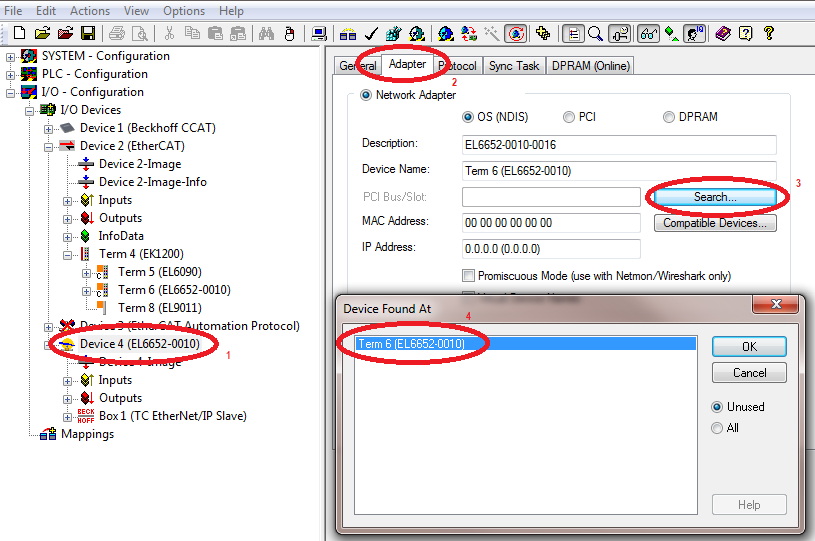 Fig.132: Searching for the EL6652-0010 terminal
The MAC address and IP address are not updated in this dialog box. These can be found on the EtherNet/IP box under "Configuration".
Configuration
Now create a configuration: the slave must be configured with an IP address, SubNetMask and with the data to be exchanged with the EtherNet/IP master.
Select the box and enter the IP address (0x8000:21) and SubNetMask (0x8000:22) (green marking), that you wish to use on the slave.
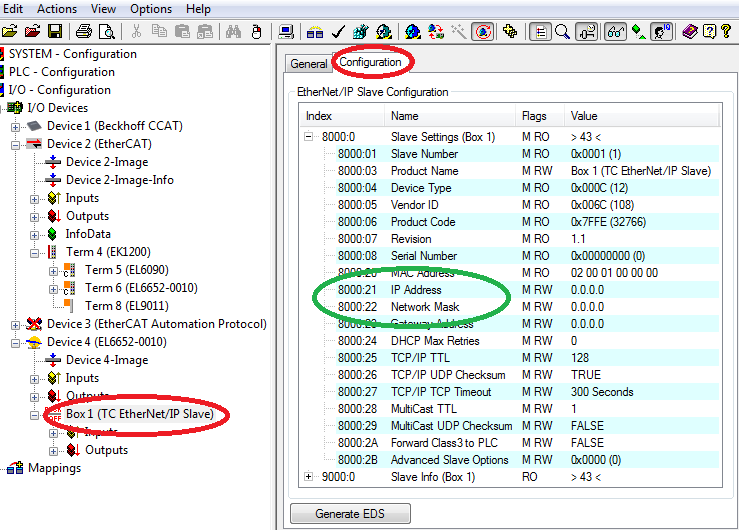 Fig.133: Configuration of the IP address, network mask
Then append the IO connection.
 Fig.134: Append "Connection Object"
The IO assembly already has inputs and outputs; here you insert any desired types of data and their quantity. These are then linked with the PLC or the task. In the next step, insert a data word (2 bytes) under the inputs (right-click on Inputs) and also append a data word (2 bytes) for the outputs (right-click on Outputs).
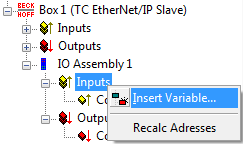 Fig.135: Append variables
An IO assembly (0x8001) is now present in the configuration. The instance numbers must be observed for the entry in the master.
- Value 128 for the configuration; as already mentioned, this is always to be used with "zero" bytes.
- Value 129 for the input data; the length is 6 bytes (4 bytes which are automatically created in the system and 2 bytes for the word created by the user)
- Value 130 for the output data; the length is 6 bytes (4 bytes which are automatically created in the system and 2 bytes for the word created by the user)
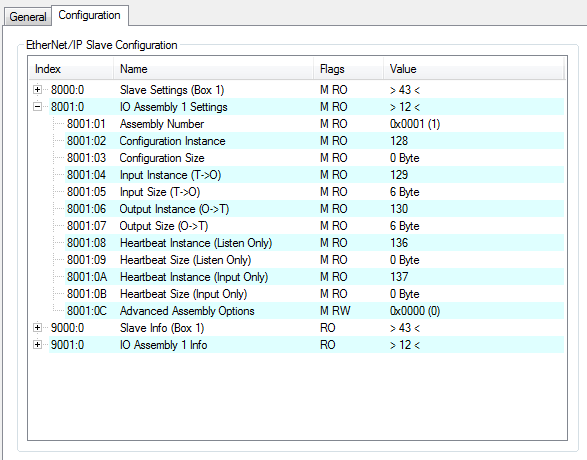 Fig.136: Configuration of the slave settings
Task time
The time with which the EtherNet/IP is to operate is specified with the SyncTask. Two methods are available here:
SyncTask via Mapping – in this case the task is used with which the variables are linked. That is usually the PLC task. However, if the PLC is to be stopped, for example by breakpoints, the task is no longer processed. The consequence of this is that the EtherNet/IP is also no longer triggered and the EtherNet/IP master goes into the error state.
SyncTask via Special Sync Task - in this case an additional task is used that is automatically started with TwinCAT. This runs in its own cycle and is therefore also independent of other tasks that are linked with the variables.
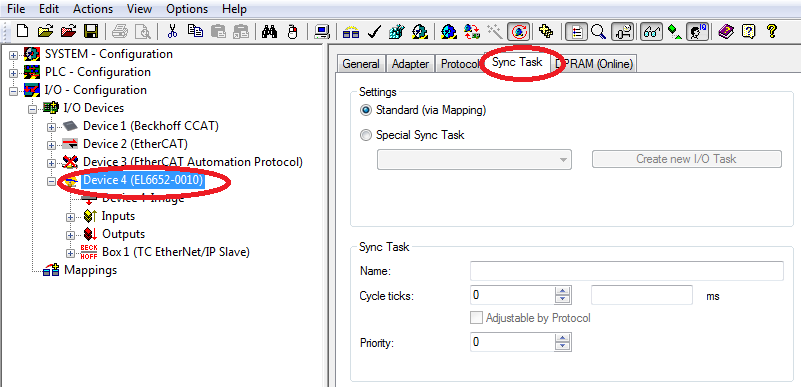 Fig.137: Selection of the task time
Virtual slave
As a special feature, the EL6652-0010 offers the possibility to create a 2nd slave with its own MAC address and IP address, which is called a virtual slave. Note here that the virtual interface must share the maximum process data with the real slave. The advantage with this option is that you can simply connect two EtherNet/IP controllers together or that you can get around limitations in the bus communication with the slave without using additional terminals.
A second box is created in the System Manager and the procedure is exactly the same as when configuring a real slave.
In this case the status LEDs are interpreted as follows: if one of the two slaves (real or virtual) has an error, this is displayed even if the other slave is error-free. If both slaves have an error the error of the real slave is always displayed.