Application sample – setting up an EtherCAT Master PC as a network bridge
The application samples have been tested with a test configuration and are described accordingly.
Certain deviations when setting up actual applications are possible.
In this sample, transmission is intended to take place from a subordinate PC via the EL6601 and EtherCAT and a Master PC into a superordinate network.
The following hardware was used:
- Computers A and B: Windows XP SP2
- Computer C: Windows XP Embedded
 Fig.169: Setting up an EtherCAT-Master-PC as Network Bridge
To do this, the Master PC "TwinCAT Master" (B) must be setup as a TCP/IP bridge in order to route TCP/IP telegrams through to the subordinate CX1020 (C) or to relay them in the opposite direction. The partner device is a PC (A).
Distinction must be made between two cases here: static addresses and DHCP address assignment (network).
The following explanations assume the preceding samples as basic knowledge.
Computers (A), (B) and (C) have a static IP address
 Fig.170: Configuration of the network PC
- Configure the three PCs as shown in the diagram. The dialogs for the properties of the Internet protocol were explained in the preceding samples.
- Using the registry editor (Start --> Run --> regedit), set the entry "IPEnableRouter" in the "bridge" PC B to the value 1. The entry is usually located under HKEY_LOCAL_MACHINE\SYSTEM\ControlSet001\Services\TCPIP\Parameters or also under HKEY_LOCAL_MACHINE\SYSTEM\CurrentControlSet\Services\TCPIP\Parameters.
- Following a restart, routing for IP telegrams is active for this PC. The connection can then be checked by means of a ping (Start --> Run --> cmd --> ping 192.168.1.1) to the EtherCAT port 192.168.1.1.
- If the EtherCAT master is in a normal and error-free state (TwinCAT in "Config"/"FreeRun" or "Run" mode), the connected Ethernet device with the IP address 192.168.1.10 can be reached via the EL6601.
- Explanation of the entry Gateway, using PC A as an sample: PC A has the IP address 10.16.2.8 with a subnet mask 255.255.255.0. This means that it can reach all IP telegrams within a range from 10.16.2.0 to 10.16.2.255. If it is required to send an IP telegram to a different address range (e.g. to 192.168.1.1), this must run via the defined gateway, in this case 10.16.2.21, which in turn can relay the telegram to 192.168.1.10 via the configured IP routing.
- Windows offers the useful command line command ipconfig for checking the configuration. If PC A is configured correctly, the command Start Run cmd ipconfig/all displays the following screen:
- IP routing is disabled (default) and the IP address of the selected adaptor (here called LAN) is assigned fixedly. Since DHCP was set beforehand, WINS entries are still present.
- The same command on PC C displays:
- This was entered under XP in the dialog
- Accordingly, the command on the bridge PC B displays:
 Fig.171: Checking the configuration with command line command “ipconfig /all”
 Fig.172: Checking the configuration PC C
 Fig.173: Entry of network parameters
 Fig.174: Checking the Configuration Bridge PC B
 | "ipconfig" switches Using the switches /release and /renew, the command ipconfig can be used to re-establish IP connections. |
Checklist for connection settings:
- Bridge PC configured for "IP routing" by means of registry entry
- Fixed IP addresses in correlating ranges for all 4 Ethernet ports involved
- Firewalls disabled if need be (unnecessary in the case of the default setting)
- EtherCAT/TwinCAT in "Freerun" or "Run" mode
- Link display on all ports involved
- "Ping" works
| Observation of network traffic Experienced users can observe and evaluate the network traffic using a network sniffer, such as Wireshark. |
| Notice on Operating system Windows CE/embedded Under Windows CE IP Routing must be set in the CX Configuration Dialog (see Fig. “Setting IP Routing in Windows CE”) |
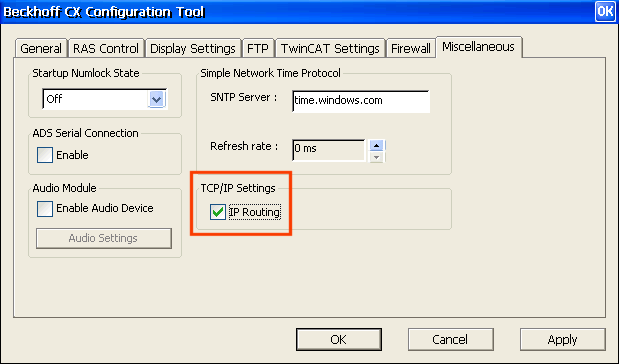 Fig.175: Setting “IP Routing” in Windows CE
Network with DHCP address assignment
A connection between the PCs C and A (or the network) is not possible.
Explanation: Computers (A) and (B) receive their IP addresses from the DHCP server if the Ethernet ports are configured accordingly. One possible sequence is as follows (see RFC1541 and RFC2131):
- A newly connected PC sends a DHCPDISCOVER message with its MAC address via MAC Broadcast to all other network devices
- The DHCP server offers the requesting device one or more IP addresses in the DHCPOFFER message
- The requesting PC selects an IP address and answers via MAC Broadcast with a DHCPREQUEST message to the DHCP server
- The DHCP server confirms the selection with a DHCPACK message.
This works for computers (A) and (B). The DHCPDISCOVER messages from computer (C) are accepted by the EL6601 and relayed in computer (B) to Windows via the EtherCAT port, but Windows (B) does not route these messages (and all other DHCP telegrams) through to the relaying Ethernet port – this function, known as DHCP Relay Agent, is only available in the server version of Windows.
This is the normal operating case when Windows PCs configured as DHCP devices are linked with each other.
Remedy:
- Install a local DHCP server on computer (B), taking care that no conflict arises with the superordinate network DHCP server
- It is possible that two Windows PCs, which are configured as DHCP devices and connected to each other, will only establish their addresses after a short time (several minutes)