2. Assigning IO-Link device to port n
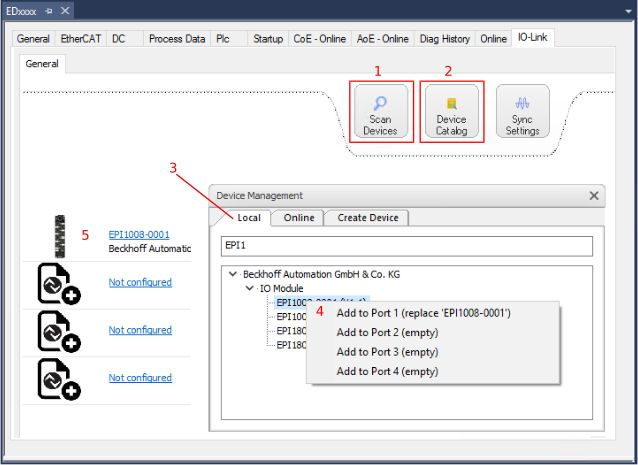 Fig.23: Configuration using the example of the IO-Link device EPI1008-0001 on port 1
Online configuration
- Prerequisite: the IO-Link device is connected.
- 1. Click the “Scan Devices” button (see chapter Automatic scanning).
- The device is automatically detected and created with the corresponding parameters. If several devices are stored in the IODD file, the first entry is always selected here. Grouping in the IODD is usually carried out by the vendor if the process data is the same and there are only mechanical differences (e.g. different material).
Offline configuration
- 1. Click the “Device Catalog” button. The “Device Management” dialog is displayed. The “Local” tab displays the device descriptions that have already been imported, sorted by vendor in a tree structure.
- 2. Select the desired IO-Link device from the tree structure by
- drag and drop: drag the device onto the port, or by
- double-clicking on the device and clicking “Add to Port n”.
Activation of the configuration
- 3. Activate the IO-Link configuration for the changes to take effect.
- The IO-Link devices are displayed, and the process data is created. If an error is found when integrating the IO-Link device, e.g. wrong VendorID or no device connected, then this is indicated via the status of the port (object “State Ch.n” 0xF100:0n).
Configuration of the IO-Link ports as digital in- or output
IO-Link ports can also be configured as digital inputs or digital outputs. This allows digital sensors and actuators having no IO-Link functionality to be connected to IO-Link ports.
- 1. Click the “Device Catalog” button. The “Device Management” dialog is displayed.
- 2. Expand the “Std I/O” tree node in the “Local” tab.
- The operation modes “dig in” and “dig out” appear.
- 3. Configure the desired port. There are two ways to do this, either by:
- drag and drop: drag the device onto the port, or by
- double-clicking on “dig in” / “dig out” and clicking “Add to Port n”.
Example of port assignment on the EL6224 IO-Link master
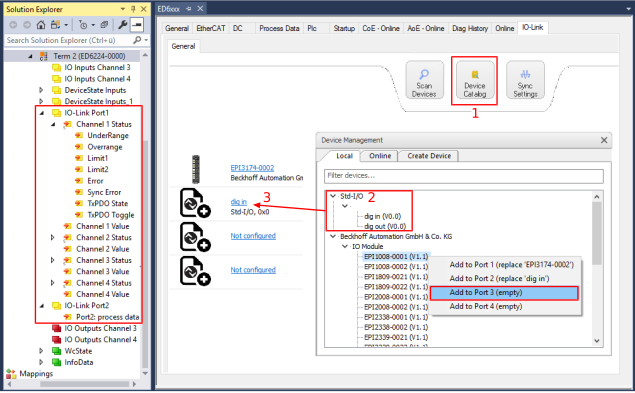
Port 1: | Port 2: | Port 3: |
The process data for port 1 and port 2 are displayed in the Solution Explorer. | ||