First steps
The following components are necessary for the first steps
- PC with TwinCAT 2.11 R3
- Ethernet cable
- Power supply (24 VDC), cabling material
- a KL2xxx or an EL2xxx, digital output terminal, end terminal
 | Required TwinCAT version TwinCAT 2.11 R3 is required for the programming of the CX80xx series. Older TwinCAT versions and TwinCAT 3.x are not supported! |
1. Connect K-bus or E-bus terminals to the controller.
2. Connect voltage to the CX80xx (see power supply).
3. Connect Ethernet (CX80xx X001) to your network or a direct connection to your PC (make sure in the case of a peer-to-peer connection that the IP addressing in your PC is set to DHCP).
4. Wait a while, approx. 1 to 2 minutes; either the CX80xx will be assigned an address by the DHCP server (usually fast) or, if it does not find a DHCP server, it uses a local IP address.
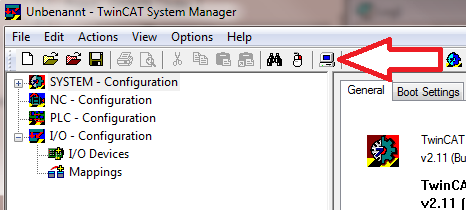
5. Switch on TC on the PC in Config Mode (TwinCAT icon blue) and start the System Manager
6. In the System Manager, click on the PC symbol (Choose Target System) or press >F8<
7. The following dialog box opens; click on Search (Ethernet).

8. Select Option 1 if you have addressed via DHCP or Option 2 in case of DHCP or local IP address. Then click on "Broadcast search".
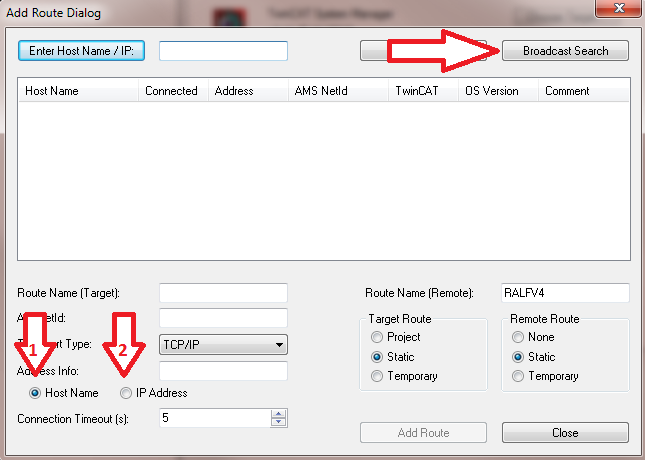
Your network is scanned for Beckhoff controllers. If none is found, this means that the DHCP of the controller is not yet completed or the network settings on your PC are incorrect. A network cable that has not been connected can naturally also be the cause, but this should not be the case if point 3 has been done.
9. The host name is composed by default of "CX" and the last 3 bytes of the MAC address. You can find the MAC address on the side of the CX80xx. The MAC address is always 6 bytes long and the first three bytes are the vendor ID, which is always 00 01 05 in the case of Beckhoff devices.

An "X" next to Connected means that the CX is already known in the system and can be used. To make it known, click in the list on the CX with which you want to connect and then click on "Add route". An input mask opens with "User name" and "Password". By default there is no password, simply confirm by clicking on OK. Afterwards the "X" should appear next to connected.
10. Next, the CX should appear in the list of the devices; select it and confirm by clicking on OK.
11. Check whether the connection is there. In the System Manager in the bottom right-hand corner. It must be blue or green and may not be yellow.

12. If the setting is green, switch the CX to Config Mode with "Shift F4" or click on the blue TC icon in the System Manager. The System Manager now asks you whether you really want to switch to Config Mode; confirm by clicking on OK.
13. The setting at the bottom right must now change to blue and the TC LED on the CX80xx must now also light up blue.
14. Now click on I/O Devices and then on Scan Devices...
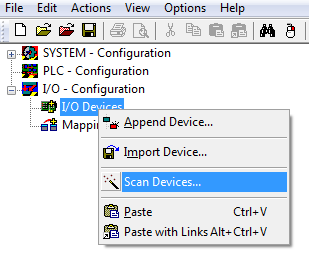
15. A message appears, informing you that not everything will be automatically detected.
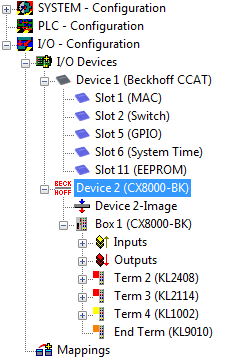
16. The CCAT interface is usually found (CX8090) or the corresponding fieldbus interface (other CX80xx devices) and either a K-bus interface or an EtherCAT interface, depending now on which terminals you have connected to the CX. The CCAT interface must be present in the System Manager file and may not be deleted. If an error message should appear when scanning, check the revision level of your TwinCAT version and perform an update if necessary.
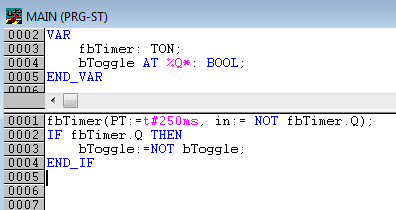
17. Now we come to the programming. To do this, open the PLC Control and select File -> New. The PLC Control asks you for the target system. Select CX (ARM). Afterwards it asks you for the function block; set the ST language (structured text). Now write a small program...
Translate the program. If it is error free (a warning must come, that it is OK) save the project under an arbitrary name, translate it again and save it once again.
18: Switch once again to the System Manager and add the program under PLC - Configuration. A FileName.typ file is sought.
19: Now open the project, then the task and then outputs, in which there must be a variable MAIN.bToggle. You can link this with the hardware. To do this, click on "Linked to...".

Select a digital output. Now you can download the configuration to the CX and switch the CX to Run Mode. To do this, click on the ‘cube’ or press Ctrl + Shift + F4. The TC LED on the CX must then light up green.
20. Switch back to PLC Control, go to "Online/Selection of the target system", select the correct CX, click on it and select runtime system 1. Now "Online/login" again (F11) transfer the PLC program, then "Online/Start" (F5). The LED on your terminal must now flash.
21. As a final step Online/Generate a boot project. This completes the project and your first program is stored on the CX.
Congratulations, the foundations have now been laid and are ready to be built on. We wish you every success!