Installing a toolboard and handle
You have the option to mechanically extend your device. The following ordering options are available: Follow the links provided to get to the respective product pages with images of the ordering options:
Order identifier | Version |
|---|---|
C9900-M406 | Toolboard for keyboard or tools, mounted on the underside of a Control Panel or a Panel PC CP3x12 to CP3x24, with integrated IP65 USB socket at the rear, can only be ordered together with the panel PC |
C9900-M423 | Toolboard for keyboard and mouse or tools, mounted on the underside of a Control Panel or a Panel PC CP3x12 to CP3x24, with integrated 2-port USB A IP65 socket on the rear side and cable channel at the rear for mouse and keyboard cable, can only be ordered together with the panel PC |
C9900-M419 | Toolboard for keyboard or tools
|
C9900-M361 | Handle, length = 386 mm, anodized aluminum
|
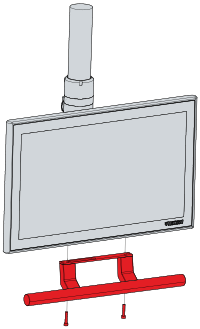
The ordered extensions are delivered with the device, you must install them yourself afterwards. Install the handle to the bottom of the device using the two M5 screws.
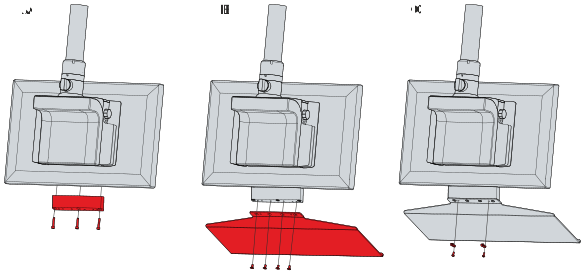
To mount a toolboard on the device, follow the steps below:
- 1. Screw the toolboard brackets to the bottom of the device using the three M5 screws (section A).
- 2. Screw the toolboard to the underside of the bracket using the four M5 screws (section B).
- 3. Screw the two strain reliefs to the underside of the toolboard using the two M4 screws (section C).
- You have mounted the toolboard on the device.